Live chat is a fantastic way to engage with your users and answer any questions they might have. However, being on call 24/7 – or anything close to it – is impossible for a single person to do. Plus, sometimes you’ll need to deal with multiple requests at once, which can tank your productivity.
Chat bots enable you to automate at least part of those conversations. At a bare minimum, they can save you time by weeding out queries that don’t require a person to answer them. In this article, we’ll talk about when it makes sense to use a WordPress chat bot and how to add one to your website in three steps.
Let’s chat!
What a Chat Bot Is (And When It Makes Sense to Use One)

Chat bots enable you to point visitors in the right direction without having to stay on top of live chat all day.
As the name implies, a chat bot is a program designed to talk with users automatically through live chat. Ideally, your chat bot should aim to ‘sound’ as lifelike as possible to emulate the experience of talking with a real person.
When people think about chat bots, their mind sometimes jumps to Artificial Intelligence (AI). There are some chat bots that use deep learning to improve their skills. However, in most cases, when you run into a chat bot in the wild it will respond using a collection of lines triggered by specific keywords.
Currently, chat bots are no replacement for humans. However, even with their limited functionality, chat bots have a lot of practical applications for websites, such as:
- Handling basic customer support queries. Your chat bot should be able to detect basic keywords related to customer issues and point them to the information they need to solve them.
- Routing customer inquiries. If you have more than one person handling live chat requests, it can be a hassle to transfer users back and forth depending on your area of expertise. A chat bot can act as a receptionist and filter requests to dedicated specialists.
Given this, chat bots can be particularly useful for service and e-commerce websites. These niches usually have to field lots of customer inquiries, so having an additional tool to help you handle the workload is a smart move.
However, creating a chat bot is usually not as simple as typing potential answers and calling it day. There are several platforms that enable you to create functional chat bots you can integrate with your website. However, most of them have a steep learning curve. In other words, it can take a lot of work to program a useful chat bot, even if you’re not building the software from scratch – which is where the following services come in.
An Introduction to Facebook Chat Bots

On top of its many social media features, Facebook also enables you to create chat bots that work through its Messenger tool. Chat bots are limited to business pages, but you can set up one and integrate it with an external website, including those using WordPress.
As far as usability goes, Facebook chat bots can be complicated to program. However, there are third-party services that simplify the process, such as Chatfuel and Manychat. Using these services, training a chat bot becomes as easy as anticipating what your visitors might say and coming up with the ideal responses to it.
Overall, there might be simpler chat bot services to get started with. However, Facebook chat bots have the distinct advantage of being backed by a company everyone knows. Plus, they can handle loads of queries for free, which is ideal for small businesses.
Key Features:
- Create chat bots powered by Facebook Messenger.
- Integrate your chat bot with external websites (including WordPress-powered ones).
- Get access to detailed analytics concerning your chat bot.
Price: Free | More Information
How to Add a Chat Bot to Your WordPress Website (In 3 Steps)
To get a chat bot up and running on your website, you’ll need to use a third-party service to create it, then find a way to integrate both. In this section, we’re going to focus on how to pull off the integration with a Facebook-powered chat bot. Let’s get to it!
Step #1: Set Up Your Facebook Chat Bot
Creating a Facebook chat bot is easier said than done. The process can be complicated depending on how you approach it. For example, if you know your way around Python, you can use it to build your chat bot through Facebook’s API.
Fortunately, there are several third-party services you can use to build Facebook chat bots without any programming knowledge at all. In fact, there are dozens to choose from. With this in mind, we took a look at some of the top options and here are a few recommendations:
- Chatfuel: This service enables you to configure your chat bot using pre-built blocks, similarly to the way Divi uses modules. You can use the service for free, although it includes ‘made by Chatfuel’ branding.
- Manychat: This platform provides you with analytics for any links you include in your chat bot messages, enabling you to monitor conversions.
- It’s Alive: If you want to use a chat bot builder with a sleek interface that’s easy to configure, It’s Alive is a great place to get started.
Feel free to do some research on other Facebook chat bot builders, as you’ll probably spend a lot of time with whichever one you pick. Once you’ve made a choice, get to work on your chat bot and bookmark this article so you can jump to step number two once it’s ready.
Step #2: Integrate Your Chat Bot With WordPress
Once you have a fully working chat bot, it’s time to integrate it with your website. The easiest way to do this is to use a plugin and in this case, we recommend WP Chatbot for Facebook Messenger.

As far as plugins go, this one is downright simple to configure. Install and activate it as usual and then go to the new WP-Chatbot tab on your WordPress dashboard. First off, you’ll need to add your chat bot’s Facebook App ID and its corresponding Page ID. Without this data, the plugin won’t work at all:

The process for finding and entering these IDs works the same regardless of whether you used a third-party service to build your chat bot or not. WP Chatbot for Facebook Messenger also enables you to set a default color for your message screen and specify how your bot should greet visitors:

Moving on, you’ll also want to configure on which pages your chat bot shouldn’t appear. Most people add chat bots to their home pages, but you might want to hide yours from posts and 404 error pages, for example:

It can also be a good idea to disable your WordPress chat bot for mobile users since it can take up a lot of space and force them to close it before they can navigate your site:

Finally, we recommend setting the Minimized option to Default. This will configure your WordPress chat bot to expand the first time someone visits your website. Once they close it, it’ll show up minimized on future visits:

That takes care of all the plugin’s settings, so go ahead and click the Save Changes button and let’s take a look at the results.
Step #3: Test Your Facebook Chat Bot Through WordPress
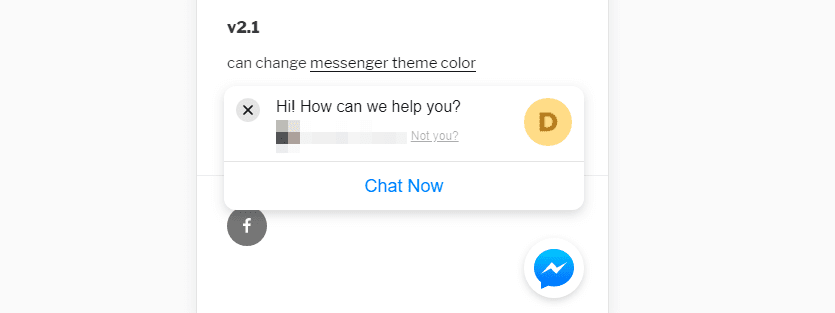
There’s plenty of merit in testing your chat bot as early as possible. You could do this as part of step one, and refine its behavior as people start to use it. For now, your main concern should be whether WordPress is loading your chat bot as intended, and if it’s connecting to Facebook successfully. Here’s an example of a chat bot we set up on one of our websites:

If the chat bot identifies you as logged into Facebook, this means it’s connecting to the platform as intended and you’re good to go. However, if your chat bot isn’t working, chances are there’s a problem with its corresponding Facebook App, so go to the platform and check if it’s running.
If so, double-check whether you’ve added the correct App and Site IDs during step two. Then, test your WordPress chat bot again. The integration process is simple, so chances are it’ll go off without a hitch the first time around.
Conclusion
If you use live chat on your website, you’ll likely deal with a lot of queries. The more messages you have to answer, the more of your time it’ll eat up. In short, using a chat bot is an effective way to handle customer questions with simple answers.
Admittedly, setting up a WordPress chat bot is easier said than done. However, in theory, it should only take you three steps:
- Create a Facebook chat bot (this is the part that’ll take the longest!).
- Integrate your chat bot with WordPress using the WP Chatbot for Facebook Messenger plugin.
- Test your Facebook chat bot through WordPress.
Do you have any questions about how to set up a WordPress chat bot? Let’s talk about them in the comments section below!
Article image thumbnail by denvitruk / shutterstock.com.
The post How to Add a Chat Bot to Your WordPress Website (In 3 Steps) appeared first on Elegant Themes Blog.
