Knowing how to share and style code snippets on your post or page using Divi can be a pretty handy skill. You may need a way to display code snippets for things like documentation, tutorials, or a resources page. The basic idea is to display code on a web page without WordPress interpreting the text as actual code. Sounds easy enough. But if you don’t know what you are doing, you may find the results pretty unpredictable. Thankfully, WordPress has a built-in method for doing this manually that can easily be incorporated in the Divi builder for adding custom styles to those code snippet boxes. Plus, there are some plugins and third party resources out there that can really simplify the process of creating great looking and functional code snippets in Divi.
In this tutorial, I’m going to show you three methods you can use to share code snippets in Divi (manually, with a plugin, and using Gist). And I’ll also show you how to design some code snippet boxes with the Divi Builder that will help take those snippets to the next level.
Let’s get started.
Sneak Peek
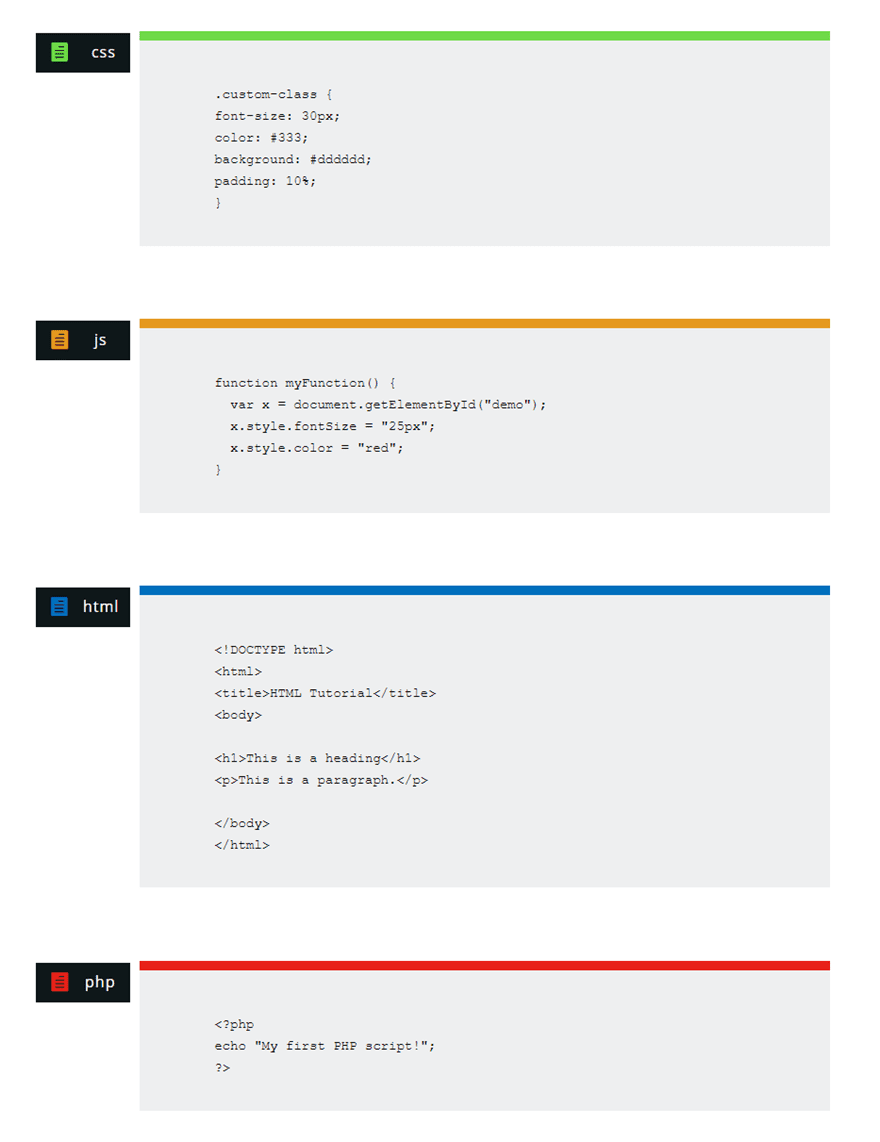
Here is a sneak peek of the code snippet designs possible in this tutorial.
The Code Snippet Boxes with Code Snippets added the Manual Way
Code Snippets added Using a Plugin

Code Snippets added Using Gist
Getting Started
For this tutorial, all you really need is the Divi Theme installed and active. We will build out the example code snippets from scratch using the Divi Builder on a new page.
To get started, create a new page and deploy the Divi Builder on the front end. Then choose the option “Build From Scratch”.
Now you are ready to go!
Designing a Custom Box for Code Snippets in Divi
Since our actual code snippet will live inside of a text module, we can use the divi builder to add design elements in (and around) the text module. For this design, we are going to use a blurb module to serve as a label for the code snippet. Then we will style and position it to the left of the text module. Then we will style the text module for our snippet.
Creating the Section, Row, and Column
First we need to create a new section with a one-column row.
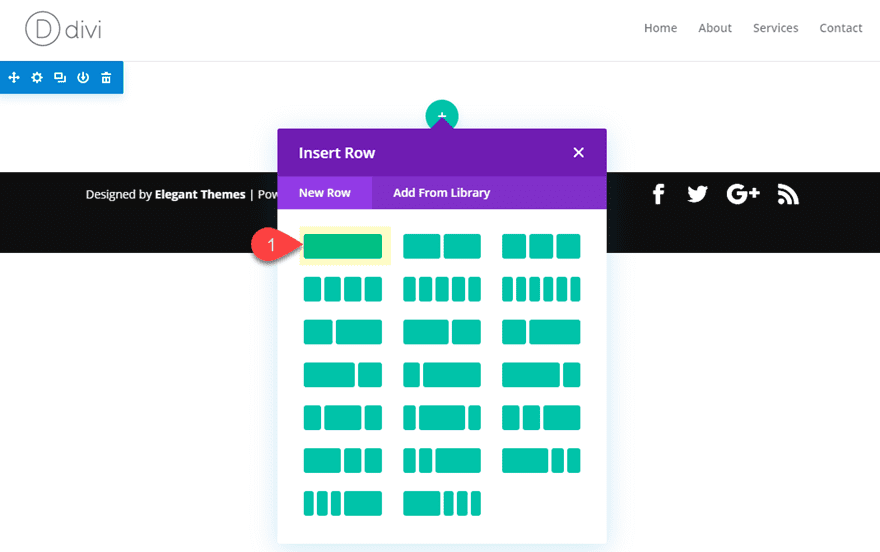
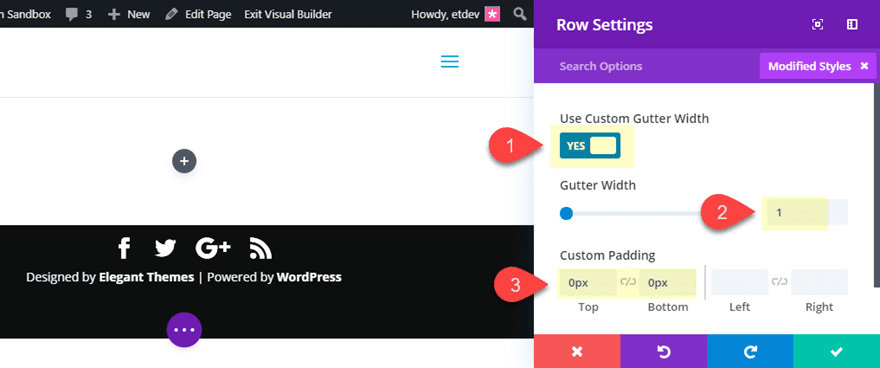
Then update the row settings as follows:
Gutter width: 1
Custom Padding: 0px top, 0px bottom
Create the Text Module
Next, add a text module to the row.
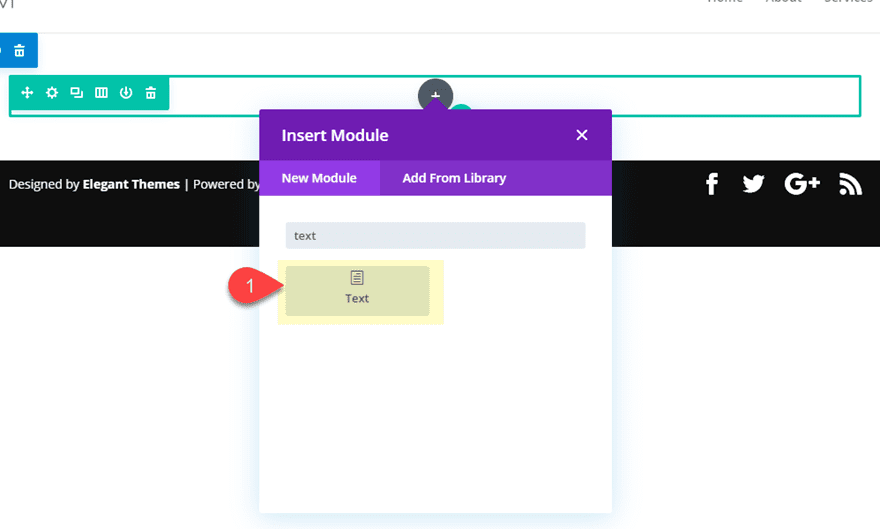
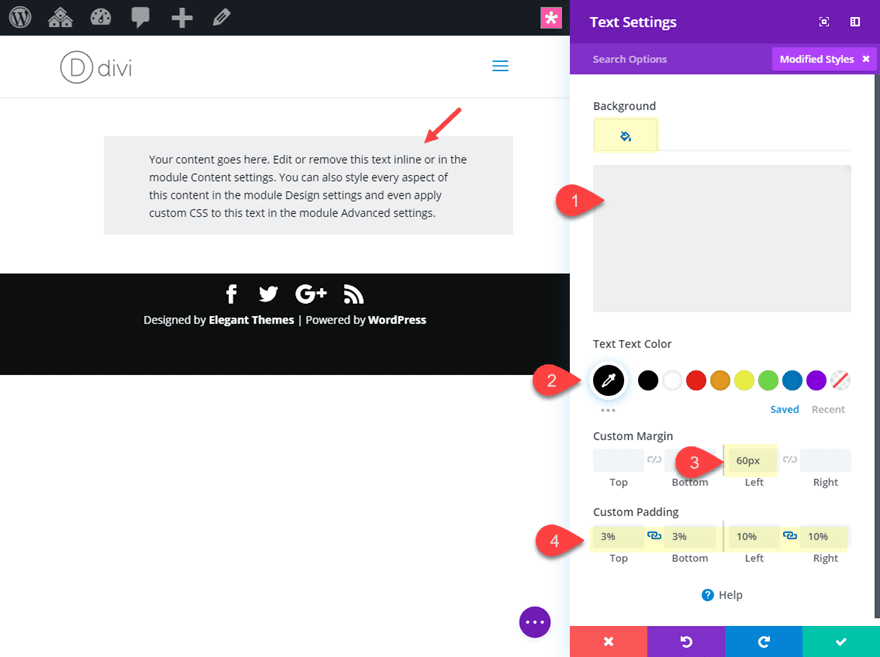
You can leave the default content in there for now. We will be adding our WordPress code snippets there later. For now, let’s style the text module by updating the following text settings:
Background Color: #eff0f1
Text Text Color: #000000
Custom Margin: 60px left
Custom Padding: 3% top, 3% bottom, 3% left, 3% right
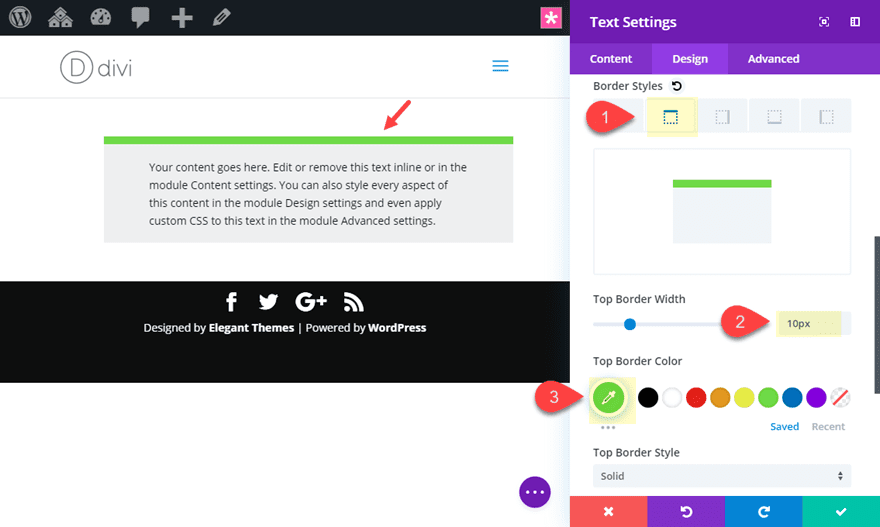
Top Border Width: 10px
Top Border Color: #7cda24
Creating the Code Snippet Label
To create the code snippet label, we are going to use a blurb module. This will allow you to add a blurb icon (or custom image icon) next to the code language that is on display.
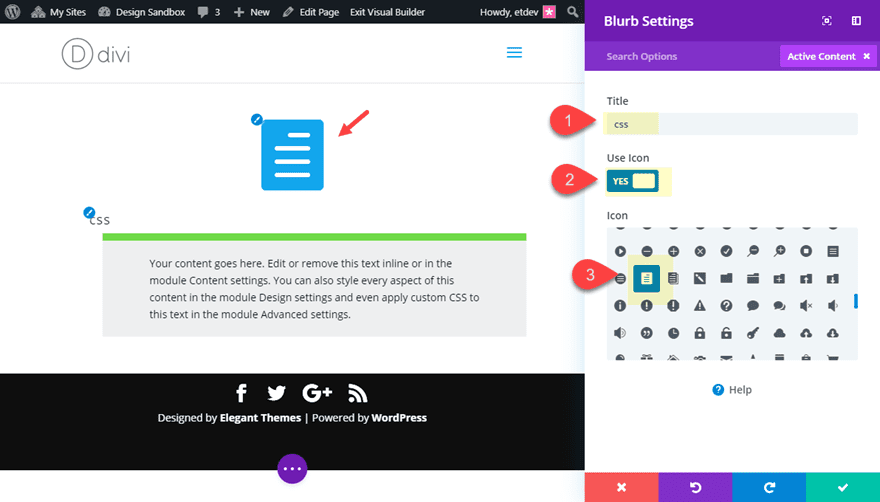
Create a blurb module and drag it above the text module. Then update the following blurb settings:
Title: css
Content: [delete mock content]
Use Icon: YES
Icon: see screenshot
Then update the design settings as follows:
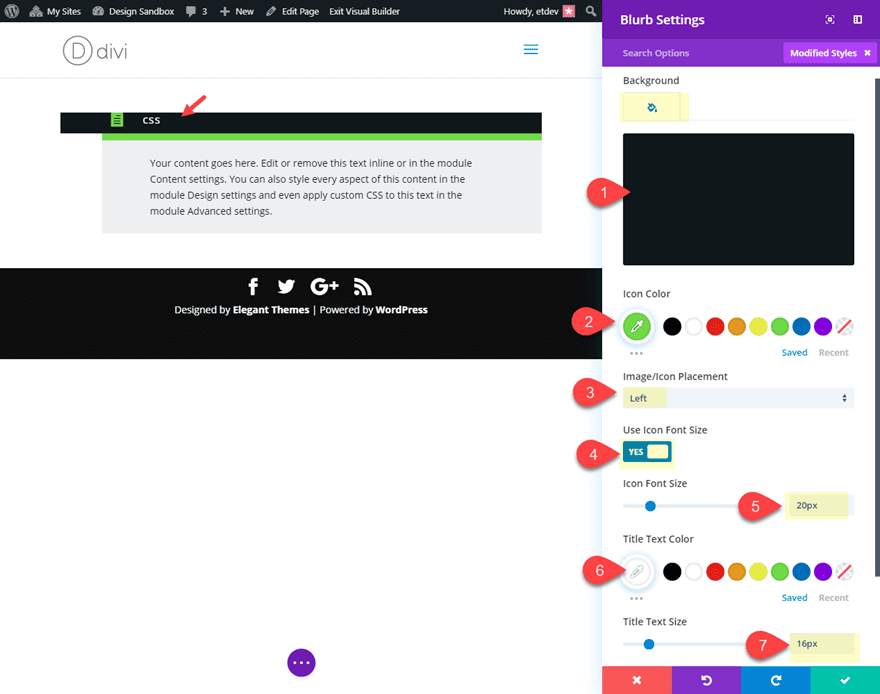
Background Color: #1b2426
Icon Color: ##7cda24
Image/Icon Placement: left
Icon Font Size: 20px
Title Text Color: #ffffff
Title Text Size: 16px
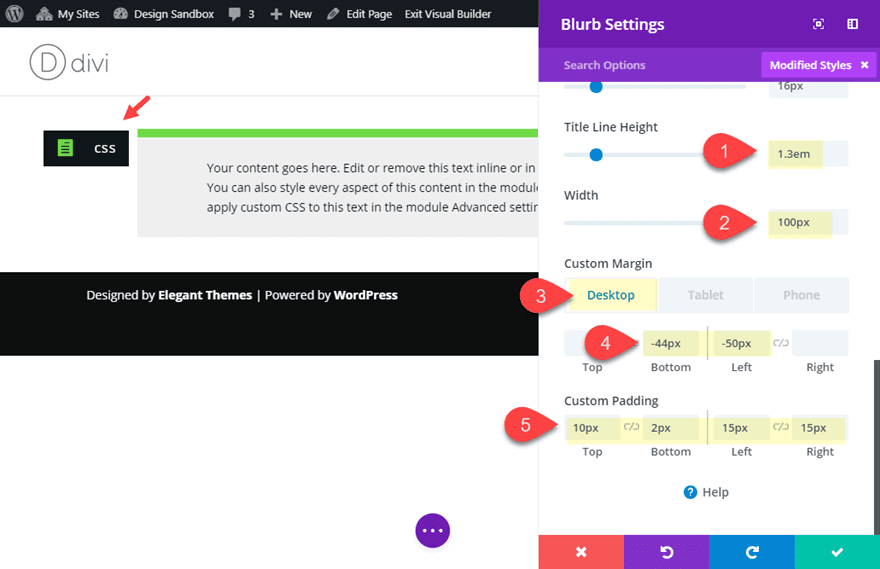
Title Line Height: 1.3em
Width: 100px
Custom Margin: -44px bottom, -50px left
Custom Padding: 10px top, 2px bottom, 15px left, 15px right
Duplicate the section to create more code snippet box designs
This takes care of our first code box design. All we need to do now is duplicate the section containing the code snippet box design and update the label and colors to create a new code snippet box for a different coding language. This is completely optional of course, but if you plan on adding different code snippets on a page, having a different color scheme for each is helpful.
For example, duplicate the section and then open the blurb module settings.
Update the Title to “js” for Javascript.
Then right click on the Image/Icon Color and select find and replace.
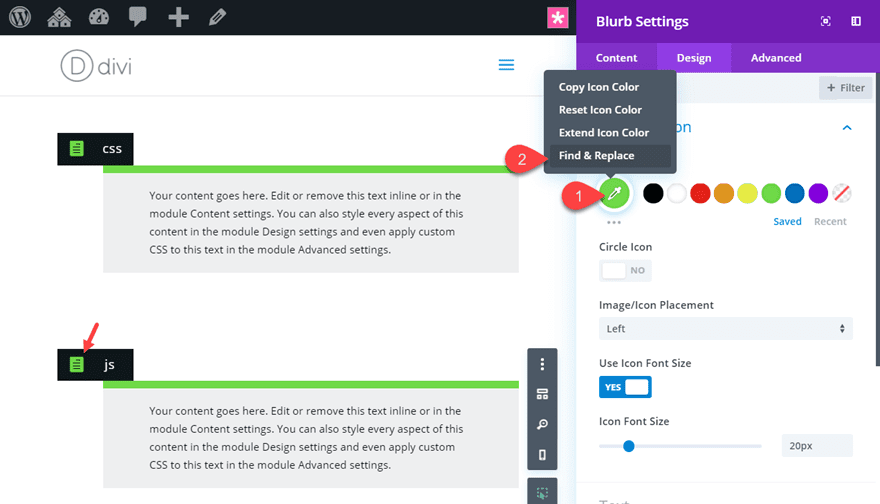
The update the following Find & Replace options:
Within: This section
Replace With: [new color]
Replace All: check replace all found values
Now you have a new code snippet box for JS code snippets.
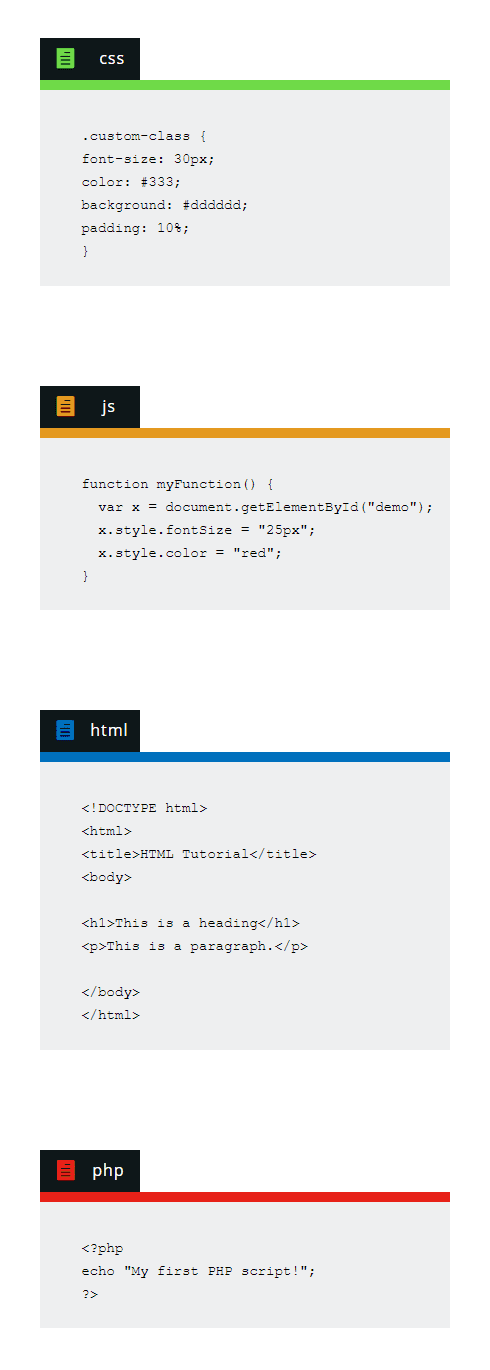
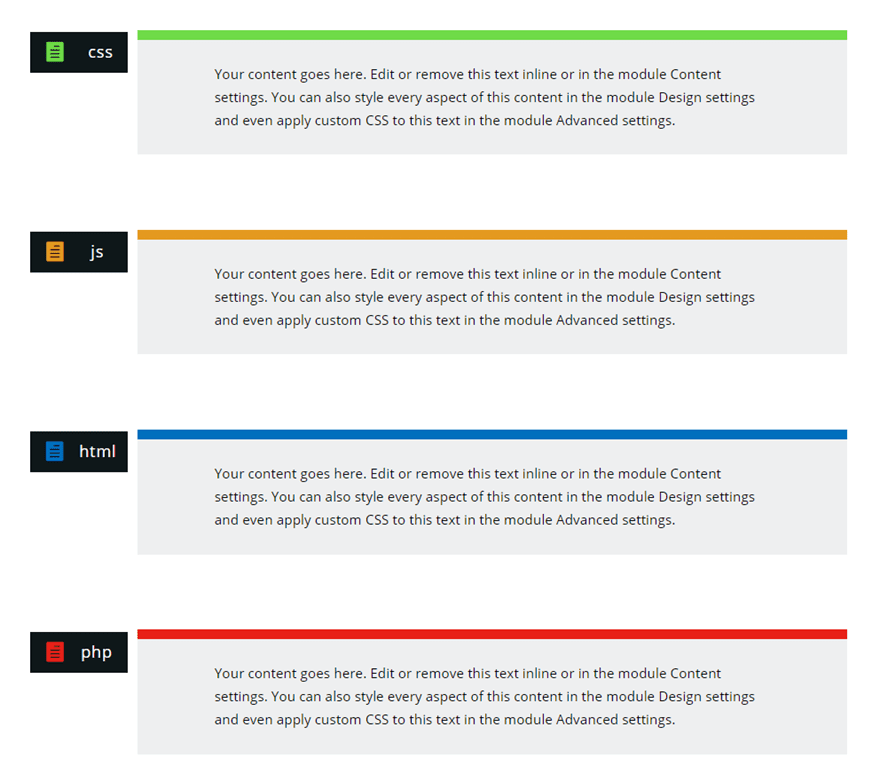
Here is an example of code snippet boxes for the popular types of code for WordPress.
Method 1: Creating Code Snippets in Divi The Manual Way (without a plugin)
If you are wanting to display code snippets on your Divi page or post manually (without a plugin), be warned. There are limitations. And I wouldn’t suggest doing the manual way if you are going to be showcasing different types of code to your site on a regular basis. But if you are interested, here is how to do it.
Step 1: Encode your Code using and HTML Entities Encoder.
HTML Encoders take those special characters (like “<") and converts them to their corresponding HTML entity. This is necessary because WordPress has some filters to display those entities as actual html code. That said, the HTML encoder is primarily needed for code that has html code. So, most CSS and simple Javascript snippets may not need the encoder (provided that you wrap the code in "pre" and "code" tags). PHP usually has HTML code. So if you are in doubt, it is always a good idea to run it through an encoder just to be safe. There are some free HTML encoders on the web. Code Beautify seems to do the trick and I like how the encoder preserves line breaks which is a pain to do manually.
For this example, I’m going to encode the following HTML:
HTML Tutorial

This is a heading
This is a paragraph.
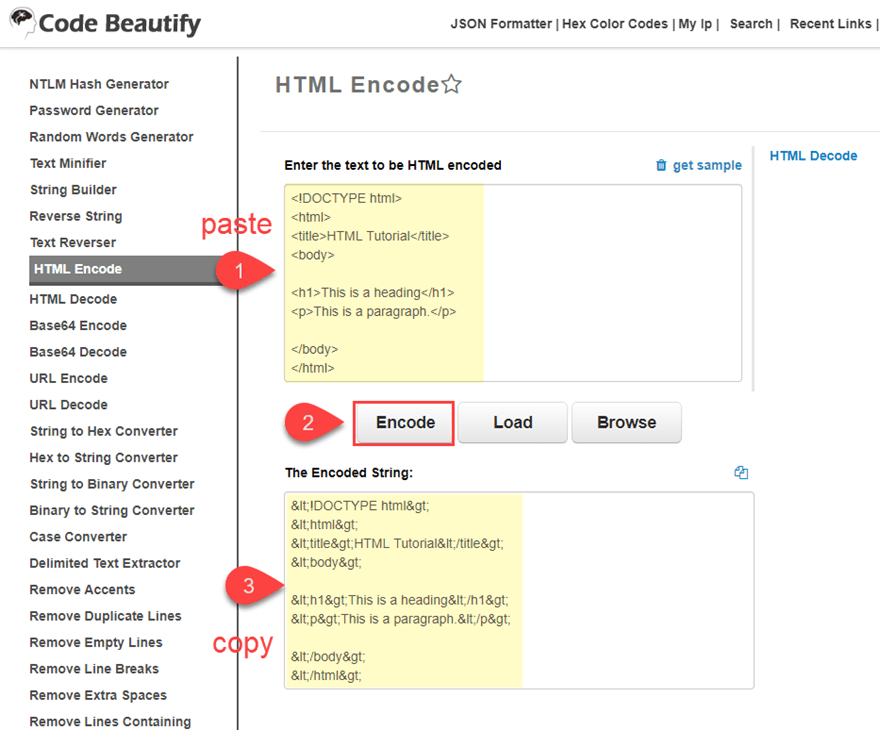
Copy the above HTML to your clipboard. Then navigate to the Code Beautify HTML Encoder.
Paste the HTML inside the box labeled “Enter the text to be HTML encoded”. And then click the Encode Button. Then copy the Encoded String that was generated in the box below to your clipboard.
Step 2: Paste the encoded string of code to a Divi Text Module surrounded by the “pre” and “code” tags.
Then open the text module in Divi and paste the code inside the content box and wrap the code with the pre tag and code tag as follows:
HTML Tutorial

This is a heading
This is a paragraph.


Now you have successfully displayed your HTML code. For more info on the “pre” and “code” tags, check out the codex on Writing Code in Your Posts.
Here is the final design with code examples on desktop and mobile view.


Using Overflow Scroll
If you are adding large chunks of code, you will need to use overflow scroll to make sure the code doesn’t break out of the text module container when displayed on your page. This is because the pre and code tag will render your content unresponsive to browser widths.
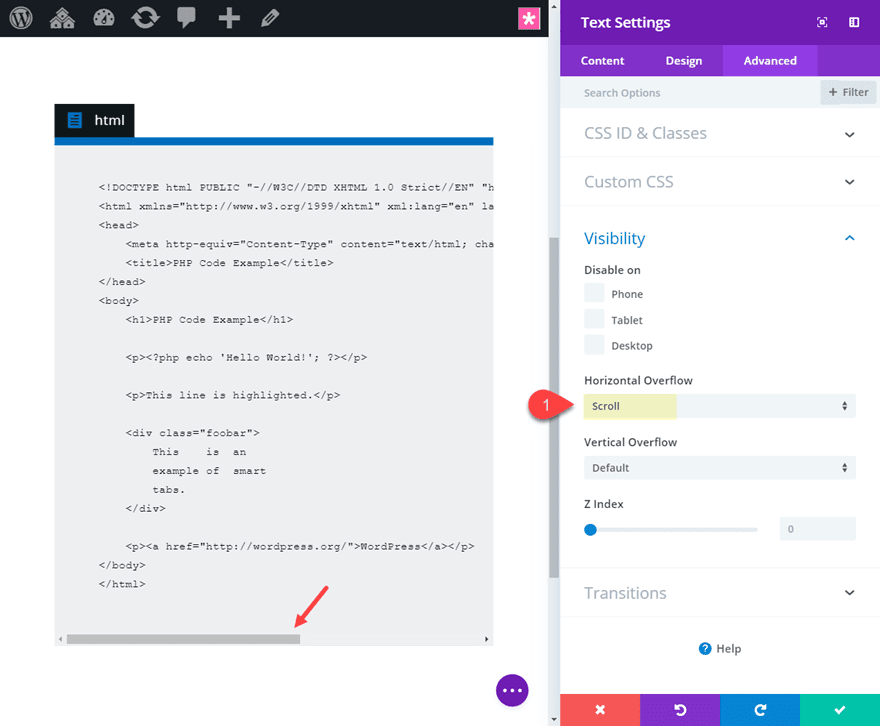
You will want to set the Horizontal Overflow setting to scroll. To do this open the text module containing the code snippet and update the following:
Horizontal Overflow: Scroll

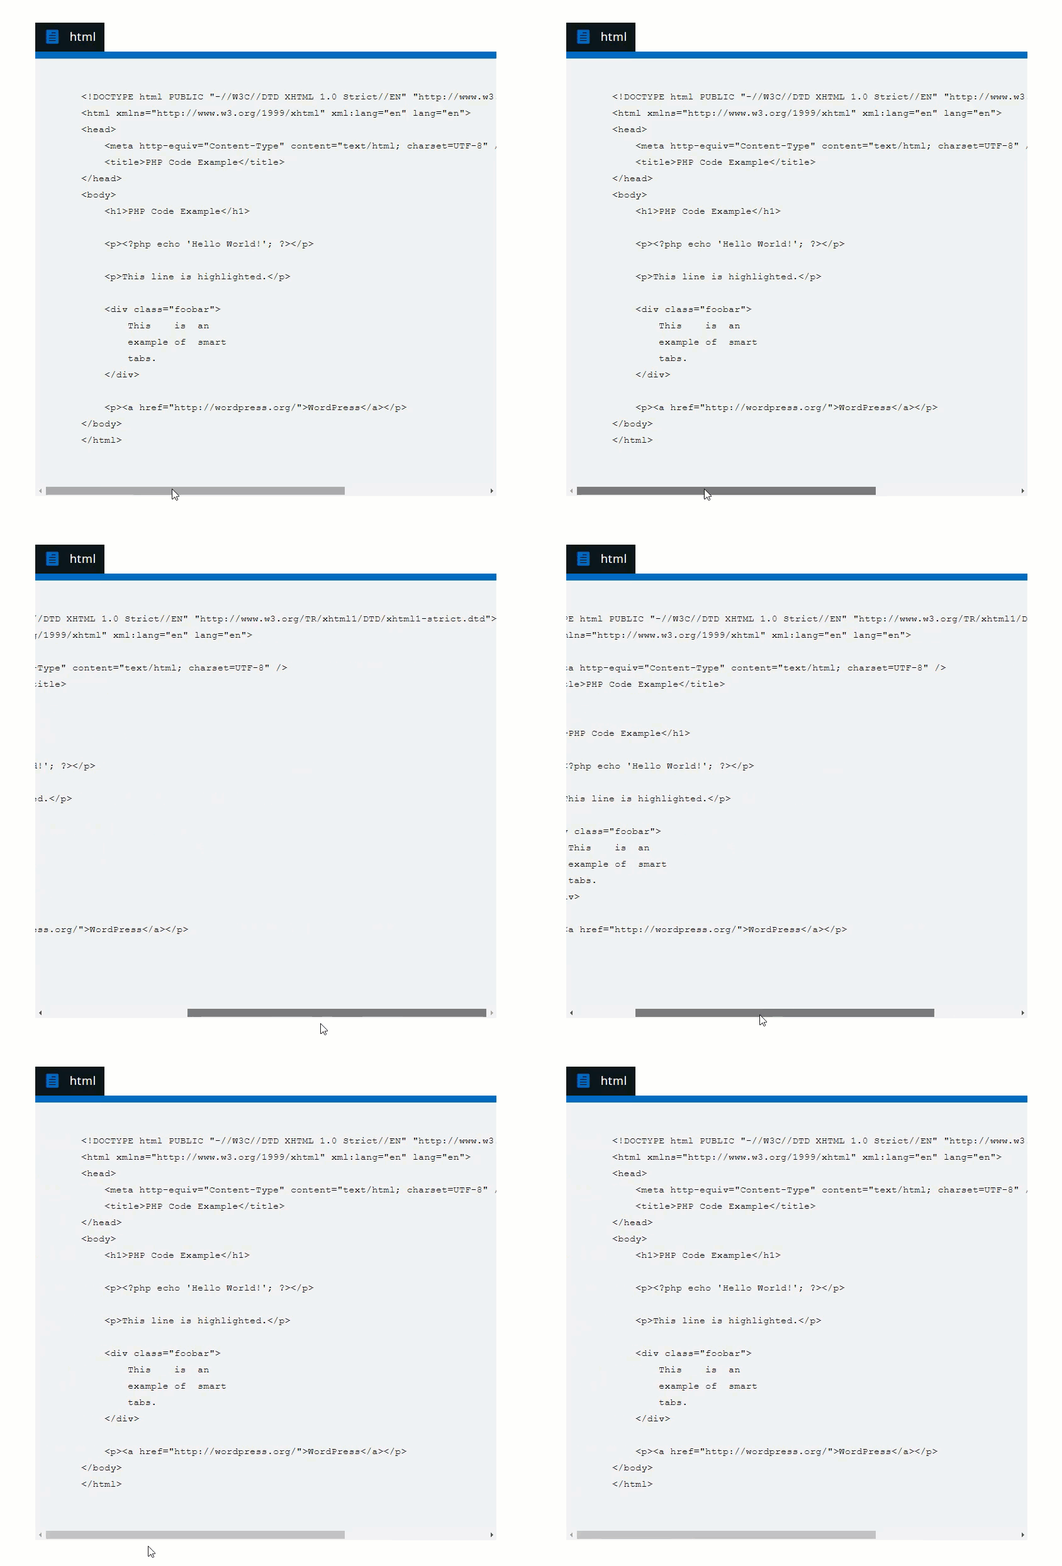
Now the user can use the horizontal scroll bar to see the rest of the code.

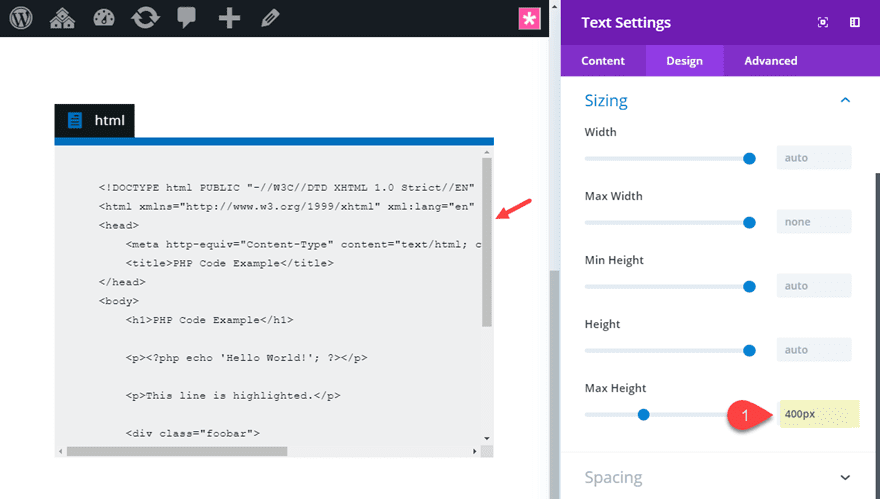
You can even give you text module a max height to initiate the vertical scroll overflow to save additional space on your page.

Now users can use both scroll bars to view the content.
Adjust Text Style Using Text Module Settings
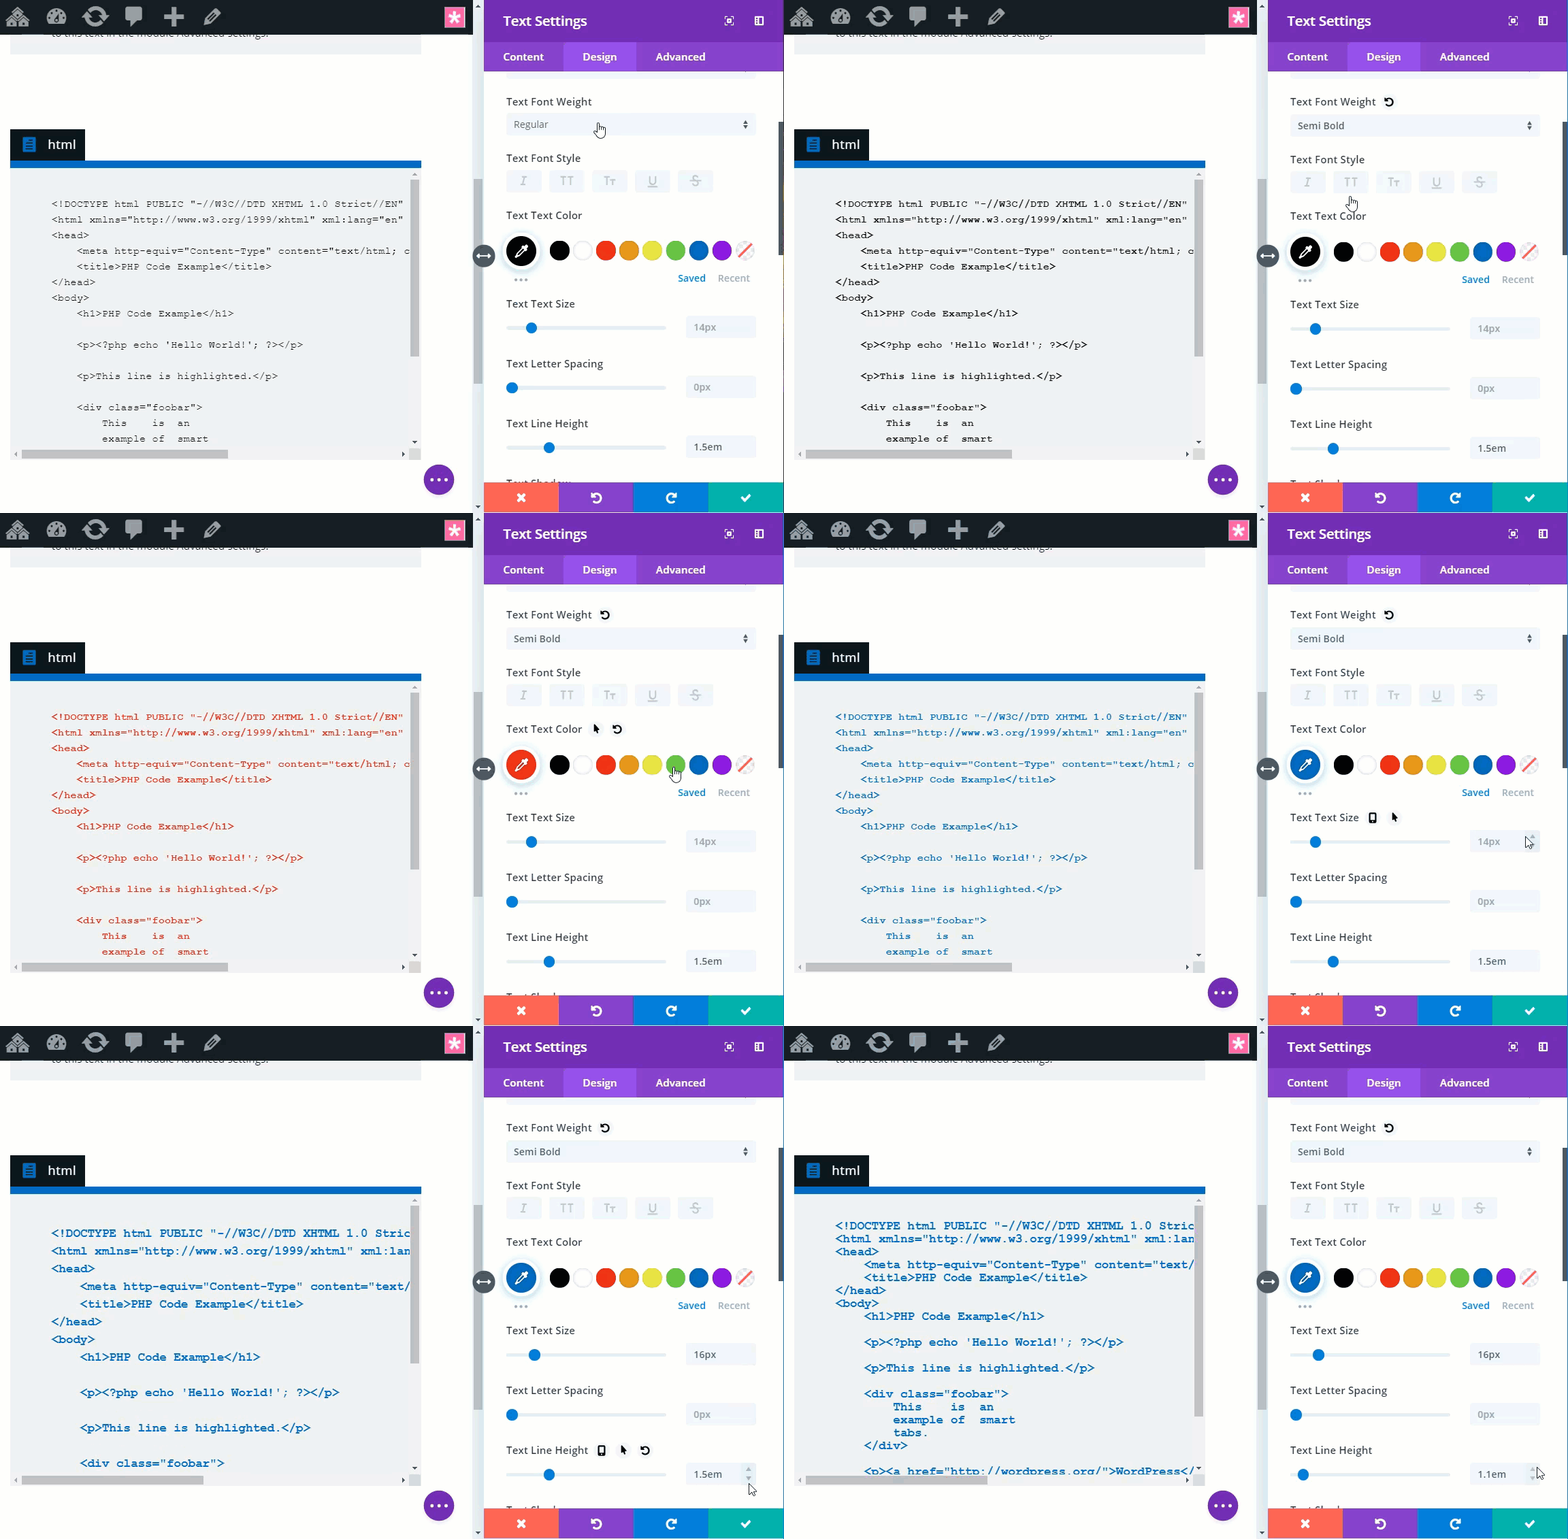
You can use the built-in text module settings to customize the style of your code snippet text. However, you will not be able to change the default font without some external CSS.

Using the Code Prettify Plugin to add Syntax Highlighting to Manual Code Snippets
Okay so I know I said the manual way would be without a plugin, but I thought this would be a helpful tip. The Code Prettify Plugin will instantly add code highlighting to all “pre” tags. The beauty of this plugin is that there is absolutely no customization needed. All you need to do is upload and activate the plugin.
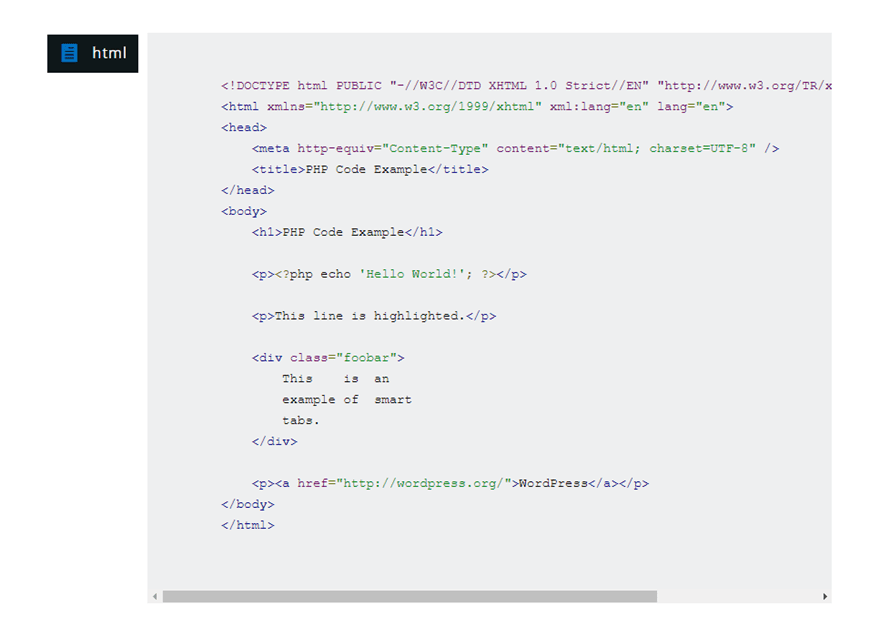
Here is an example of what the code will look like with Code Prettify active.

Code Prettify is from Google and is also used to style all those wonderful snippets on stackoverflow.com.
Method 2: Creating Code Snippets in Divi Using a Plugin
Using a plugin to display code snippets in Divi will probably save you time especially if you plan on adding code snippets on a regular basis. And since many of the plugins include syntax highlighting and other style options built-in, you can have more control over your snippet display.
For this example, I’m going to show you how to add a code snippet to the code snippet boxes you already designed using the SyntaxHighlighter Evolved plugin. But feel free to explore more plugin options.
Add the plugin to your Site
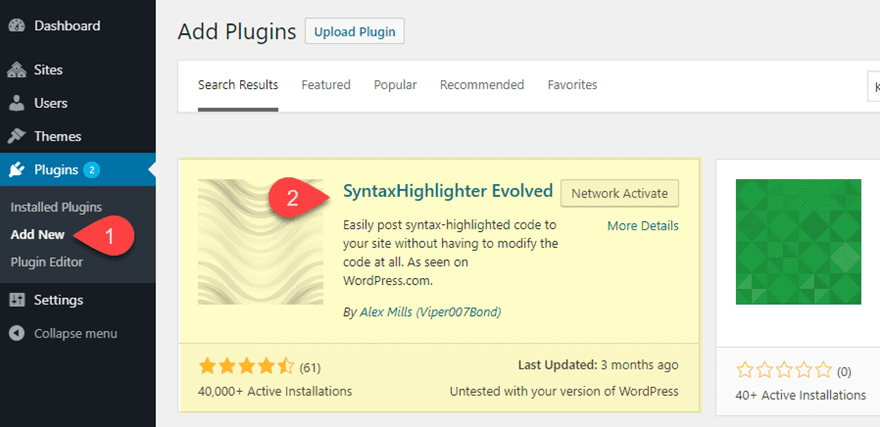
The first step is to upload and activate the plugin to your site. From your WordPress Dashboard, click to add a new plugin and search for the plugin. Then install and activate the plugin.

Configure Plugin Settings
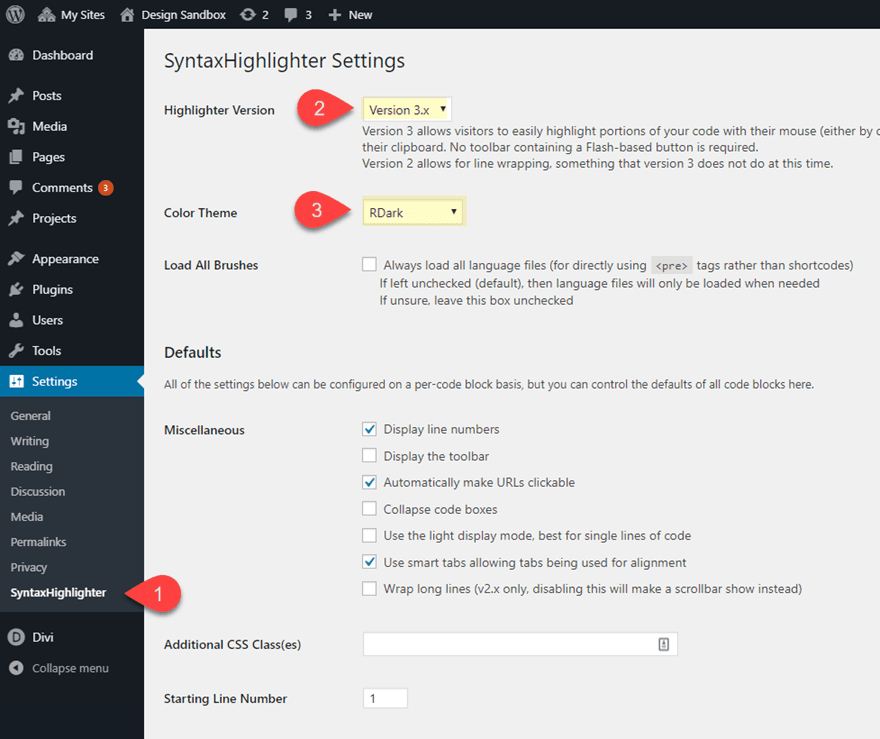
To configure the plugin settings, navigate to Settings > SyntaxHighlighter. Then update the following:
Highlighter Version: Version 3.x

Color Theme: RDark

Add the Code Snippet to the Text Module with the Corresponding Shortcode tag
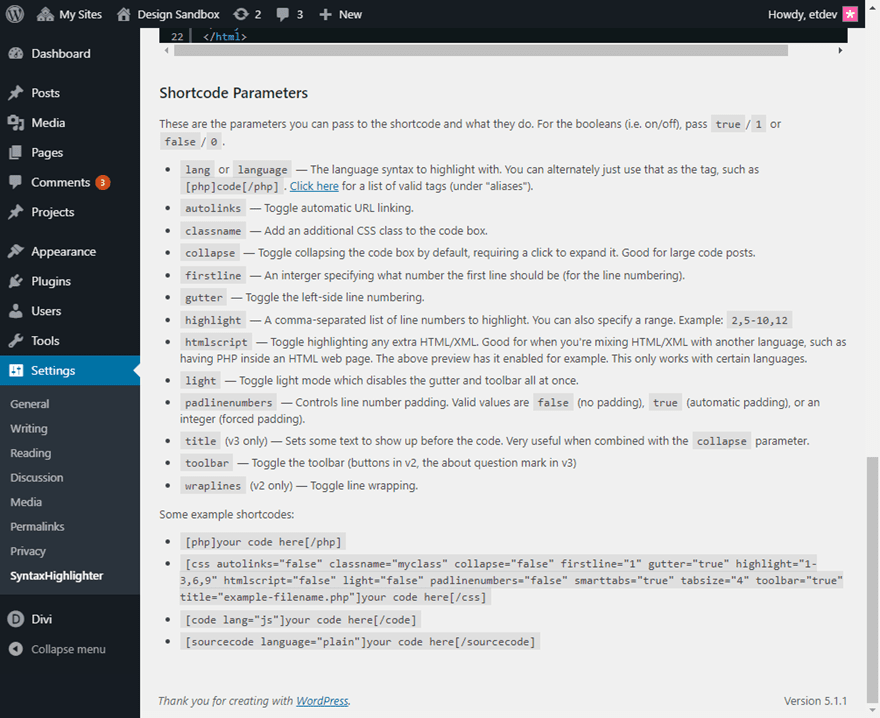
The plugin supports different code languages to display. All you need to do is wrap the code in the proper shortcode tag. You can find a list of shortcode parameters under the plugin settings page along with shortcode examples.

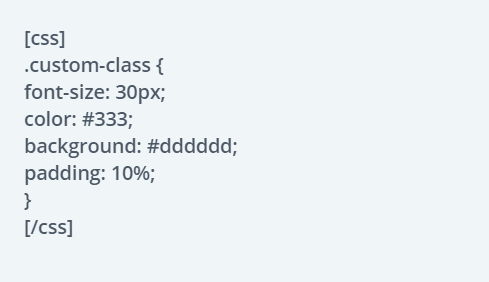
For example if you want to display a CSS snippet, you code should be inside the css shortcode brackets. It should look something like this:

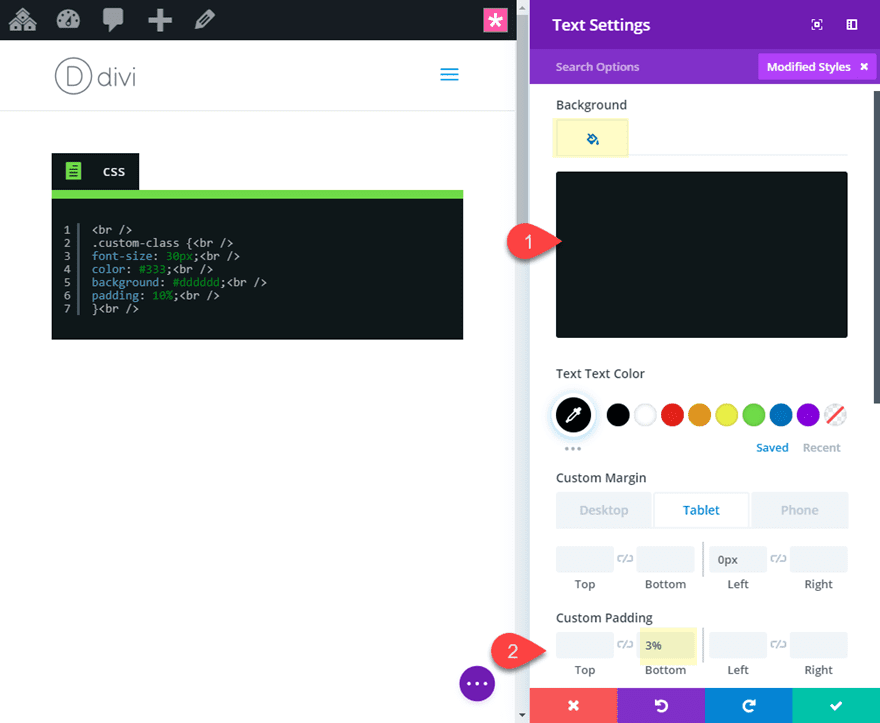
After you add the code snippet with the proper shortcode to the text module, update the design settings for the text module as follows:
Background Color: #1b2426 (this matches the color used by the plugin’s color theme)

Padding: 3% bottom

Here is the result so far.

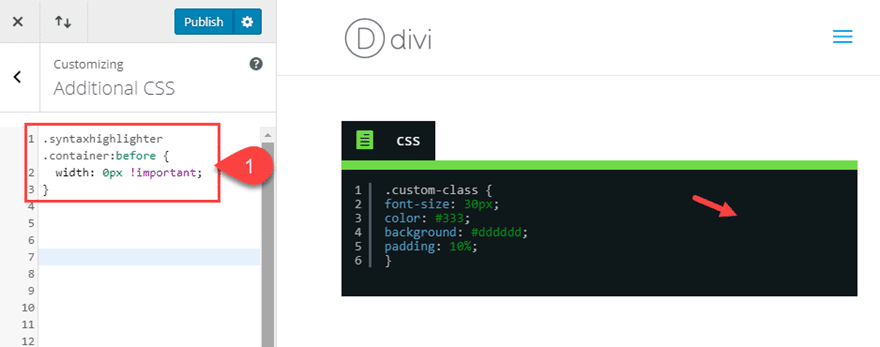
To get rid of that white border line on the right, you will need to add the following custom CSS to your theme customizer:

.syntaxhighlighter .container:before {
  width: 0px !important;
}


Here is the final design.

Note: You will probably want to explore the different shortcode parameters available. They will allow you to highlight certain lines of code among other things.
Method 3: Creating Code Snippets in Divi Using GitHub Gist
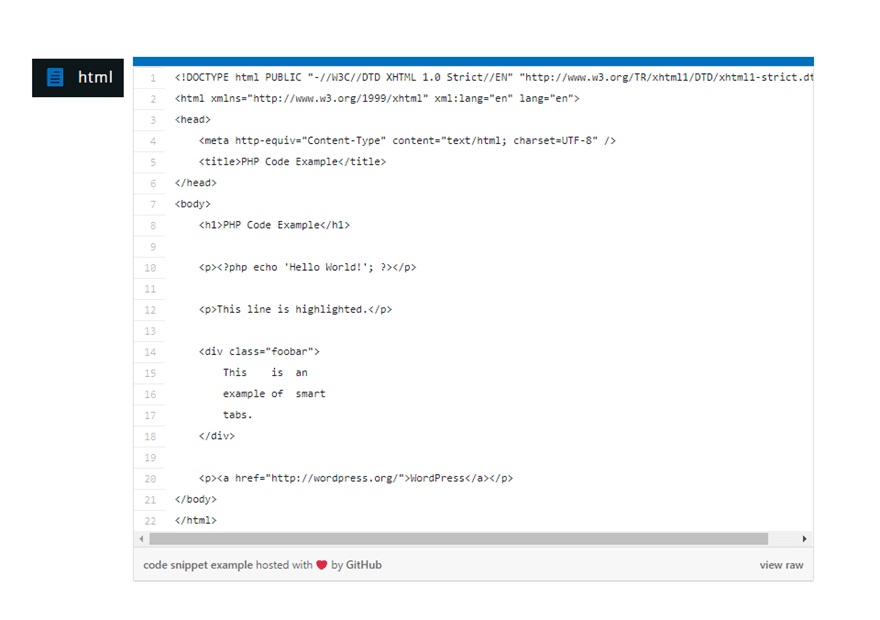
A really popular (and easy) way to share code snippets on the web is to use a third party site like gist.github.com. Gist is a tool provided by Github to make it easy for developers to archive and share simple code snippets. And you can easily embed these snippets in Divi with a script that is generated when you create a new gist.
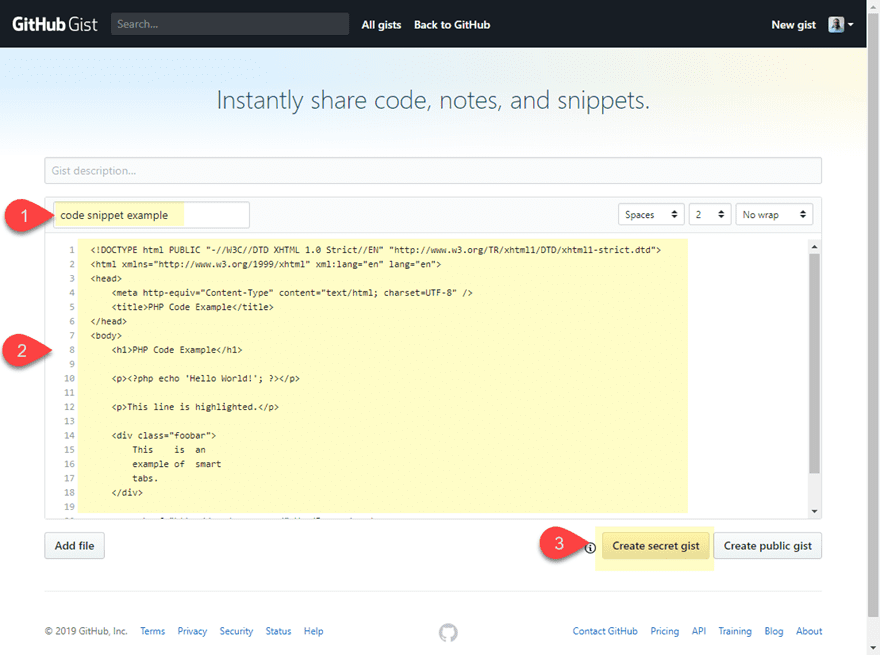
Once you sign up for an account, you will have access to gist. To create a new gist, go to their website and click to add a new gist. Then give your Gist a title and paste the code snippet into the content box. Then click to create a secret gist.

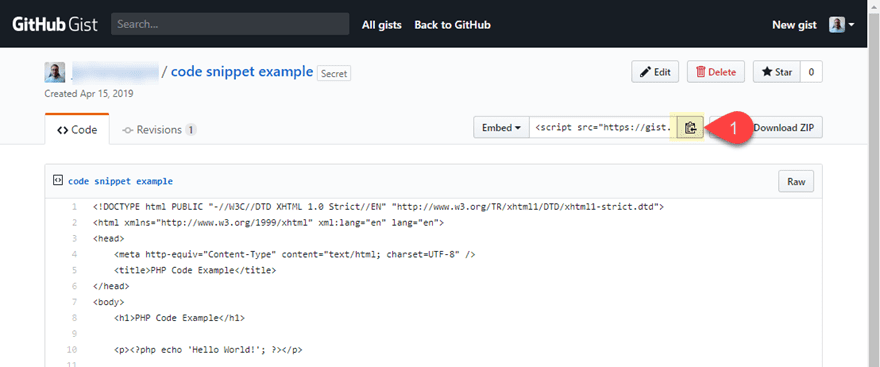
Then copy the embed script at the top of your new gist.

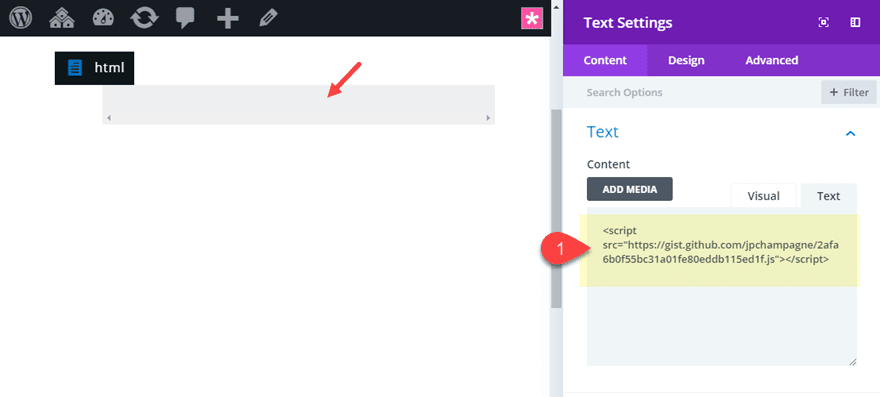
Next, go to the text module in Divi and paste the script to the content box.

Then take out the custom padding.
Here is the final result. Notice you even have a convenient “view raw” link at the bottom of the Gist embed to view the raw code.

What About Code Snippets Outside of the Divi Builder?
Since this tutorial focuses more on adding code snippets using the Divi Builder, I didn’t cover how to add code snippets using WordPress Block or using the classical WordPress editor. However, some of the same principles will still apply. For example, the “pre” and “code” tags will still display code snippets in the classic editor. And there is even a Code block in Gutenberg for this as well. Plus the plugin featured in this article also has a WordPress Block dedicated to this. And the method using the Gist script will also work as expected.
Final Thoughts
Displaying Code Snippets in Divi doesn’t have to be difficult. Adding the snippets manually using the pre and code tags WordPress provides will do the job for most non-html code snippets, but you should run the snippet through an html encoder first is to be safe. Plus, you can further customize the code snippet text style using the text module settings. And don’t forget about Code Prettify to add highlighting to your manual code snippets.
For those of you who are sharing code snippets on a regular basis, using the SyntaxHighlighter plugin or Gist is probably your best bet. Regardless, you will always have the option of adding more creative designs to your code snippets using the Divi Builder.
For more info, check out our post on some helpful code snippet plugins you can use.
I look forward to hearing from you in the comments.
Cheers!
The post How to Share and Style Code Snippets in Divi (3 Methods) appeared first on Elegant Themes Blog.

