WordPress Posts and Pages are the two legs on which the platform stands. Without them, you wouldn’t have a canvas to read or write or publish at all. WordPress Posts are the regular, new content that you publish to your site. These are what readers see marked as New! in their various feeds. WordPress Pages, on the other hand, are the other side of the coin. They are the stable, static (or close to it) places on your website that hold the information least likely to change–About Us, Contact, Subscribe, Privacy Policy, and so on.
What are WordPress Pages?
As we said above, Pages is the content on your site that is least likely to change. When making new Pages or updating their content and dates, users and search engines aren’t notified like the will be regarding Posts. These don’t get pushed by RSS and search engines will find updates when they crawl the site, not by being told by the software.
WordPress.org’s definition is (obviously) pretty solid, too:
A Page is another tool to add content to a WordPress site and is often used to present “static” information about the site; Pages are typically “timeless” in nature. A good example of a Page is the information contained in “About” or “Contact” Pages. A Page should not be confused with the time-oriented objects called Posts, nor should a WordPress Page be confused with the word “page” referring to any web page or HTML document on the Web.
Because Pages live outside of the normal blog chronology, and as such, are not displayed with the rest of your Posts, but are displayed individually.
You might create new Pages for landing screens for new projects or even temporary announcements. While they do get indexed by search engines, using Pages to create temporary spaces on your site makes it so that you can target people specifically. They don’t display alongside the timely, most recent blog posts intended for everyone.
Creating WordPress Pages
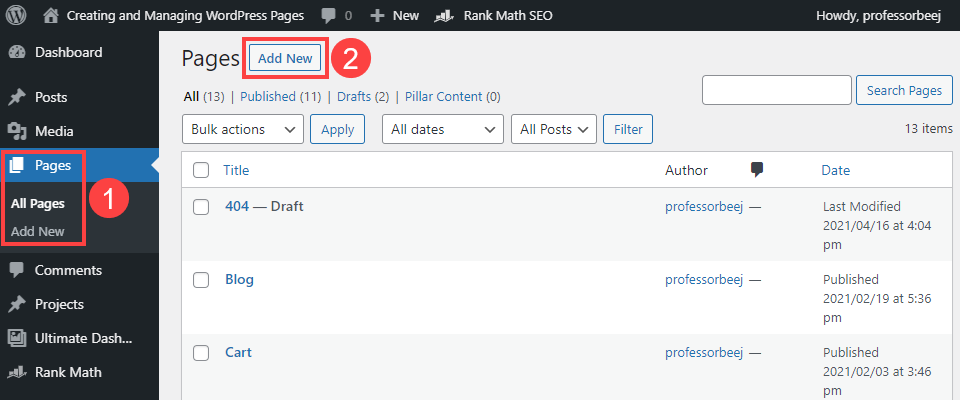
Head into your WordPress dashboard. Find the Pages (1) entry in the left-hand sidebar and click into either All Pages or Add New (2). Both give you the option to create WordPress Pages.

The All Pages screen displays the individual pages that you have created and drafted already. Whether you press the Add New button in the sidebar or the top of the screen, you will go to the same place: the WordPress block editor.

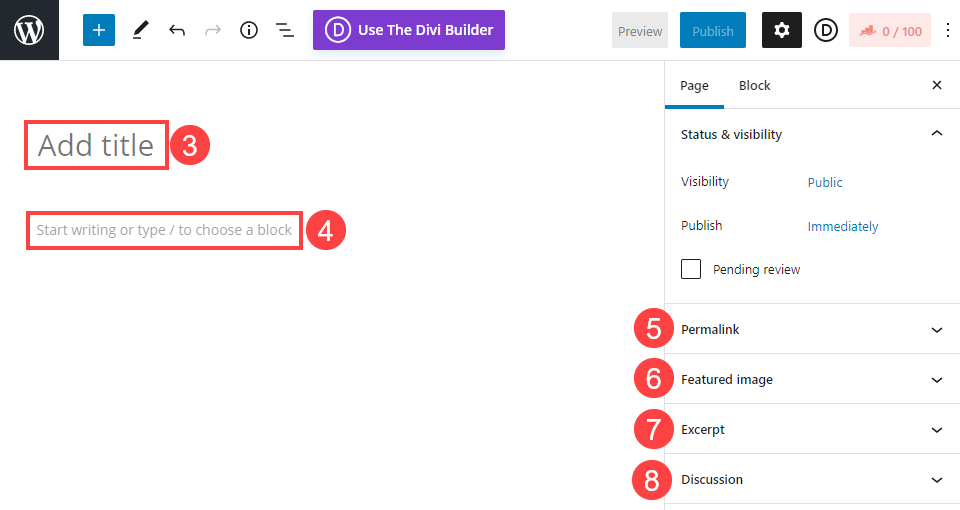
In terms of utility, the block editor for Pages is the same as the one you use for Posts. If you are writing a pretty straightforward page of content where you don’t want or need an intricate design, the block editor is great. Otherwise, you can use your favorite page builder (such as Divi) to edit the Page content (4), while still using the block editor as you see above to edit and enter metadata.
Writing and Editing the WordPress Page
You absolutely want the page to have a Title (3), and one that is SEO-friendly at that. Additionally, the title that you choose will determine the default Permalink (5) of the post. For example, if you name the page What You Need To Know About Us, your URL will be yoursite.com/what-you-need-to-know-about-us. You would have to manually adjust that in the Permalink metabox to a shorter version like /about.
Keep in mind that because Pages differ from Posts in that they are standalone. Meaning they are not organized by the typical WordPress taxonomies with Categories and Tags. Or even date. For example, if you have your permalink structure set to yoursite.com/category/month/post-title, your Pages would still always be yoursite.com/post-title.
You should set a Featured Image (6), as that is used by many themes and plugins to varying degrees. As well as being the primary content, alongside the Excerpt (7), for social media sharing. When writing an Excerpt, simply summarize the Page’s intent in a short sentence or two.
Make sure to take a look at the Discussion (8) metabox as well. By default, WordPress Pages have comments enabled. Sometimes, this is what you want and need. You might be making an announcement and want feedback on it, or you might want questions about a new feature. However, you probably don’t want a series of comments on your Contact Us page, since its entire point is for visitors use the displayed means to contact you, not comment on your site.
When all of that is done to your liking, simply press the Publish button, and the Page goes live.
Managing WordPress Pages
One of the usual places that you will find Pages is in the various navigation menus and lists around your site. With this, keep in mind that Pages don’t automatically populate into the site like Posts do. For instance, if you want your new About Us Page to show up in your header menu, you will need to go to Appearance – Menus (1).
Find the new Page under the Pages (2) box, check the box, and make sure to press Add to Menu (3). At this point, the new entry will appear under the Menu Structure section. If you don’t want to have to repeat this process for each new Page, you can check the Auto Add Pages (4) option, which will populate your navigation menus when you publish new Pages. However, we caution against this because it can skew designs and clutter your menus tremendously.
Make sure that when you’re ready that you press Save Menu (5). WordPress menus do not automatically save updates and additions, so if you navigate away from this screen without saving, your menus will not change.
Editing and Quick Edits
Since Pages are so static, it’s a pretty good idea to go through them occasionally. You can perform a quick audit if any information or titles need updated. To do so, navigate to Pages – All Pages (6). When you hover over an entry, you will be given a context menu with a few edit options (7). The most useful of which is Quick Edit.
When selected, the Page’s details will expand. From here,you can adjust the permalink slug, dates, template, publish status, and so on. You cannot edit the content in this panel, though. However, you can quickly take down an outdated Page so aren’t putting misinformation out there.
When done, click Update (8), and the Quick Edit panel slides shut.
You can also click the Edit (7) button to be taken to the block editor. Likek before, you can adjust any of the Page content or metadata. If you have used a page builder, you may also see an option to edit the content with that directly, loading the builder immediately instead of the intermediary block editor step.
Taking advantage of this context menu and quick editing features can help keep a WordPress site using lots of Pages organized and running efficiently.
Wrapping Up
WordPress Pages and WordPress Posts often get conflated as being the same thing. And while they do share a number of similarities, their use within the WordPress system is entirely different. Pages give you an opportunity to provide content that is out of time with the stream of content your site normally produces, highlight specific elements, or even provide a temporary space for announcements, discussions, or special offers that may be taken down or targeted more specifically than what you put in your typical WordPress Posts.
What are your tips for creating and managing WordPress Posts?
Article featured image by Hani Suwaryo / shutterstock.com
The post WordPress Pages: How to Create and Manage Them appeared first on Elegant Themes Blog.
