The WordPress editor is growing into a full-fledged site builder. Thanks to the full site editing and the new theme blocks like the Query Loop Block, you can display lists of dynamic content for any post type anywhere in WordPress with ease.
In this article, we’ll dive deeper into the WordPress Query Loop Block so you can better understand what it is and how to use it.
What is the WordPress Query Loop Block?
The Query Loop Block is one of the most advanced WordPress theme blocks available in the new Site Editor. It was added to WordPress Core in version 5.8 and is a a more complex version of the Latest Posts Block. It allows anyone to visually build a block that pulls and displays post content dynamically to a page or template. The Query Loop Block isn’t limited to displaying blog posts either. You can use it to pull content from any custom post type you may have. You can even use it with WooCommerce Blocks to display products.
What are “Queries” and “Loops”?
In WordPress terminology, a “Loop” is a way of displaying similar information on repeat. A loop of blog posts, therefore, is a series of blog posts with common attributes such as blog title, featured image, author name, publish date, and a short description. The loop pulls this data from posts (or any post type) and places them in a loop. The loop then displays posts to site visitors.
The query aspect of a “Query Loop” means that a user can query, or command, certain information to pull into the loop. So a Query Loop Block can pull and display all posts or posts of specific categories—to name just a couple of options. This allows someone to show posts in “Category A” and no posts from Category B or C.
Query Loop Blocks can display:
- Blog Posts
- Website Pages
- WooCommerce Products
- Other Custom Post Types
Any post types are fair game for display in a dynamic loop.
Query Loop Nested Blocks
There are two immediate “Nested Blocks” that belong to the Query Loop Block:
- Post Template Block – Holds further nested blocks that display post metadata (Title, Featured Image, Author, etc.)
- Pagination Block – Allows posts to overflow into pages for more to be displayed
We won’t cover these nested blocks in this article but you can click on any of their hyperlinks above to get all the information about how each works within a Query Loop Block.
How to Add the Query Loop Block to an Index WordPress Template
In this example, we are using the “Twenty Twenty-two” Default WordPress Theme. This was the first default theme to include editing through the Site Editor (previously called “Full Site Editor”).
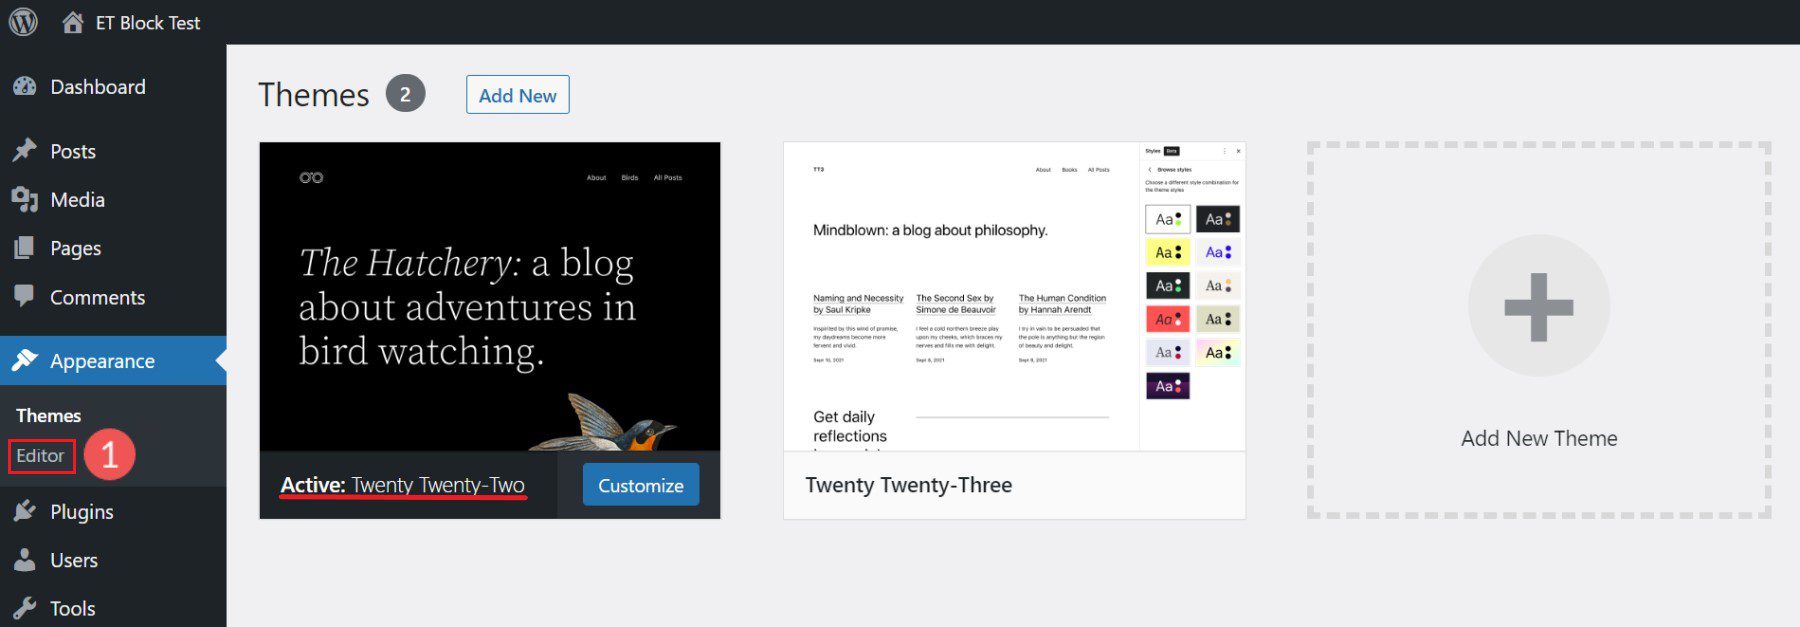
We’ll be walking through how to add a WordPress Query Loop Block to a Template in the Site Editor. To get there, first, hover over “Appearances” and then click “Editor”.
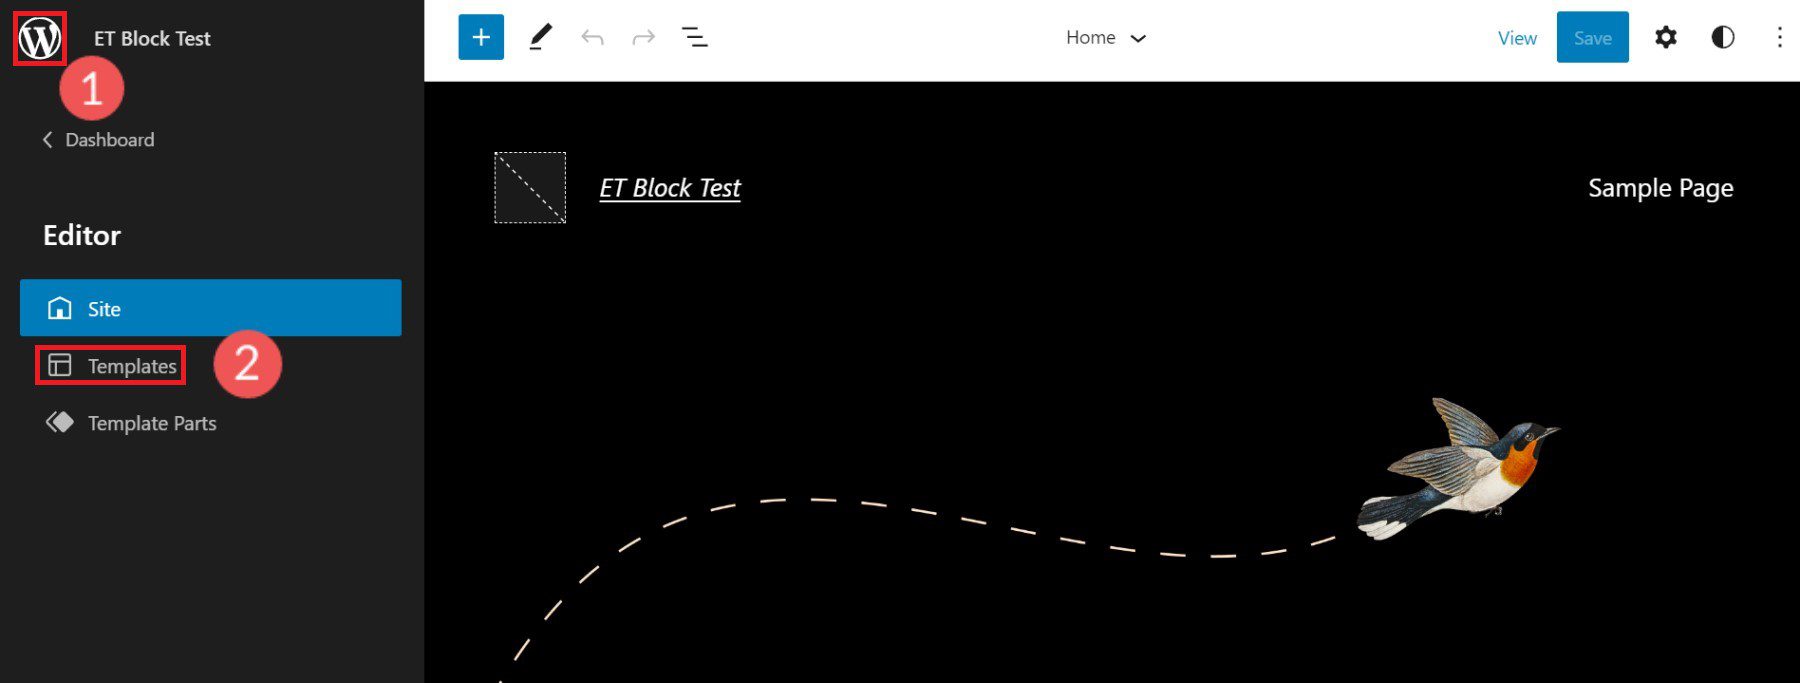
Then, click on the icon in the top left to pull down the dropdown menu. In that menu, click “Templates”.
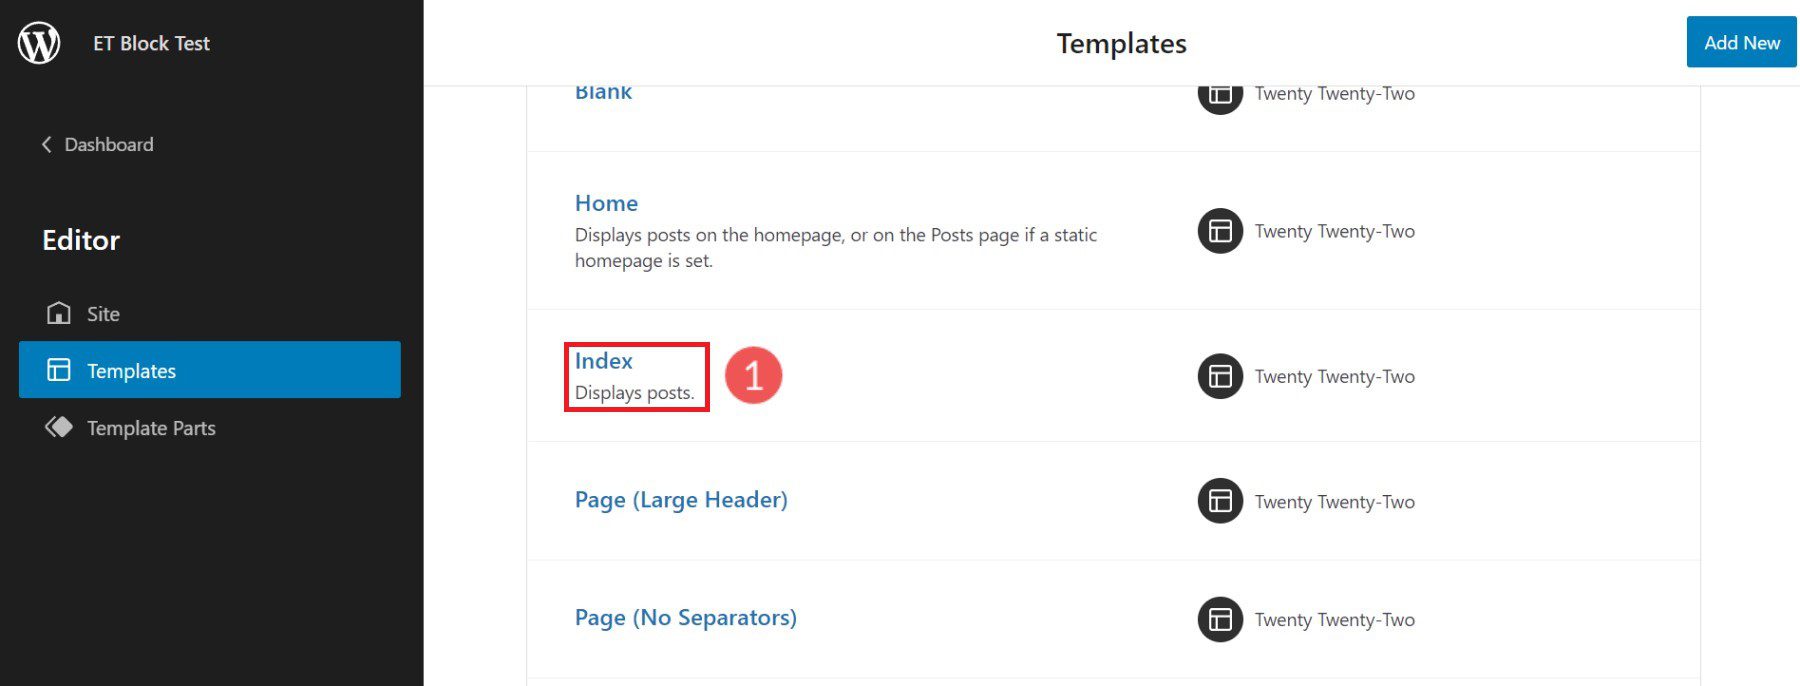
Now, from the list of presented templates, find the template you wish to edit. One of the most natural templates for this block is the “Index” template since it is the template that indexes or displays website posts.
You are now on Twenty Twenty-two’s Index Template. You’ll notice that it already comes with a Query Loop Block configured. But, if you are using a different Block Theme then it may not come with it.
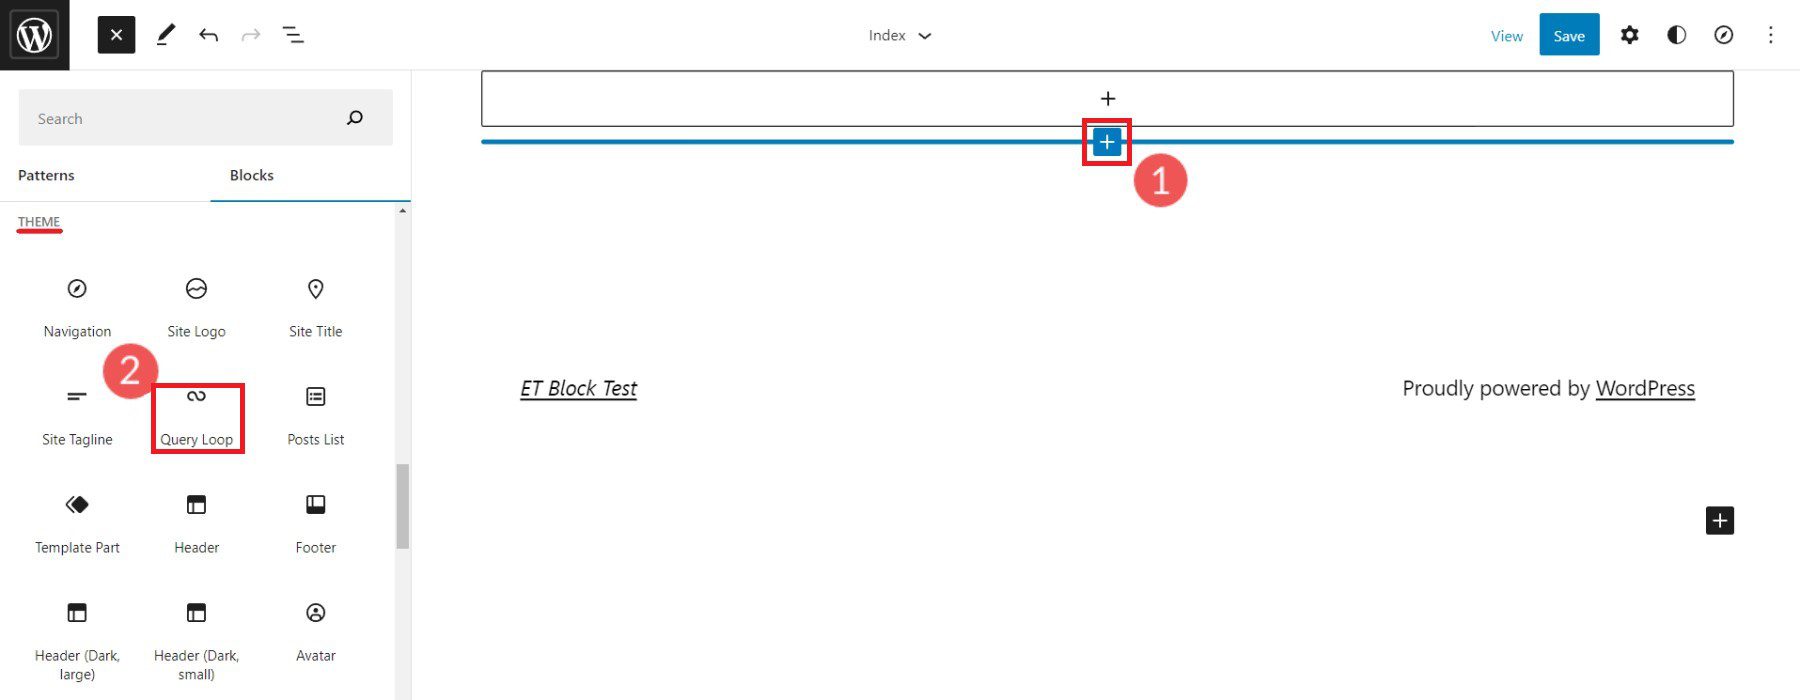
To add a new Query Loop Block, click the “(+)” icon. Scroll down to the “Theme” blocks or type “Query Loop” into the search bar. Drag the Query Loop block into the Site Editor.
WordPress has predefined “Patterns” that can give you a headstart in designing your Query Loop. You can choose a specific pattern if you know that there’s one that fits your needs, or you can start blank. We’re going to click “Start blank”.

There are four default variations to apply to a Query Loop. For this example, click the “Title & Date” variation.

This will create the Query Loop with the “Title and Date” variation.

Notice nested blocks appear inside WordPress’ Query Loop Block. This is because those blocks provide necessary features for the Query Loop. Since we chose the “Title & Date” variation, those nested blocks need to be included to show “Title” and “Date” information. A different variation would have loaded a different arrangement of nested blocks.

Now that a Query Loop Block is on a template, we’ll explore the Toolbar and Settings for this advanced Theme Block.
Query Loop Block Toolbar and Settings
Each block within the Site Editor and Block Editor has its own Toolbar options and a Sidebar of More Settings.
Query Loop Block Toolbar
To find the Toolbar for the Query Loop Block it is easiest to go to the List View and select the block—making sure a nested block is not selected.
The first unique Toolbar option for the Query Loop Block is the “Display Settings”. Clicking on that will show three options:
- Items Per Page – Control # of posts displayed at a time in the loop
- Offset – Skips starting point of posts by a set amount
- Max Page to Show – Limits # of pages shown, even if the query has more results
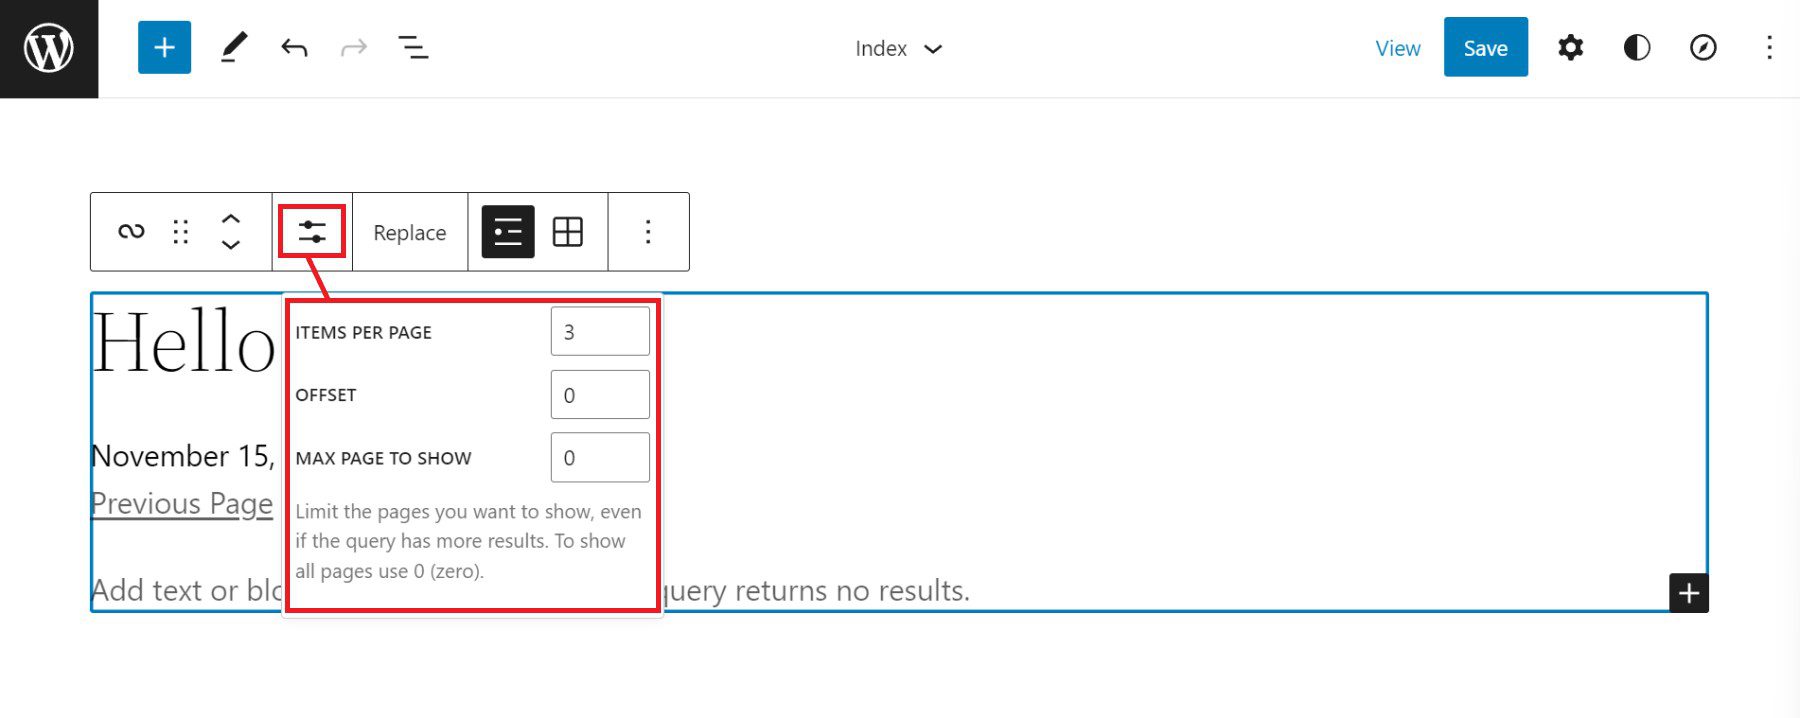
Next on the Toolbar is the “Replace” button. This gives the option to strip the Query Loop Block’s pattern and replace it with a different pattern.

The last unique Toolbar option for the Query Loop Block is the toggle between List View and Grid View. List View displays the post loop “as a list” with posts stacked. Grid View displays the post loop as a grid with more of a table layout for the posts to fill.

Query Loop Block Settings Sidebar
The Query Loop Block has additional configurations in the “More Settings” sidebar. To reveal the sidebar, either click the “Show More Settings” option nested in the Toolbar or by clicking the “Gear” icon in the top right while the Query Loop Block is selected.
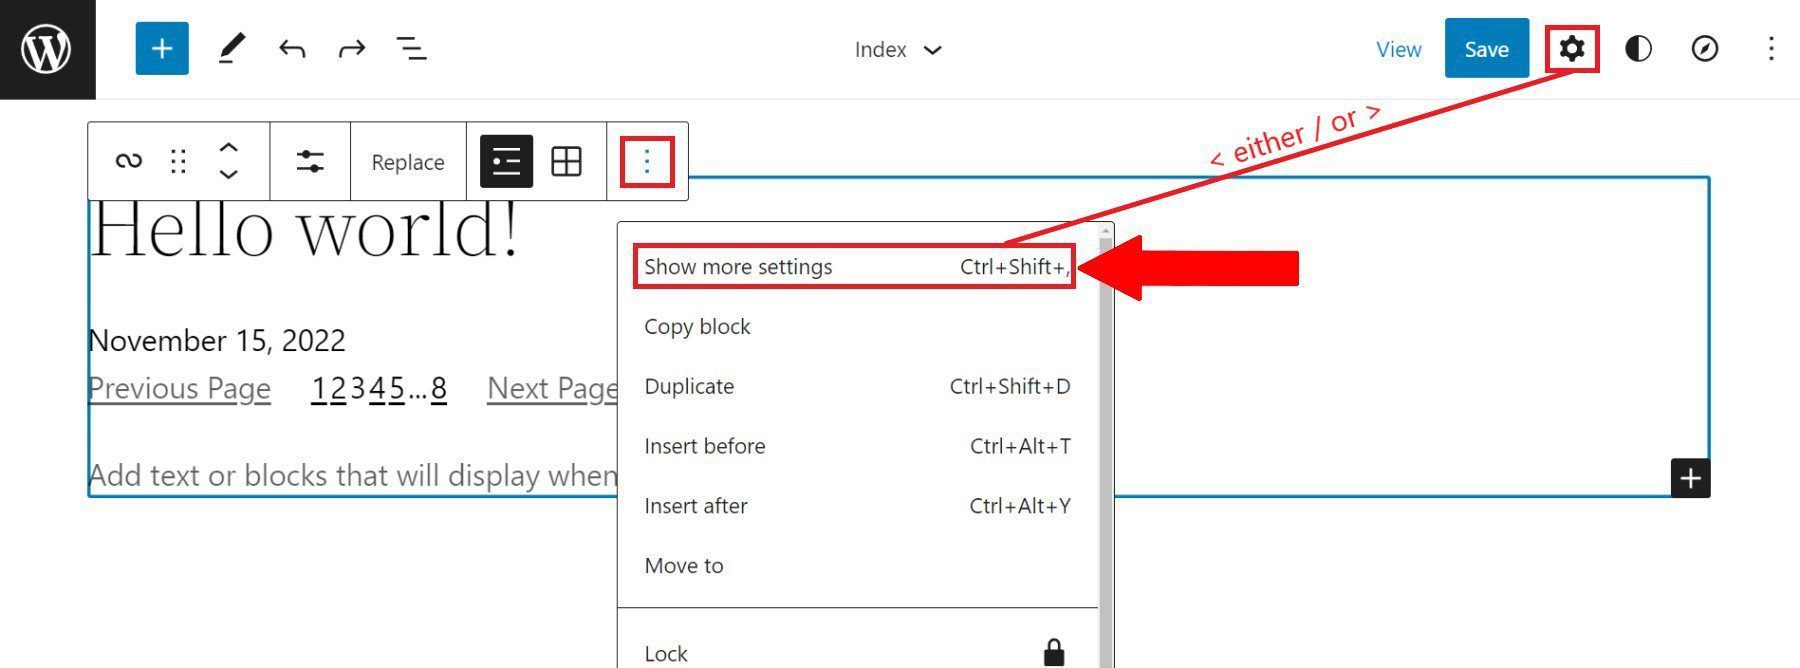
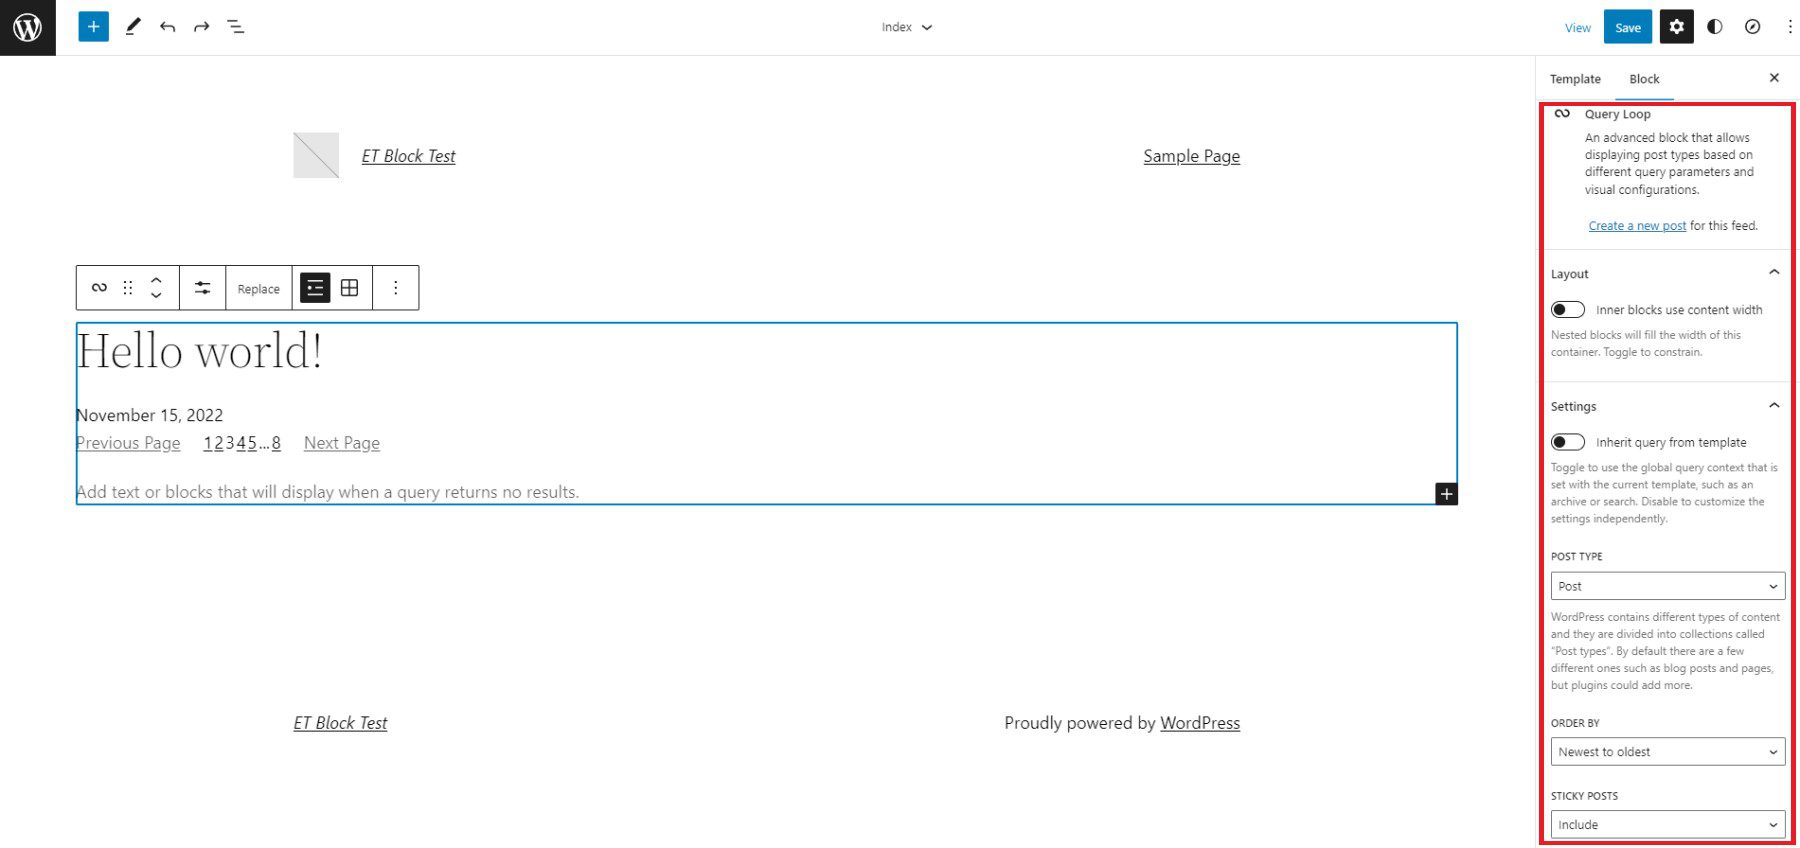
The first visible sidebar setting gives site owners the ability to create a New Post for the Query Loop from this editing page. After that, there is the Layout Toggle which affects how Nested Blocks use layout width compared to the Query Loop Block—more on that later. The Settings Toggle allows for selecting a custom or an inherited query for the block—more on that below as well.
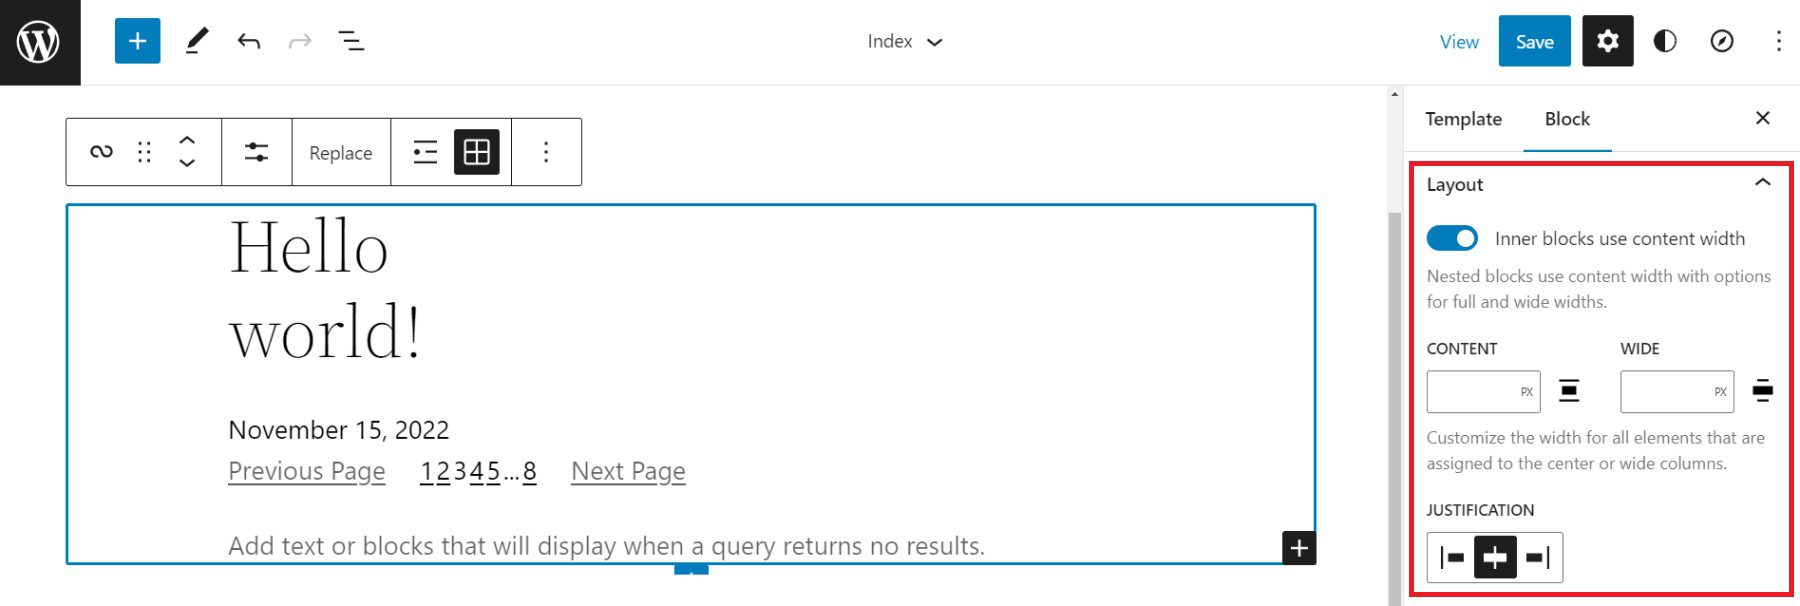
Layout Options
The “Layout” settings for nested blocks allow a designer to toggle additional settings on (blue). These settings allow one to choose if those blocks use content and width percentages. It also reveals an option for left, center, or right content justification. With it untoggled (grey), nested items are set to full width by default.
Query Settings
When the query “Settings” is untoggled (grey), then you can select exactly what to query. The first option is “Posts” which can be pages, posts, or custom post types. Next, users can choose between ascending or descending order for either date published or alphabetically. Lastly, there is an option to include or exclude sticky posts in the query.
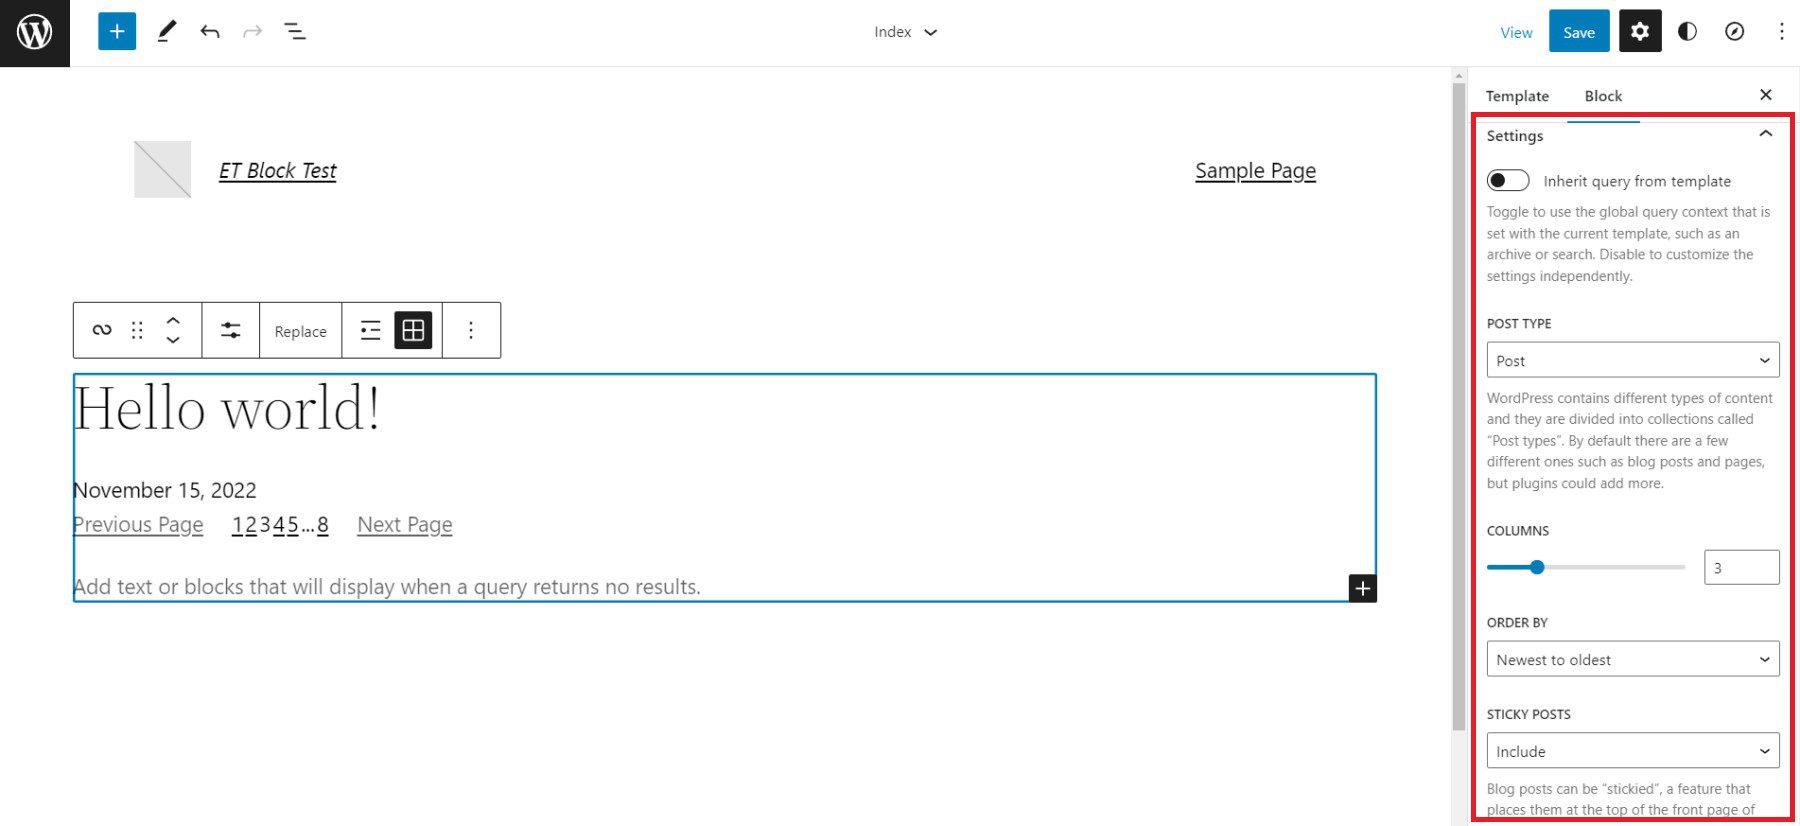
Toggling “Settings” (blue) sets the Query Loop Block to inherit the query from the template used template.

Query Filters
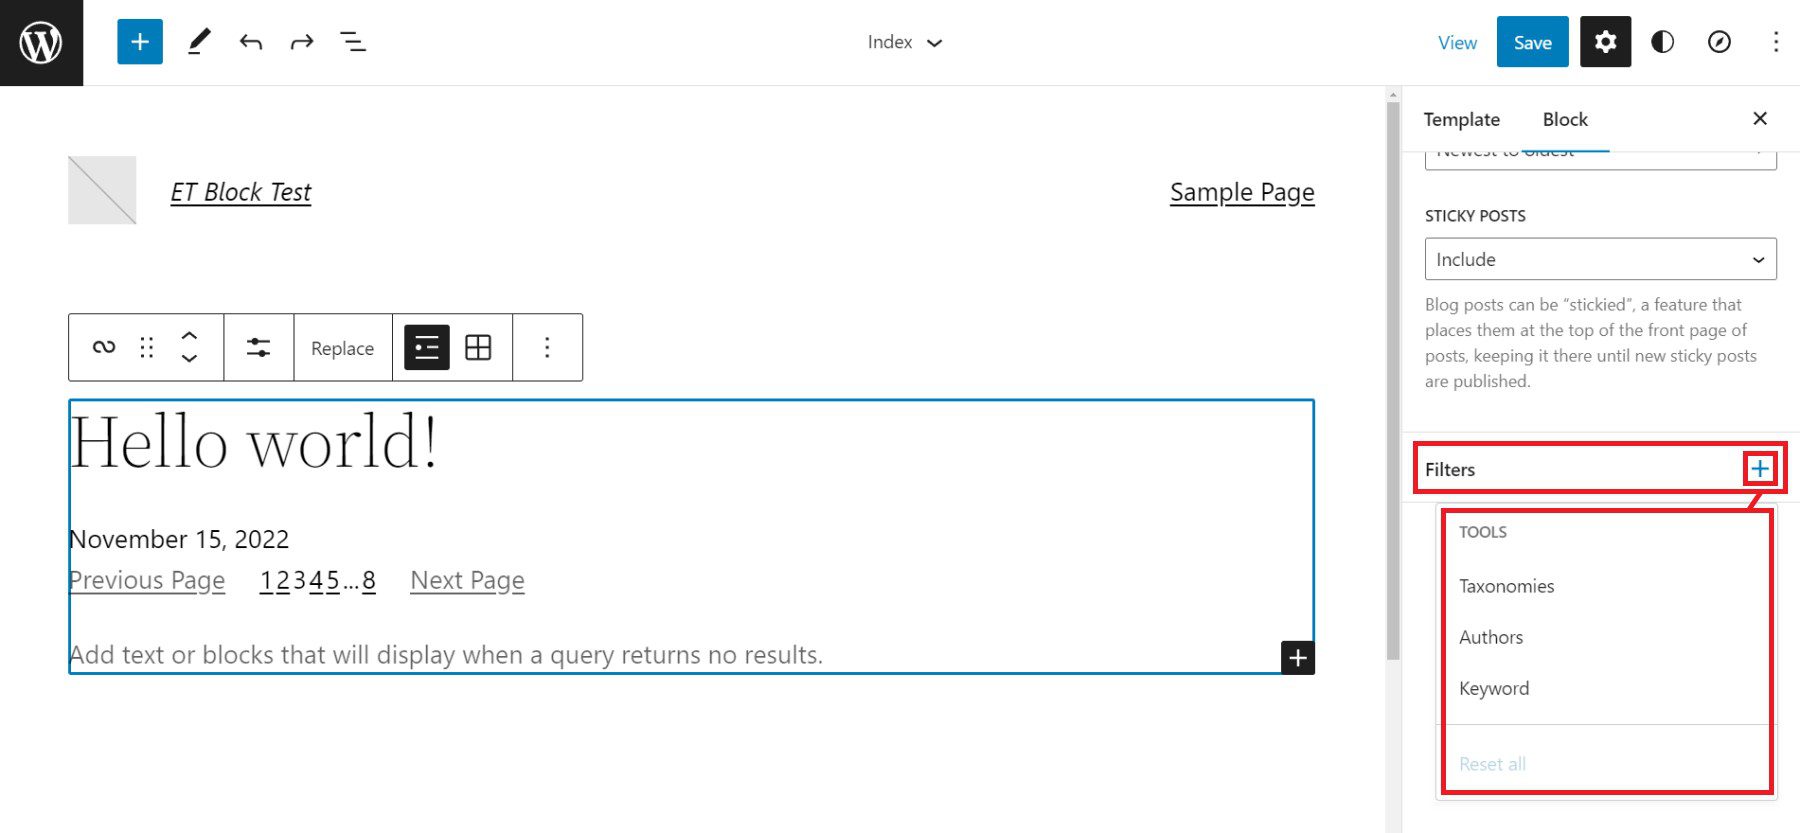
Next, with query “Filters” gives users the option to further customize the query by filtering posts by:
- Post Categories – Comma-separated list of categories
- Post Tag – Comma-separated list of tags
- Post Author – Dropdown list of authors
- Post Keyword – Enter a list of keywords to filter by
Color Options and Advanced Settings
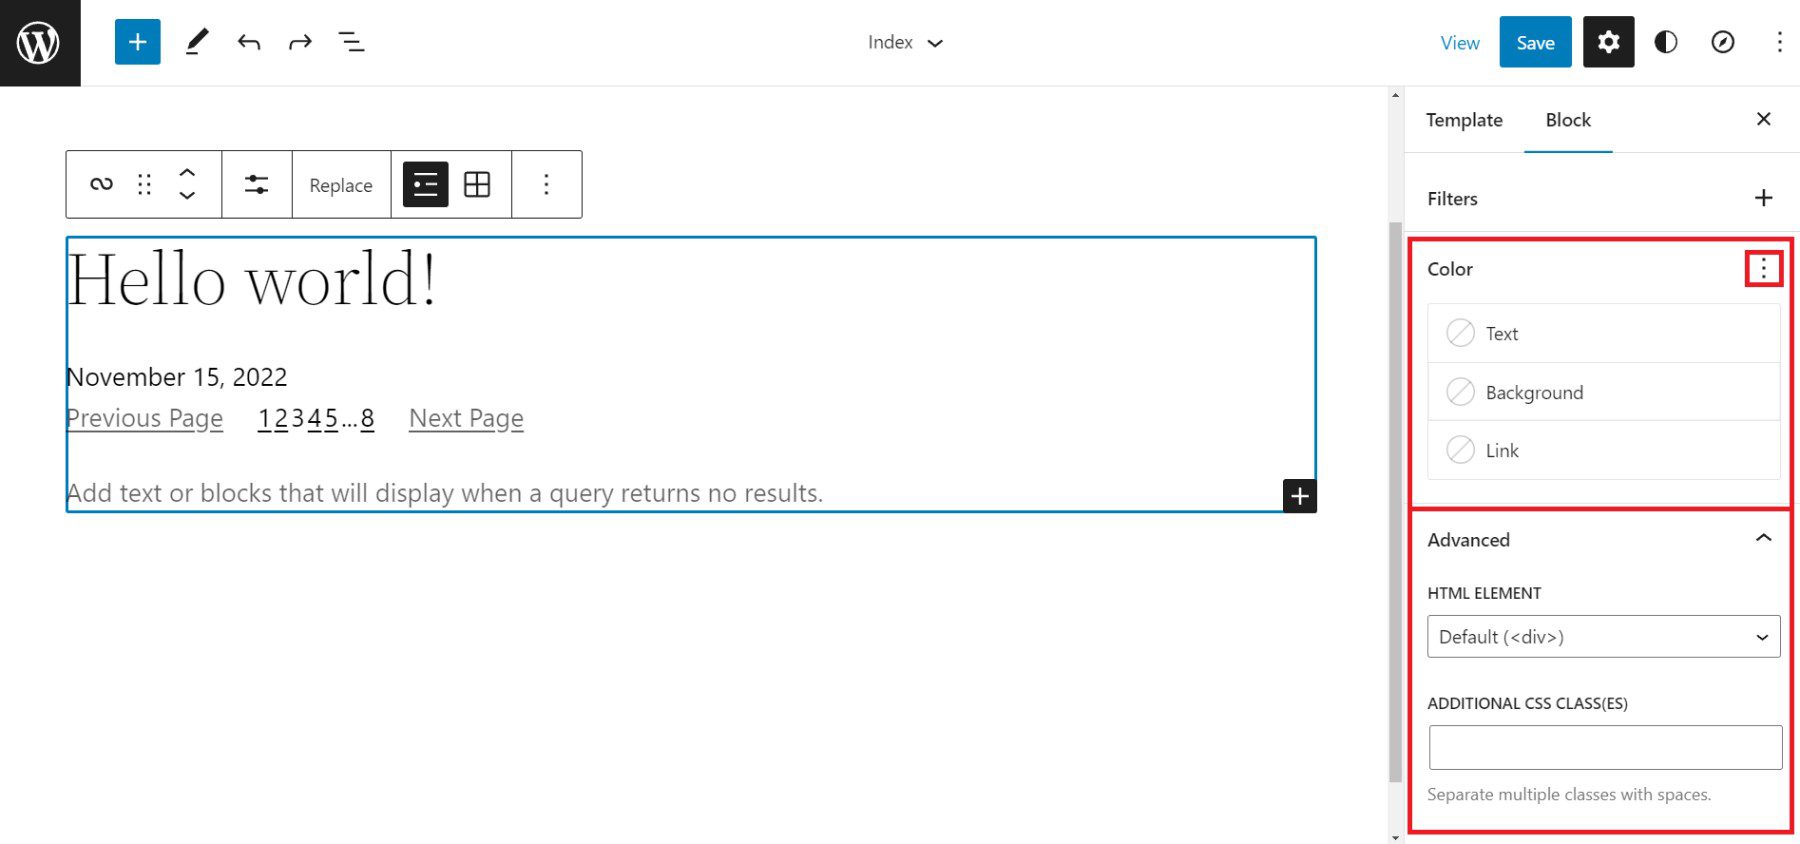
Lastly, we have Color settings and Advanced settings. The color options allow designers to choose colors for:
- Text Color
- Background Color
- Link Color
Advanced settings include the ability to add a CSS class to the WordPress Query Loop Block and/or assign an HTML element to the block.
Each nested block within the Query Loop Block has its own Toolbar options and sidebar Settings. Visit the list of nestable blocks above to learn more about each and the settings that they have.
Tips and Best Practices for Using the Query Loop Block in WordPress
Query Loops are powerful blocks. Follow these tips and best practices to get the most out of them.
Set Global Styles for Query Loops and Nested Blocks
Global Styles can be set on a block-type-by-block-type basis. This lets designers create global default styles that apply to all instances of a block throughout the website. This is a huge time saver.
Currently, on the 2022 Theme, the Query Loop Block allows you to add Global Styles for text color, background, and link colors. To get to the global styles editor, click on the “Global Styles” icon (half-filled in circle), select “Blocks”, and find the Query Loop Block.
You can also assign separate global styles to each of the nested theme blocks (like Post Template, Post Title, etc.) within a Query Loop as well.
Use Multiple Query Loop Blocks on a Single Page to Create a Featured Blog Section
In creating a Blog Page template, you may want to create a featured post that stands out because it is the most recent post published on your site. Below is a simple version of the concept.
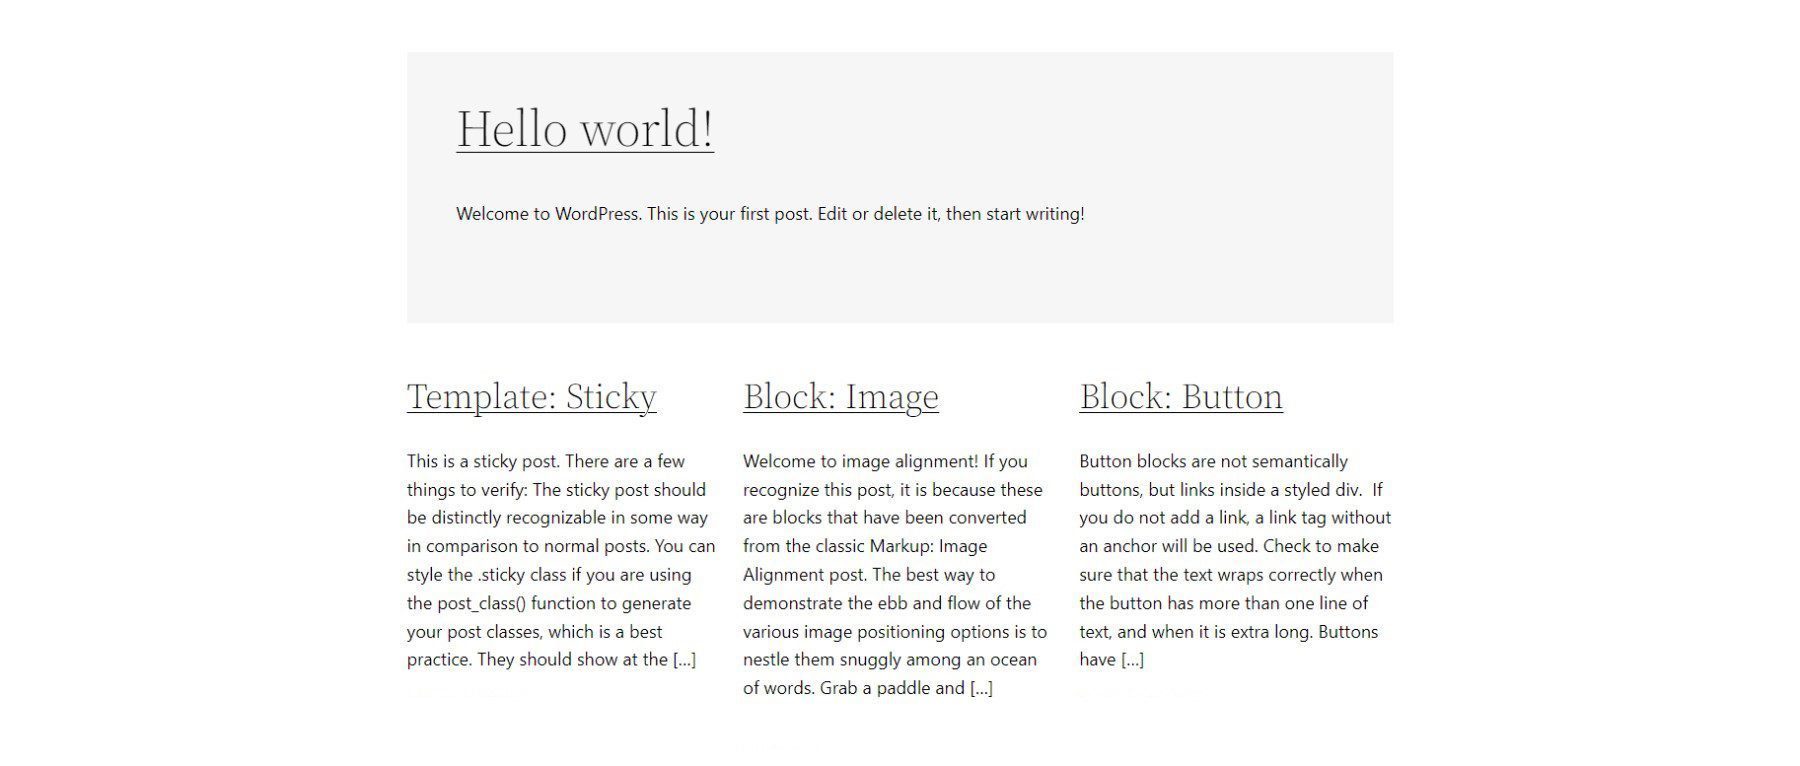
There will need to be two Query Loop Blocks on our “Index” template. The top Query Loop Block will have a “List View” display and will only show one single post. Make sure that it has no Pagination Block nested in this first Query Loop.
With the second/bottom Query Loop Block, set it to “Grid View”. It should display multiple posts in columns and set the “Offset” to 1. An offset of 1 will skip the first post of the query. This is desired since the query loop above contains the featured post.
Use Consistent Design for Query Loops Displaying the Same Post Types
Query Loops used for “blog articles” should look similar. If you use Query Loop Blocks for other post types, consider a slightly different style for those so your site visitors can differentiate what are “Blog Posts” and what are other types of content. This will make for a clear website UX.
Using Divi’s Blog Module: A Query Loop Block Alternative with More Design Options
If you use Divi, the Blog Module functions much like the native WordPress Query Loop Block. And adding Divi’s Blog Module to a page or template is simple, giving you all the options you need to customize the parameters, layout, and design of the dynamic post content.
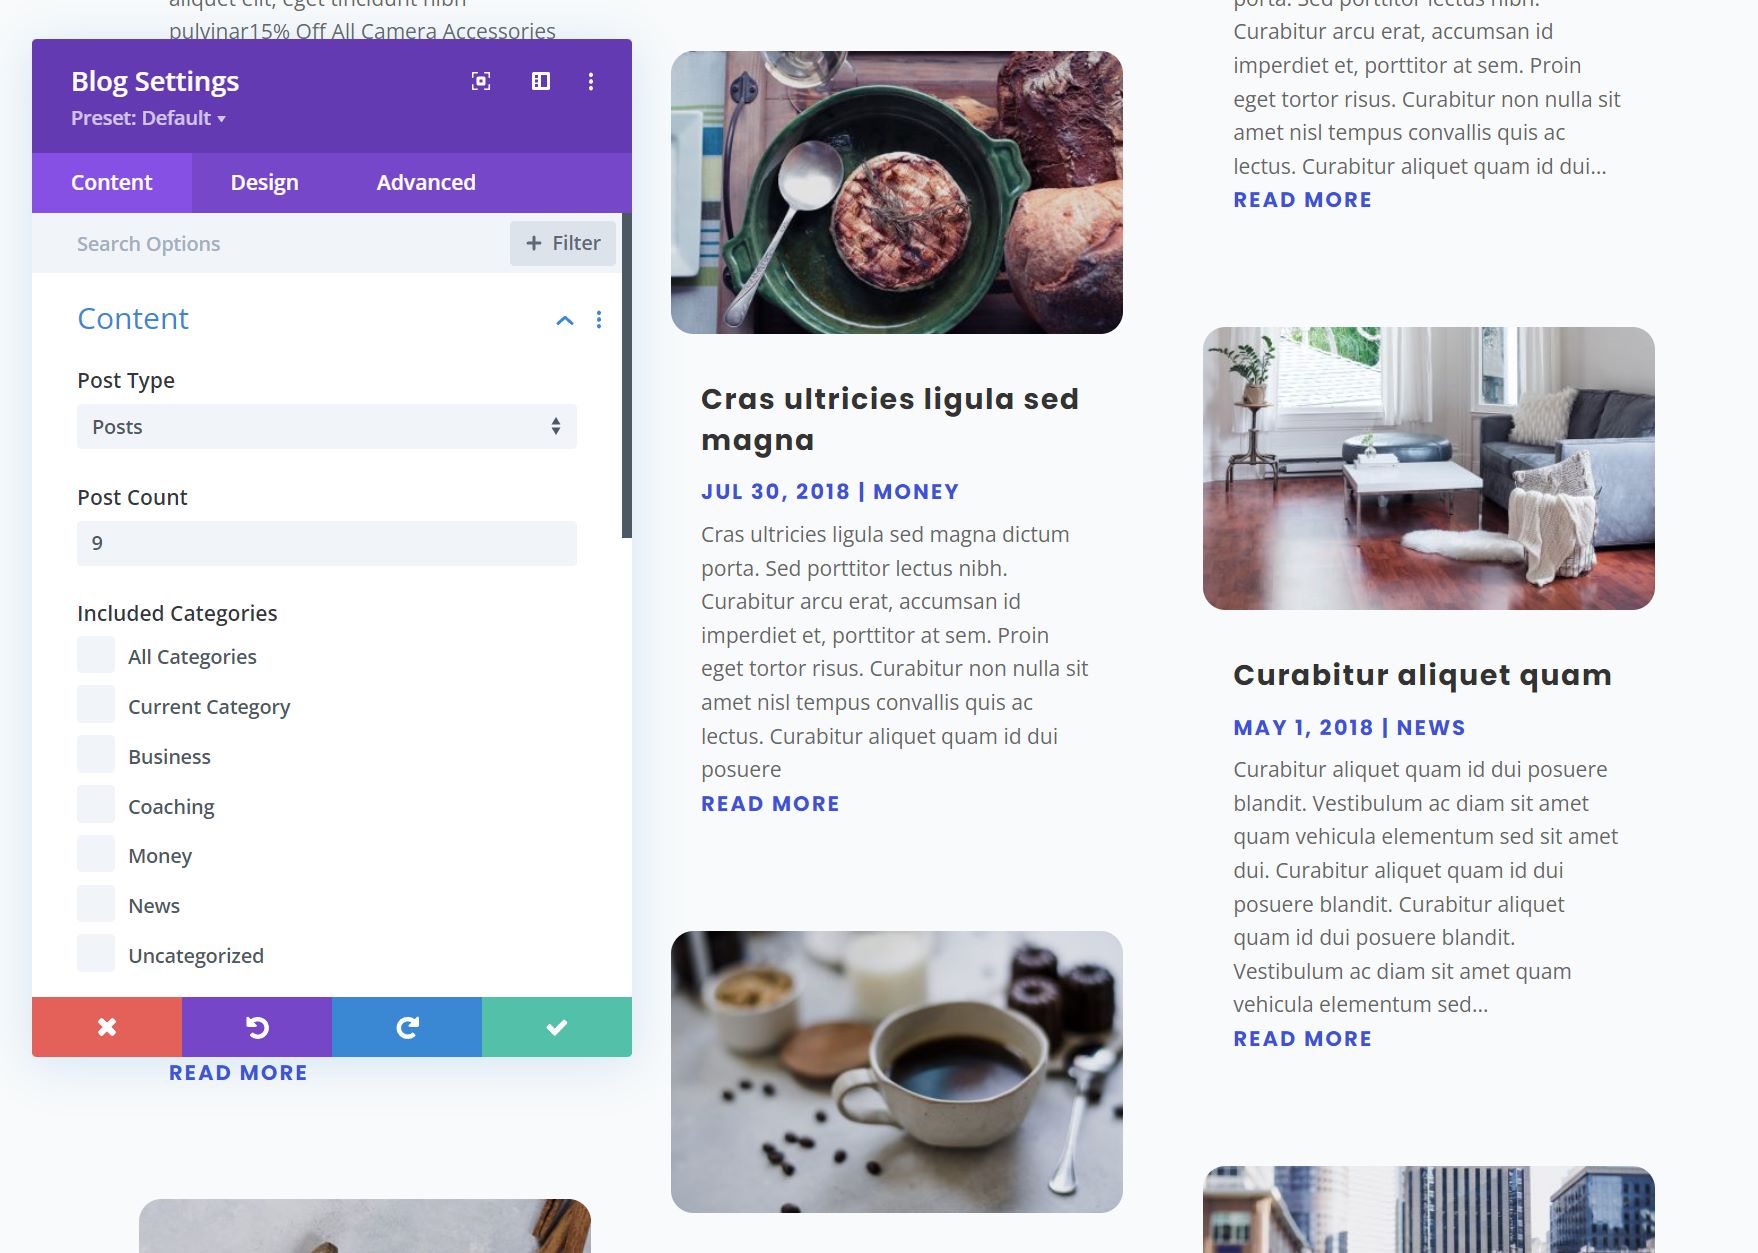
The content displayed within the Blog Module is completely flexible as well, allowing you to select a certain post type, post type categories, and the number of posts to include. Individual Module Elements can be added or removed such as featured images, titles, meta-text, body text, read more links, pagination, and so on.
Each of these Module Elements can be completely styled using Divi’s extensive design options. Learn more about using Divi’s Blog Module on Templates.
Frequently Asked Query Loop Questions
Answering some of the most asked questions about WordPress’ Query Loop Block.
What’s the Difference Between the Query Loop Block and the Latest Posts Block?
The Query Loop Block is similar to the Latest Posts Block in that it has the capability of displaying a list of the latest posts on your blog dynamically. However, the Query Loop Block is much more advanced, allowing you to build your “list” of posts, pages, or other post types from scratch by integrating other nested blocks. For example, if you have a custom post type for recipes, you can use the Query Loop Block to create an entire page of recipes customized to your liking.
Does the Query Loop Block Require Coding Knowledge?
No, the WordPress Query Loop block does not require coding knowledge because the functionality is already built-in. This block enables you to display a loop of posts on your WordPress site using customizable block settings on the front end.
Where Can I Use the Query Loop Block?
The WordPress Query Loop Block loops through published posts and pages to display them. It will automatically update as new pages/posts meet the query parameters. This makes this block useful in many places such as post or archive templates, or on static pages where you want to display things like recent posts dynamically.
Have you used the Query Loop Block on your WordPress site? What discoveries have you made? Let us know in the comments below.
Featured Image by Dmitry Kostrov / shutterstock.com
The post How to Use the WordPress Query Loop Block appeared first on Elegant Themes Blog.
