Some people (including me) appreciate a little heads up on the length of a blog post or, more importantly, how much time is it going to take to read. A great way to do this is to display an estimated reading time and/or word count at the top of your blog posts. You see this feature on popular blogs like medium.com. It doesn’t have to be intrusive or distract the user from engaging with the content. But it can add a nice UX boost for those who spend a lot of time devouring content on the web.
In this tutorial, we are going to show you a quick and easy way to add an estimated reading time and word count to your Divi blog posts. The readingTime.js library we are going to use is simple, lightweight, and easy to implement on your Divi site. Plus you can have more control over the style and placement of the reading time and word count placement. All this without having to rely on another plugin!
We’ll be adding the estimated reading time and word count to a blog post template using the Divi Theme Builder. So, once it is added to the template, the reading time and word count will display nicely on all your posts throughout your site.
Let’s get started.
Sneak Peek
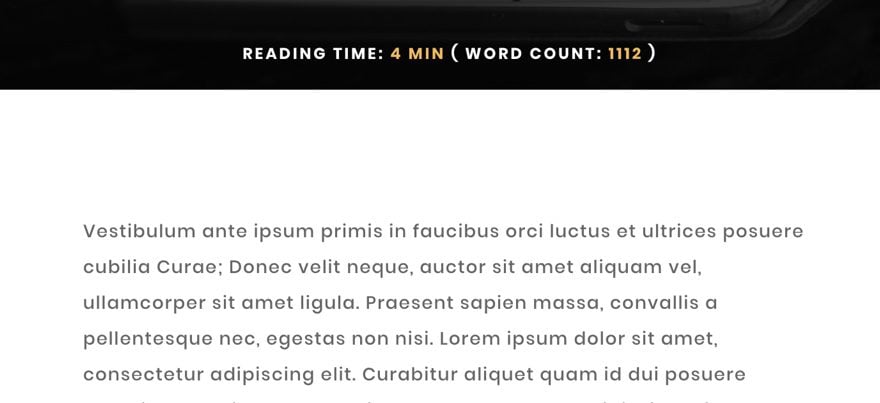
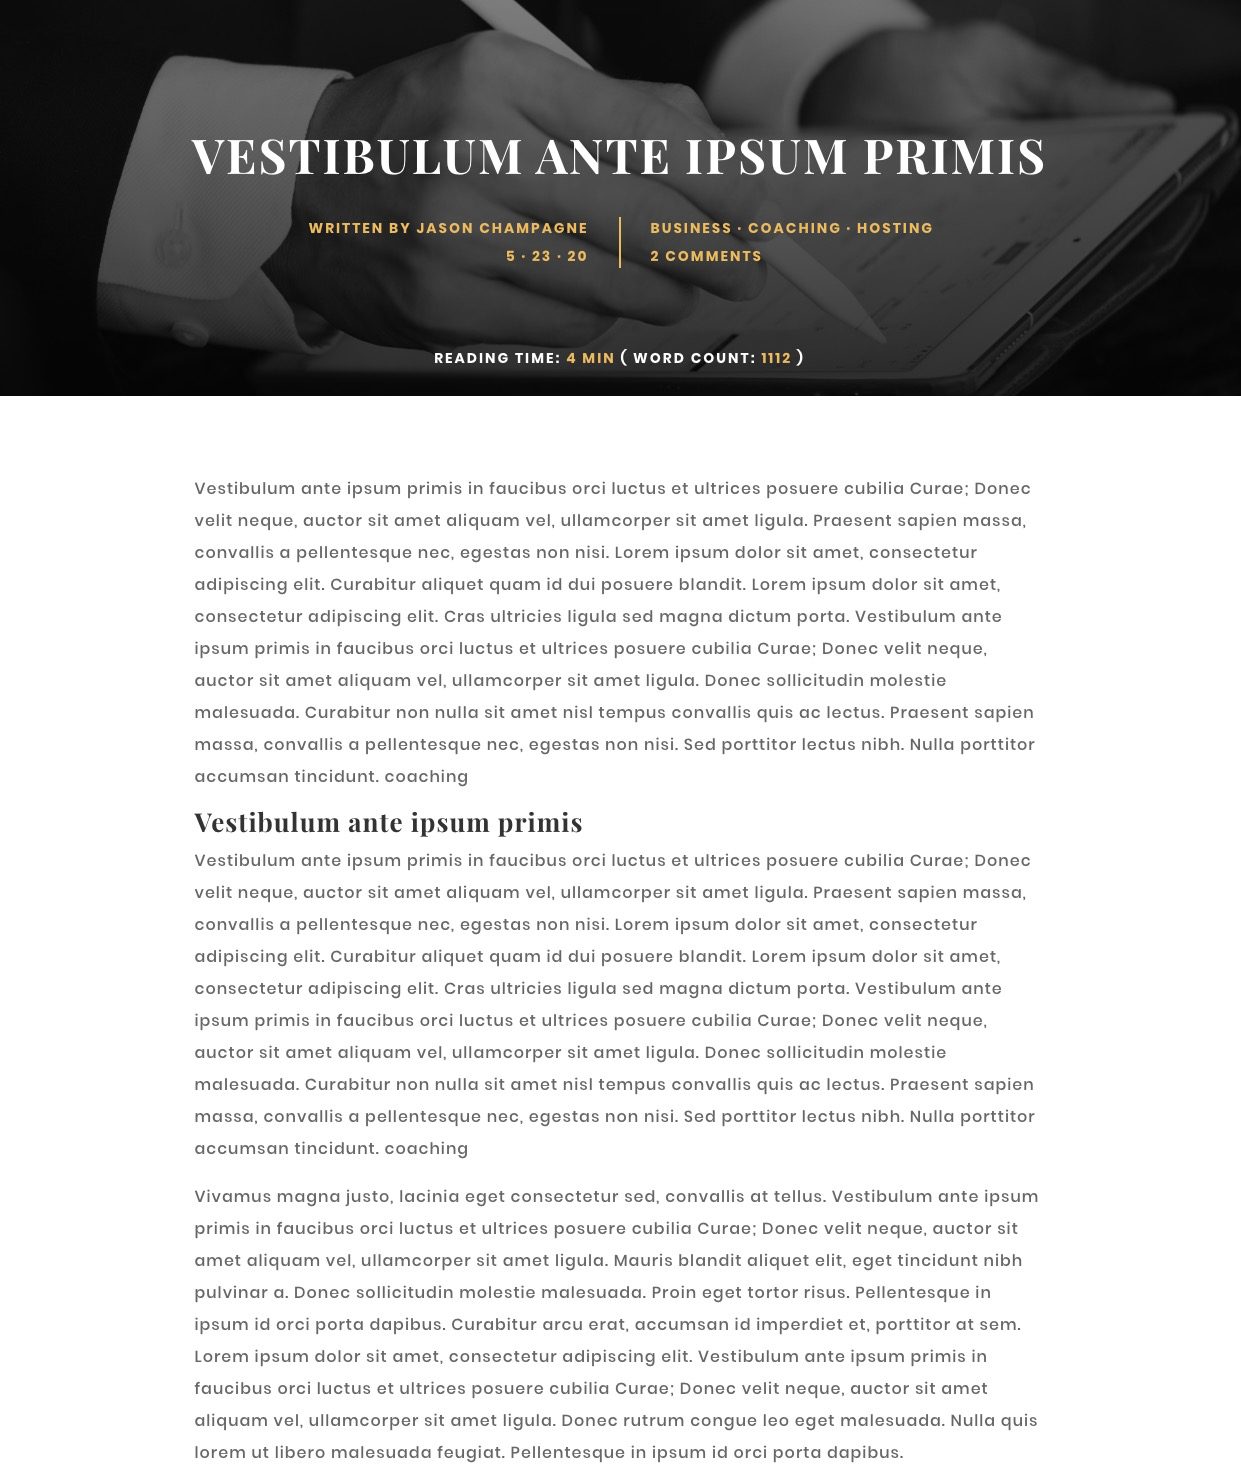
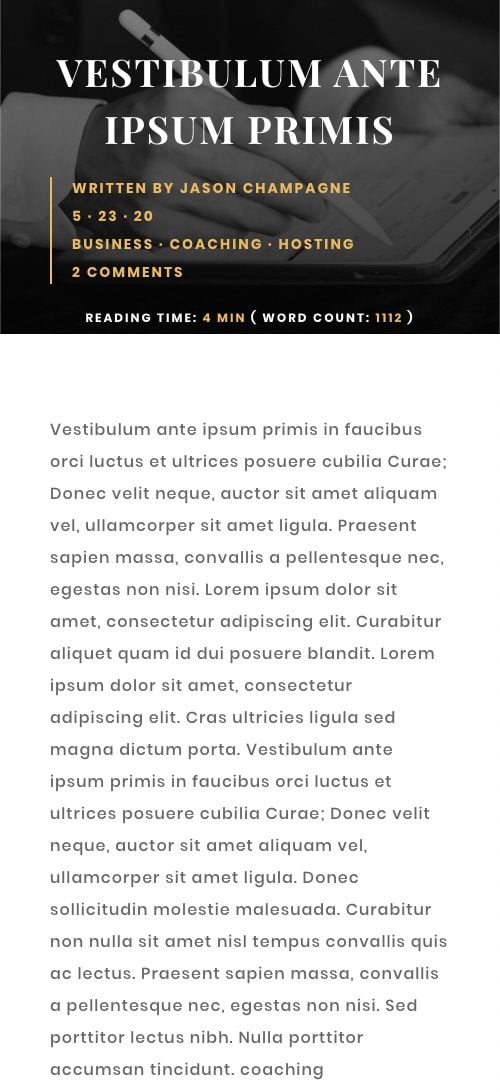
Here is a quick look at the reading time and word count we’ll be adding to a post template in Divi.
Download the Layout for FREE
To lay your hands on the designs from this tutorial, you will first need to download it using the button below. To gain access to the download you will need to subscribe to our Divi Daily email list by using the form below. As a new subscriber, you will receive even more Divi goodness and a free Divi Layout pack every Monday! If you’re already on the list, simply enter your email address below and click download. You will not be “resubscribed” or receive extra emails.
@media only screen and ( max-width: 767px ) {.et_bloom .et_bloom_optin_1 .carrot_edge.et_bloom_form_right .et_bloom_form_content:before, .et_bloom .et_bloom_optin_1 .carrot_edge.et_bloom_form_left .et_bloom_form_content:before { border-top-color: #ffffff !important; border-left-color: transparent !important; }
}.et_bloom .et_bloom_optin_1 .et_bloom_form_content button { background-color: #f92c8b !important; } .et_bloom .et_bloom_optin_1 .et_bloom_form_content .et_bloom_fields i { color: #f92c8b !important; } .et_bloom .et_bloom_optin_1 .et_bloom_form_content .et_bloom_custom_field_radio i:before { background: #f92c8b !important; } .et_bloom .et_bloom_optin_1 .et_bloom_border_solid { border-color: #f7f9fb !important } .et_bloom .et_bloom_optin_1 .et_bloom_form_content button { background-color: #f92c8b !important; } .et_bloom .et_bloom_optin_1 .et_bloom_form_container h2, .et_bloom .et_bloom_optin_1 .et_bloom_form_container h2 span, .et_bloom .et_bloom_optin_1 .et_bloom_form_container h2 strong { font-family: “Open Sans”, Helvetica, Arial, Lucida, sans-serif; }.et_bloom .et_bloom_optin_1 .et_bloom_form_container p, .et_bloom .et_bloom_optin_1 .et_bloom_form_container p span, .et_bloom .et_bloom_optin_1 .et_bloom_form_container p strong, .et_bloom .et_bloom_optin_1 .et_bloom_form_container form input, .et_bloom .et_bloom_optin_1 .et_bloom_form_container form button span { font-family: “Open Sans”, Helvetica, Arial, Lucida, sans-serif; } p.et_bloom_popup_input { padding-bottom: 0 !important;}

Download For Free
Join the Divi Newsletter and we will email you a copy of the ultimate Divi Landing Page Layout Pack, plus tons of other amazing and free Divi resources, tips and tricks. Follow along and you will be a Divi master in no time. If you are already subscribed simply type in your email address below and click download to access the layout pack.
You have successfully subscribed. Please check your email address to confirm your subscription and get access to free weekly Divi layout packs!
How to Upload The Template
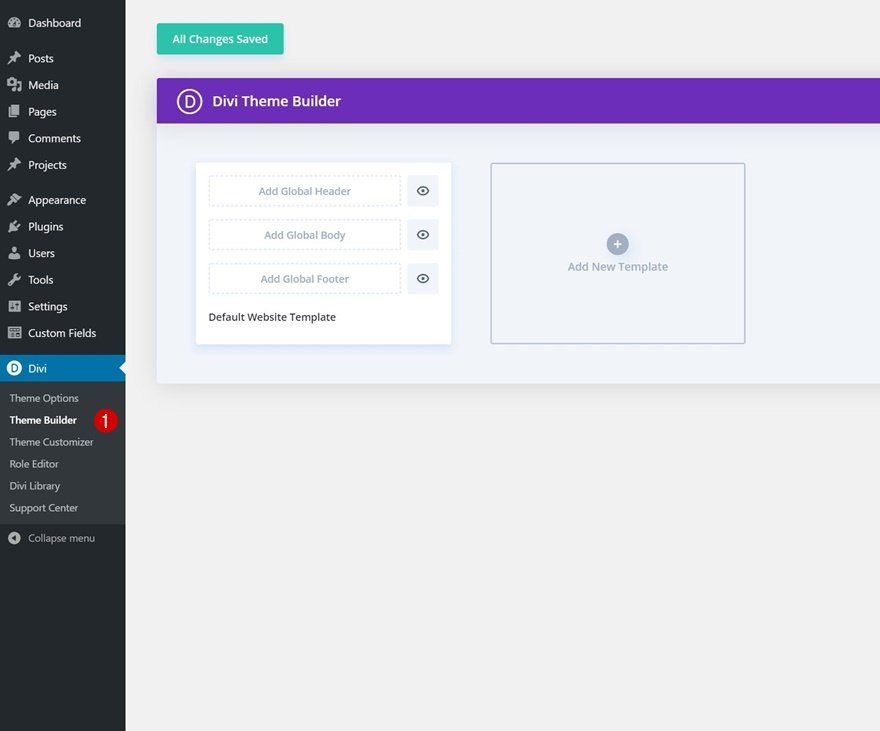
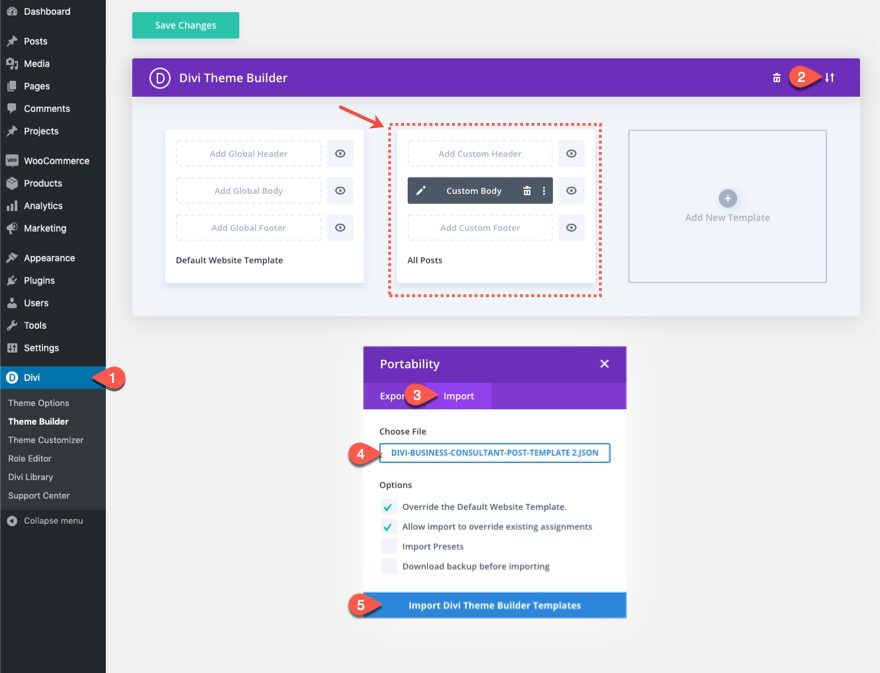
Go to Divi Theme Builder
To upload the template, navigate to the Divi Theme Builder in the backend of your WordPress website.
Upload Website Template
Then, in the top right corner, you’ll see an icon with two arrows. Click on the icon.

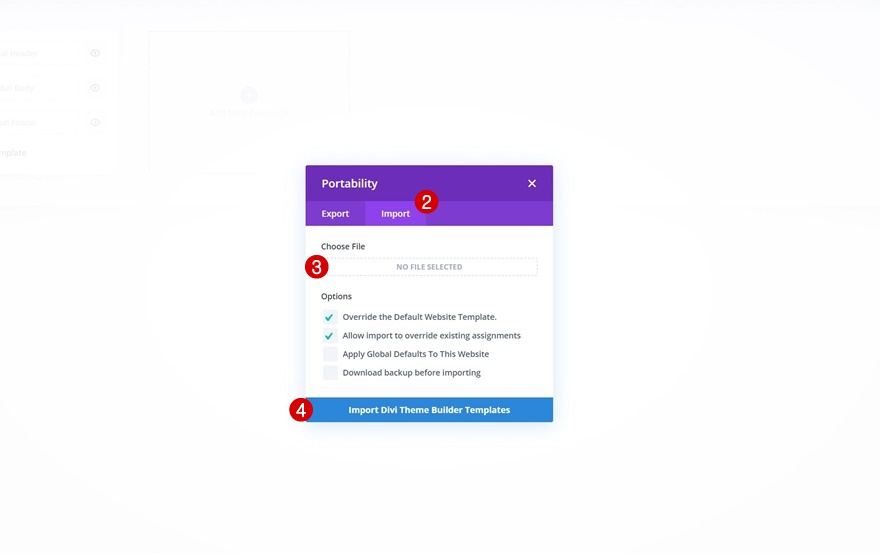
Navigate to the import tab, upload the JSON file which you were able to download in this post, and click on ‘Import Divi Theme Builder Templates’.
Save Divi Theme Builder Changes
Once you’ve uploaded the file, you’ll notice a new template with a new body area that has been assigned to All Posts. Save the Divi Theme Builder changes as soon as you want the template to be activated.

Let’s get to the tutorial so we can learn to build this thing from scratch, shall we?
How to Display Post Estimated Reading Time and Word Count in Divi
What You Need to Get Started
To get started, you will need to do the following:
- Navigate to the Divi Theme Builder
- Click the portability icon at the top right of the page.
- Select the Import tab in the Portability popup.
- Choose/Import the Divi Business Consultant Post Template File (download here).
- Click the Import Button
After that, you will have a post template ready to edit.
Adding the Text/HTML to the Post Template
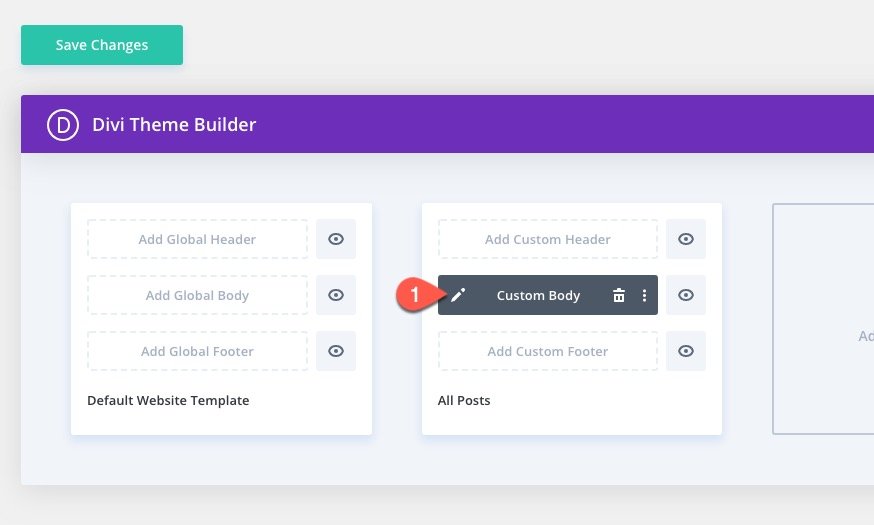
To edit the post template, click the edit icon on the custom body area.
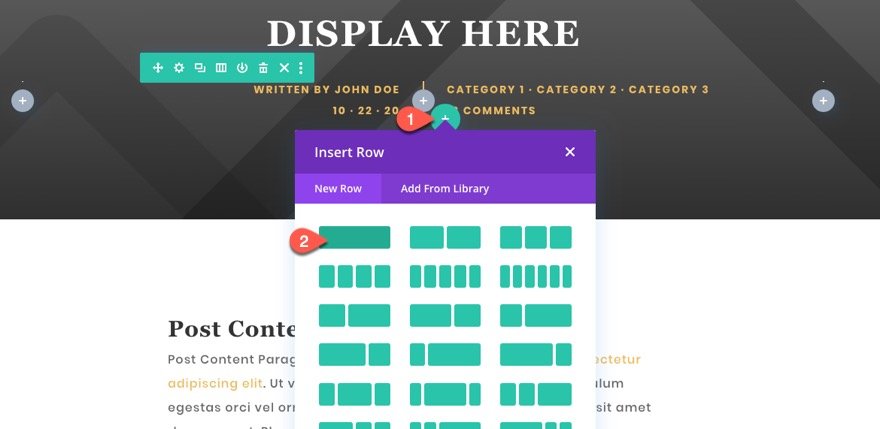
In the post layout editor, add a new one-column row under the row containing the post meta data in the top section of the layout.
Once done, add a text module to the new row.
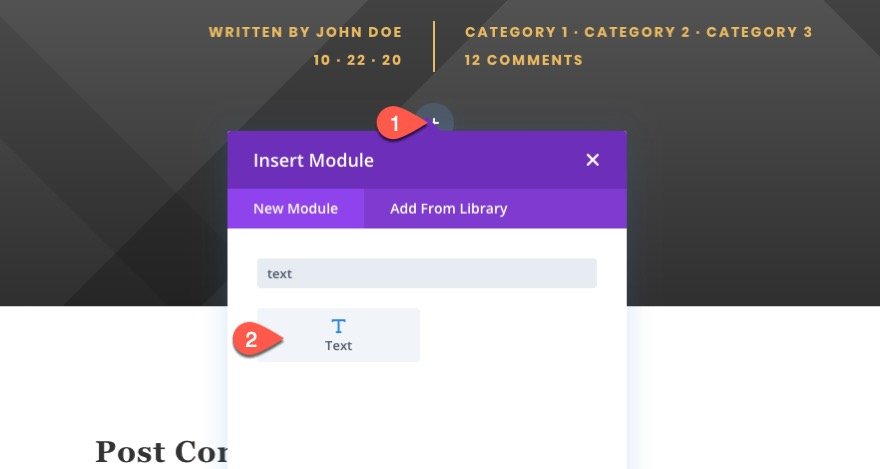
In the text module settings, paste the following HTML inside the body (using the text tab):
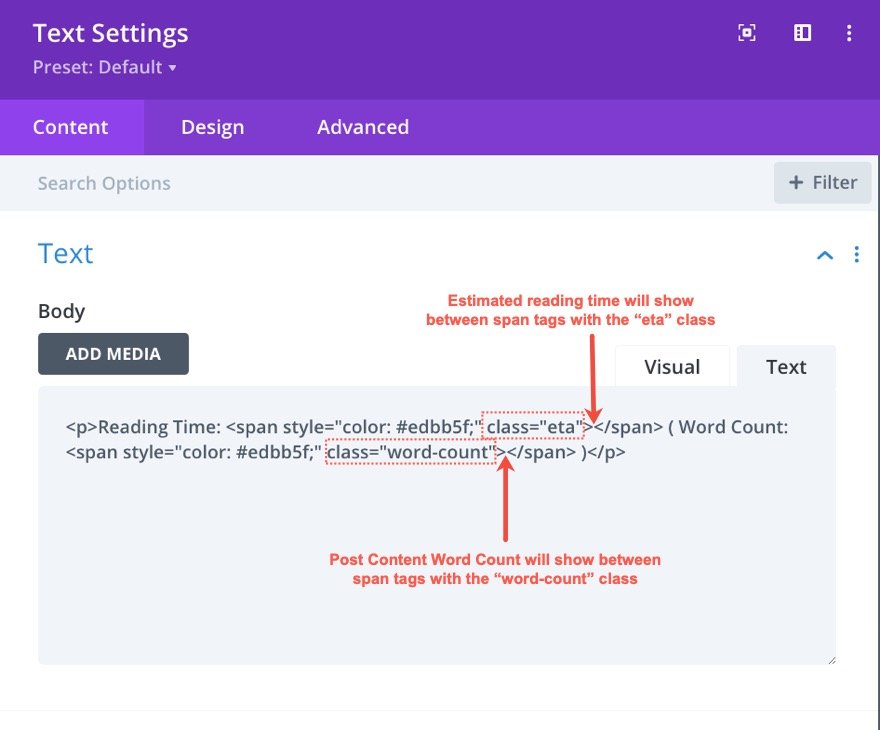
Reading Time: ( Word Count: )
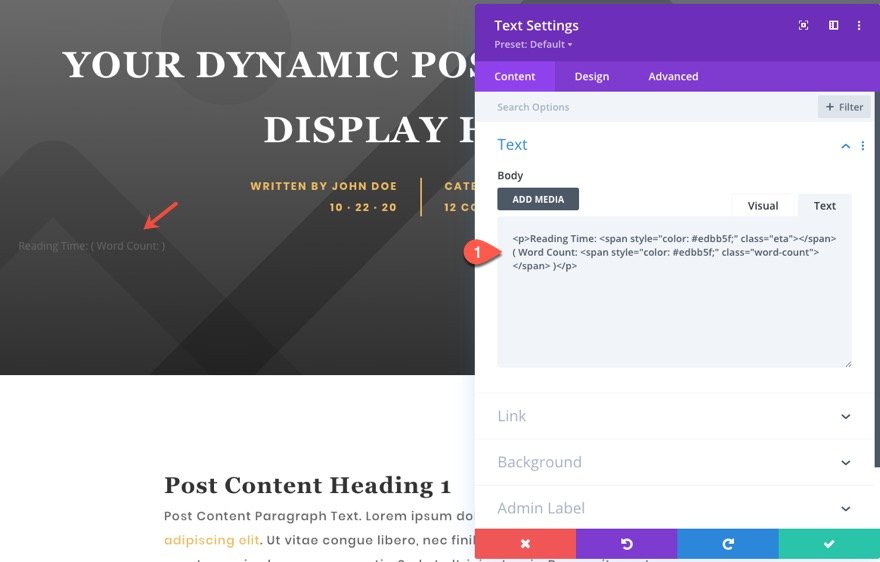
The important thing to remember is that the span tag with the class “eta” will eventually display the estimated reading time of the post content. And the span tag with the class “word-count” will display the word count of the post content.
Styling the Reading Time Text
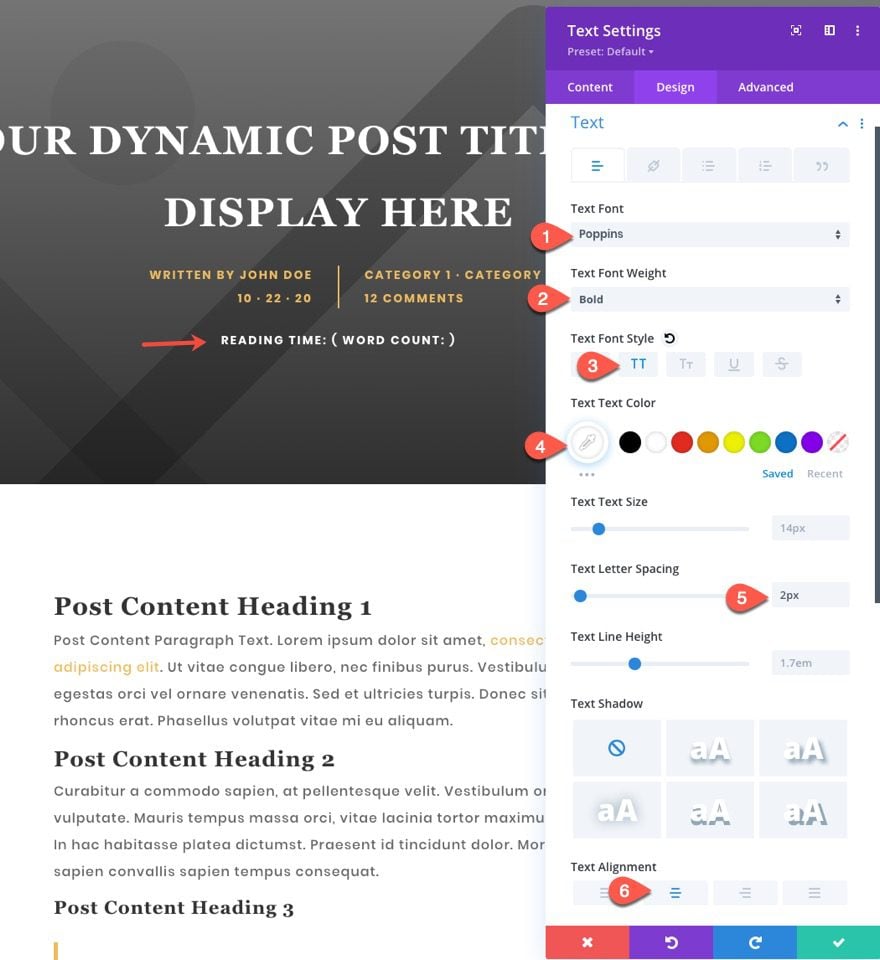
Under the design tab, update the text styles as follows:
- Text Font: Poppins
- Text Font Weight: Bold
- Text Font Style: TT
- Text Text Color: #ffffff
- Text Text Size: 14px (desktop), 12px (phone)
- Text Letter Spacing: 2px
- Text Alignment: center
Styling the Row
Once the text settings are complete, open the settings for the row and update the following:
- Gutter Width: 1
- Width: 100%
- Max Width: 100%
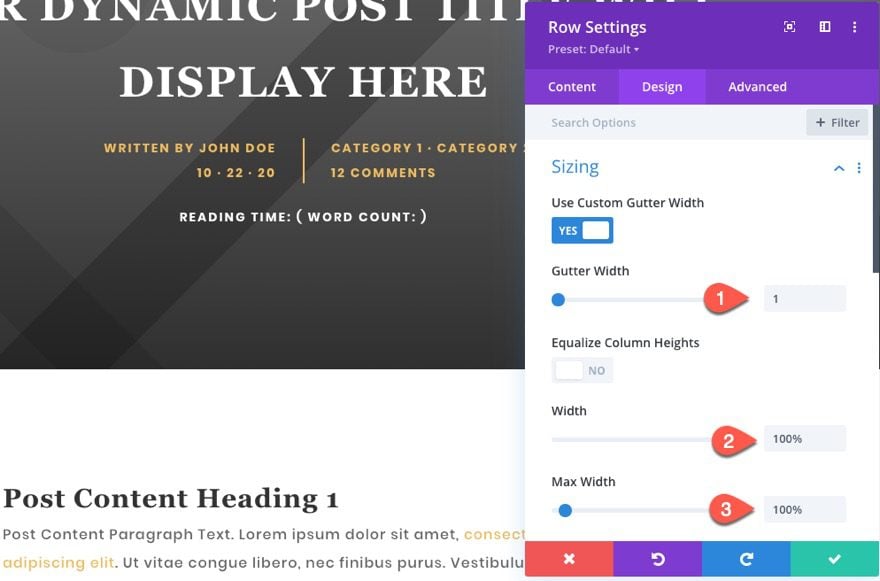
In the Advanced Tab, update the position:
- Position: Absolute
- Location: bottom left
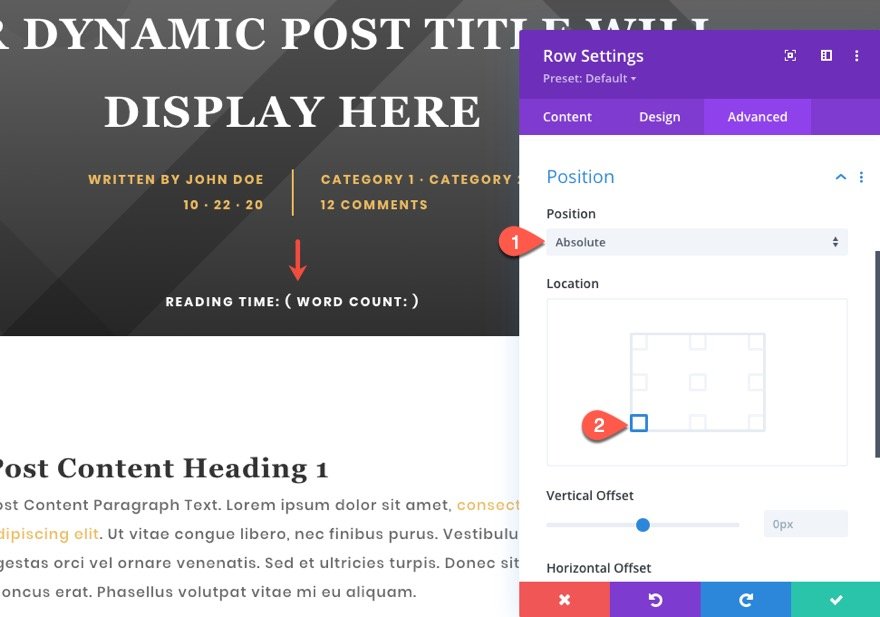
Adding the Code
To add the necessary code to generate the estimated reading time and word count, first, add a code module under the text module.
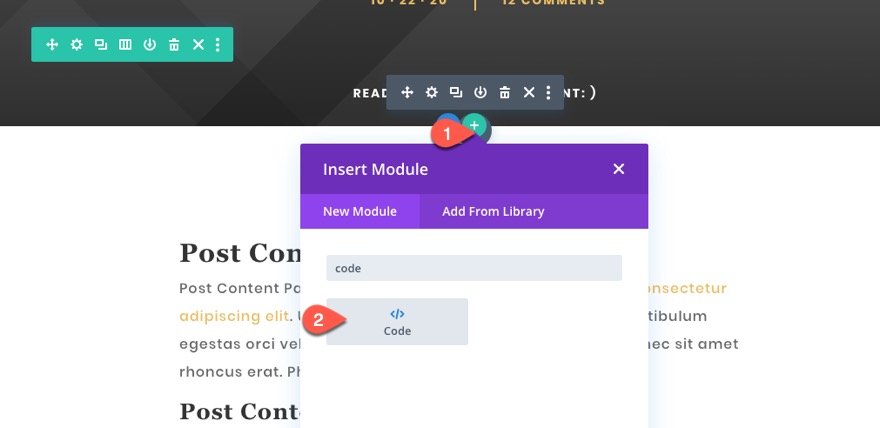
We are going to use the readingtime.js library with some custom code to target our post content area, reading time target class eta, and word count target class word-count.
Paste the following code in the code block making sure to wrap the code in the script tags:
(function($) {
$(document).ready(function(){
$('.et_pb_post_content').readingTime({
readingTimeTarget: $('.eta'),
wordCountTarget: $('.word-count'),
wordsPerMinute: 275,
lang: 'en',
});
});
})( jQuery );
About the Code
The target class et_pb_post_content is what is used to designate the post content area in Divi that holds the post content so the code knows the text it needs to count and estimate reading time. For example, if you used body as the target, the code would calculate all content/text on the entire page, not just the content of the article.
The readingTimeTarget is assigned to the class eta which corresponds to the class we added to the span tag in the text module. And the wordCountTarget is assigned to the word-count class we add to the other span tag in the text module.
Also, feel free to update the words per minute value (currently 275) to represent what you think it should be. This will of course affect the reading time displayed. From what I’ve researched, the average adult reads about 300 words per minute. Plus you can always update the language value as well. For example, you can replace ‘en’ for ‘fr’ if you want the text displayed in French). For more info you can check out the documentation on github.
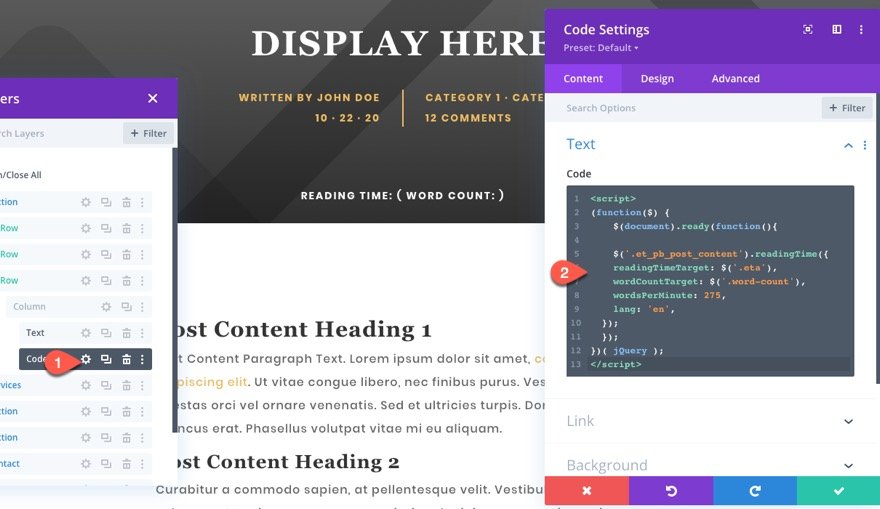
Save the Template layout and Theme Builder.
Then, navigate to Divi > Theme Options > Integrations.
Then add the library to the header area with the script tags:
src="https://cdnjs.cloudflare.com/ajax/libs/reading-time/2.0.0/readingTime.min.js
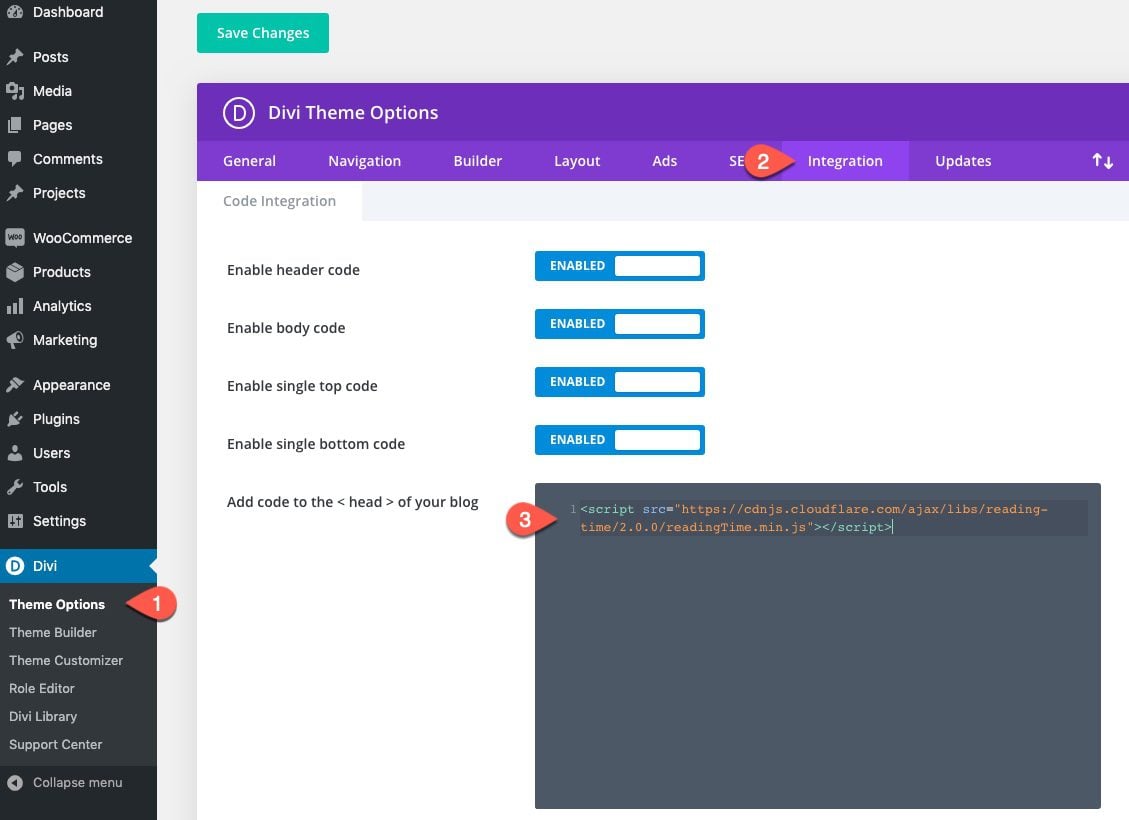
It should look like this…

Final Result
Now all you need to do is visit a live blog post on your site to see the estimated reading time and word count at the top of the post content.


Final Thoughts
Adding a post estimated reading time and word count to your Divi blog posts is surprisingly easy. Plus you can choose where you want the element displayed on your post template and style it using the built-in Divi design settings. Hopefully, this will come in handy!
I look forward to hearing from you in the comments.
Cheers!
.inline-code{padding: 0px 4px; color: crimson; font-family: Monaco,consolas,bitstream vera sans mono,courier new,Courier,monospace!important} video.with-border {border-radius: 8px;box-shadow: 0 8px 60px 0 rgba(103,151,255,.11), 0 12px 90px 0 rgba(103,151,255,.11);display:block;margin: 0 auto;}
The post How to Display Post Estimated Reading Time and Word Count in Divi (with ReadingTime.js) appeared first on Elegant Themes Blog.

