When you’re browsing the internet, you may occasionally come across an HTTP status code, such as “HTTP 304 not modified.” This typically prevents you from accessing the site you’re trying to use, which can be frustrating. Fortunately, there are some simple steps you can take to resolve it.
In this post, we’ll explain what the HTTP 304 not modified status code is, and explore some of its common causes. Then we’ll walk you through five potential solutions you can use to fix it.
Let’s get started!
An Introduction to the HTTP 304 Not Modified Status Code
There are a handful of different HTTP error codes you may come across online. Some of the most common are 301 and 302 redirects, as well as the infamous 404 Error. Another problem you might encounter from time to time is HTTP 304, also referred to as the “304 not modified” status code.
Technically, HTTP 304 is a redirect rather than an actual error. However, it can prevent you and other visitors from accessing a web page.
Status codes are sent every time you visit a website from your browser. However, that usually happens in the background. If you actually see the status code, it means that something went wrong.
Typically, if you’re seeing this status code, it means that your browser and the website are having trouble communicating. More specifically, it indicates that information wasn’t properly sent from your browser to the site’s server, which is preventing you from seeing the web page you’re trying to access.
The reason this code is referred to as “not modified” is that the site you’re trying to reach hasn’t been changed since you last visited it. Browser caching stores data from web pages on your local device, so you don’t have to repeatedly download the same information.
If your browser receives an HTTP 304 not modified code, it will attempt to display the saved or cached version of the URL instead. Unfortunately, this may occasionally prevent you (or other users) from seeing the page entirely, because the information is outdated.
Common Causes of HTTP 304 Not Modified
Before we begin troubleshooting this issue, it may help to understand some of the reasons it may be happening. There are a few common causes of HTTP 304 that are worth knowing about.
One possibility is that you have malware or a virus on your computer, which is disrupting your browser and more specifically its caching mechanisms. Another potential reason is that your browser currently contains corrupted files, preventing it from successfully saving and updating data.
A third common cause is an issue with a third-party application or software. For example, you might have installed a tool or browser extension that is now causing issues with your browsing experience.
How to Fix the HTTP 304 Not Modified Status Code (5 Methods)
Now that you understand a bit more about what this status code is, let’s take a look at how to fix it. Below are five potential solutions for resolving HTTP 304 not modified.
1. Clear Your Browser Cache
As we mentioned earlier, a disrupted cache is a common cause of HTTP 304. Therefore, the first and simplest step you can take to resolve this issue is to clear your browser cache.
If you’re using Google Chrome, you can do this by navigating to the menu icon in a new tab (the three vertical dots in the top right-hand corner). Then navigate to More tools > Clear browsing data:
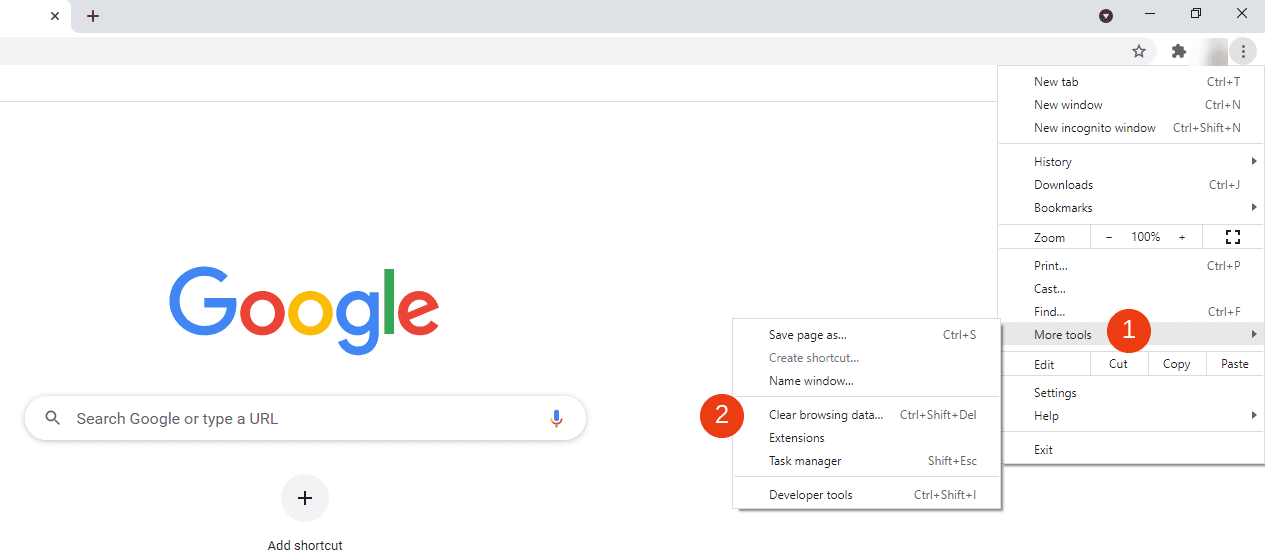
In the window that opens next, confirm that All time is the selected option for the Time range drop-down menu. Next, make sure that all three options (Browsing history, Cookies and other site data, and Cached images and files) are selected:
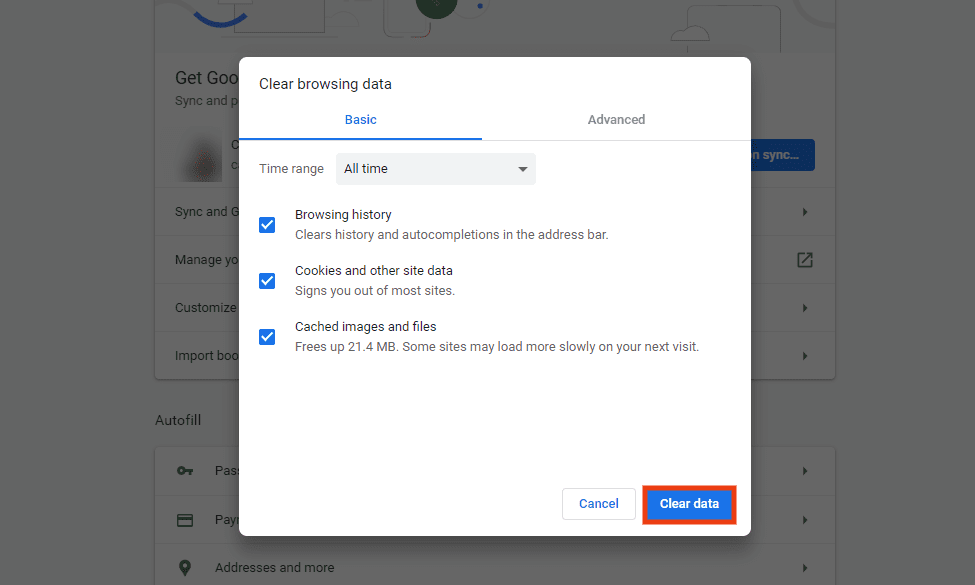
After that, click on the Clear data button. When you’re done, refresh your browser and try accessing the website again.
If you’re using a browser other than Chrome, the steps for clearing your cache will be slightly different. You can check out our guide to clearing your browser cache for step-by-step instructions.
2. Temporarily Disable Your Browser Extensions
It’s possible that a third-party tool or browser extension is to blame for the HTTP 304 status code. Therefore, you might want to try temporarily disabling these tools to see if you can pinpoint any that are interrupting your connection.
To do so, you can navigate to a new browser tab, click on the menu icon, and then browse to Settings > Extensions:
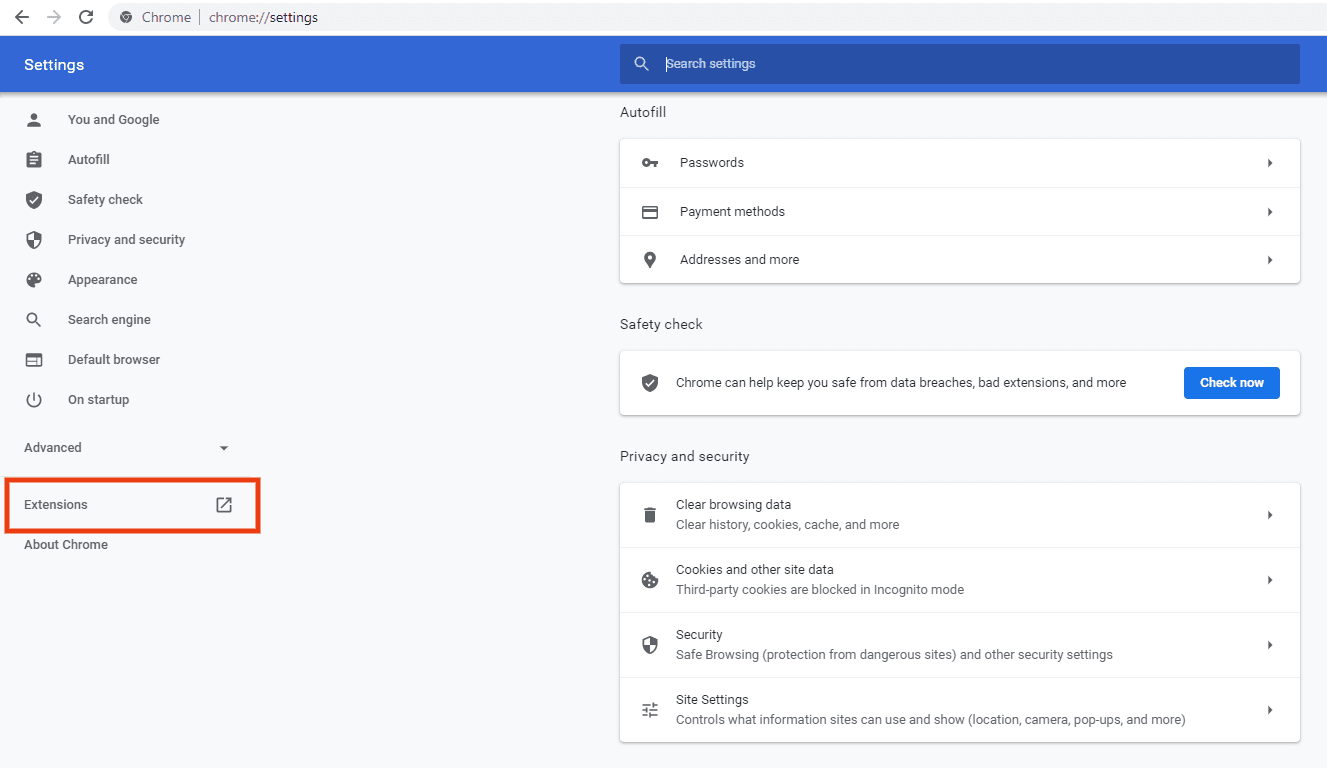
On the Extensions page, you can toggle the switch to temporarily disable an app, or click on the Remove button to delete it completely:

We recommend toggling each extension off one by one, checking the site after each to see if it’s now accessible. If turning one of these tools off resolves the HTTP 304 issue, you’ll want to delete the add-on entirely (as it’s likely infected) and find a replacement if necessary.
3. Conduct a Malware Scan
Another problem that may be causing the HTTP 304 code is that you’re using an outdated version of Chrome. Alternatively, there may be malware or problematic software corrupting your browser. This is why we recommend running a malware scan on your site and using Chrome’s built-in cleanup tool.
First, it’s best to ensure that you’re using the latest version of Chrome (and update it if you’re not). To do so, you can navigate to the settings menu, and then click on Help > About Google Chrome:
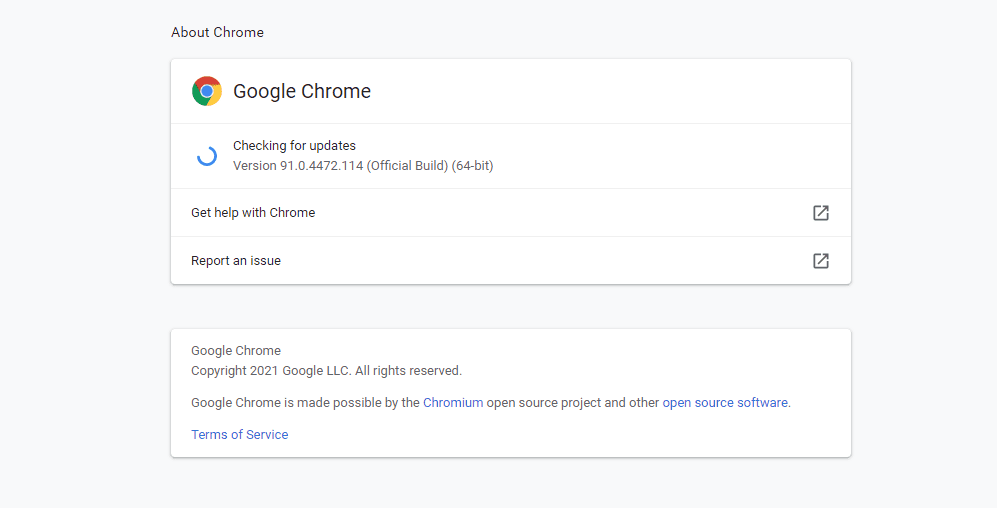
The browser will begin checking to see whether there’s an update available. If there is, you can hit Restart to update Chrome.
Next, you can enter “chrome://settings/cleanup” into your browser’s search bar, and then press the Enter key:
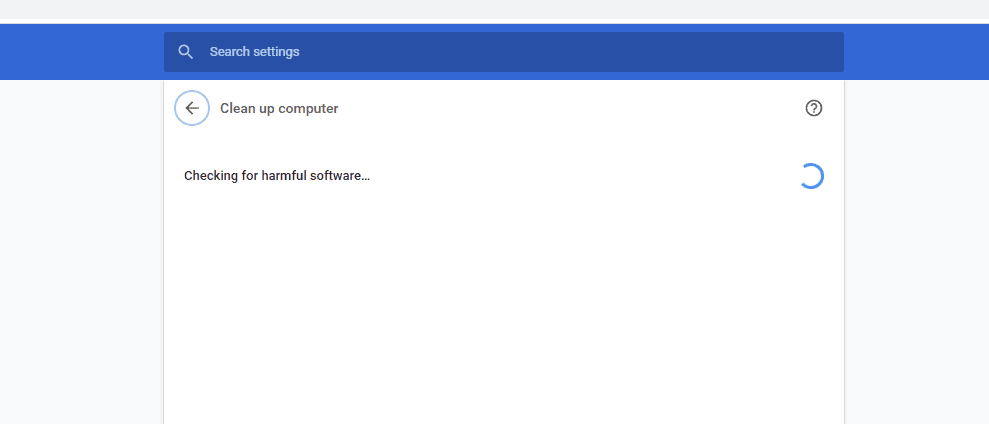
Your browser will begin checking for any harmful software. If any is present, you can disable or delete it entirely, and then check to see if the HTTP 304 error persists.
Finally, you might also want to try running any malware scanner you have installed on your computer. This is something we recommend regardless of your Operating System (OS). However, it’s especially important if you’re using Firefox, Safari, or another browser other than Chrome that doesn’t come with a built-in cleanup tool.
4. Reset Your DNS and TCP/IP Settings
If you’re still encountering the HTTP 304 status code, the next step you can try is to flush your DNS. To do so, you can enter “chrome://net-internals/#dns” into your browser’s search bar, and then hit the Enter key:

Next, click on the Clear host cache button, located under the DNS tab. Once you’re done, try restarting your browser to re-access the URL.
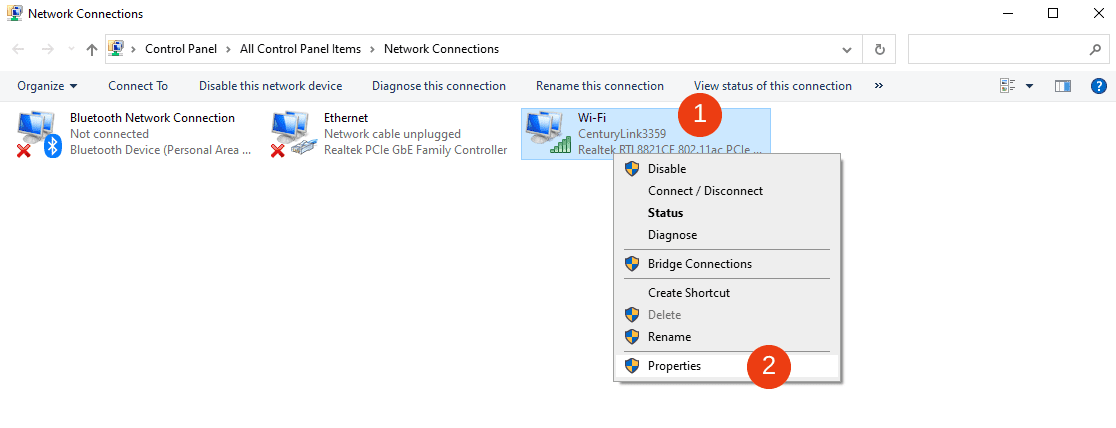
If this doesn’t work, you can also try switching to the Google Public DNS. You can do so by typing “ncpa.cpl” into the Windows search bar, and then clicking on the OK button.
In the Network Connections window that opens, right-click on your current network connection and select Properties:
Next, double-click on Internet Protocol Version 4. In the window that opens, click on the option that says “Use the following DNS server address”:
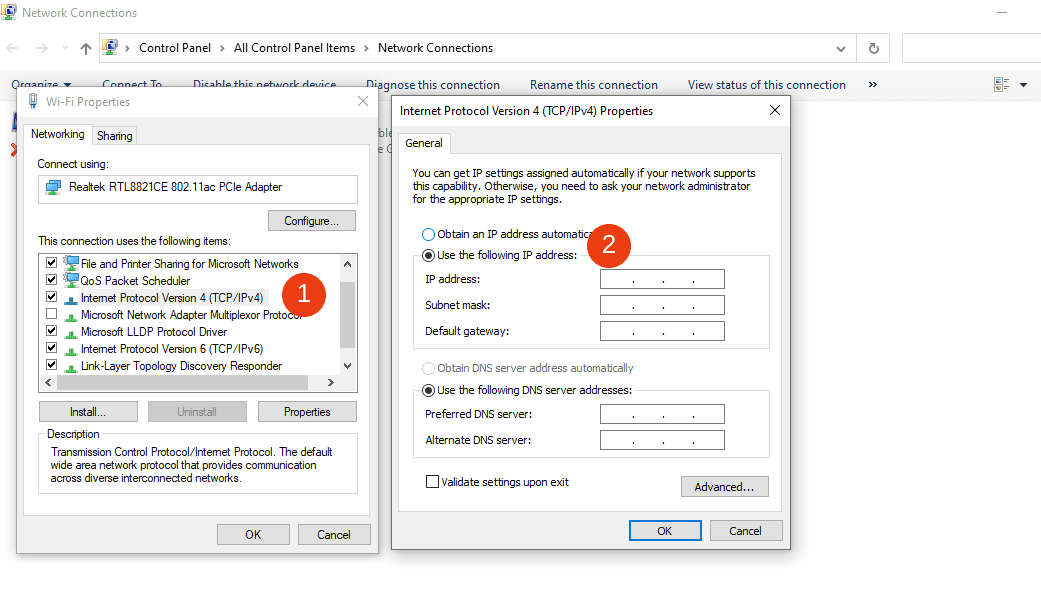
Next to the Preferred value field, enter “8.8.8.8”. Next, enter “8.8.4.4” into the Alternative field. Once you’re done, click on OK. After you restart your computer, try accessing the site again.
If you’re using macOS, you can change your DNS settings by navigating to Apple > System > Preferences > Network. Next, click on Advanced > DNS:
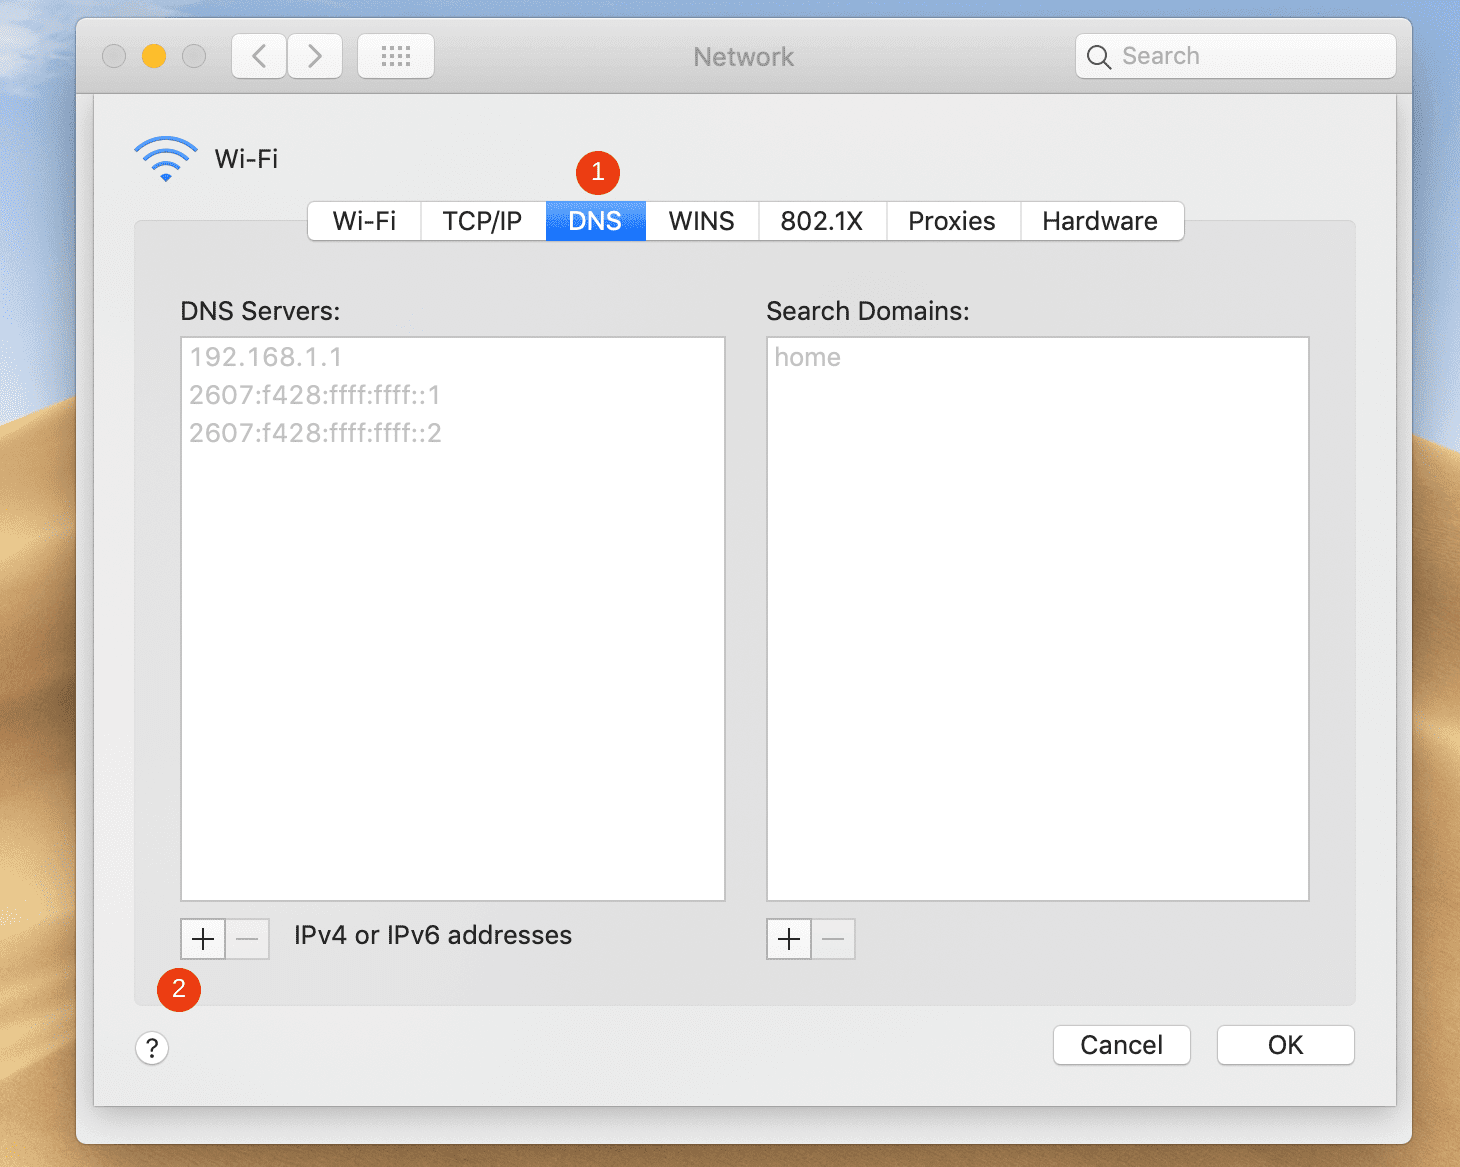
After that, you can select the (+) icon next to IPv4 or IPv6 addresses. You can enter the same Google Public DNS values as above, and then click on OK.
5. Check Your Server Configuration Files
HTTP 304 can be a client-side issue (your browser) or a server-side problem (your website). If you own the site producing the HTTP 304 status code, the final fix you can try is to check your server configuration files. The steps for doing so will vary depending on whether your server uses Apache or NGINX.
If you’re running on Apache, your server configuration file will be called .htaccess, short for “hypertext access”. It will likely be located in the root directory of your site, usually within the public_html folder. The .htaccess files are responsible for handling a wide range of requests, including redirects.
You can access this file via a File Transfer Protocol (FTP) client such as FileZilla, or your web host’s file manager. Once you locate and open your .htaccess file, you’ll want to look for a section labeled “mod_cache”. It should look something like this:
LoadModule cache_module modules/mod_cache.so

    LoadModule cache_disk_module modules/mod_cache_disk.so

        CacheRoot "c:/cacheroot"
        CacheEnable disk  "/"
        CacheDirLevels 5
        CacheDirLength 3


    # When acting as a proxy, don't cache the list of security updates
    CacheDisable "http://security.update.server/update-list/"
Rather than deleting this section altogether, you can temporarily “turn it off” by commenting out the code. To do this, place a “#” in front of each line.
If you’re using NGINX, you’ll want to look for the nginx.config file. However, since NGINX usually comes with built-in caching, it isn’t common for this configuration file to be the source of HTTP 304 codes.
Conclusion
Encountering error and redirect messages when you’re trying to access a website can be extremely frustrating. However, understanding what certain status codes mean can help you narrow down the issue, so you can begin troubleshooting and resolving the problem.
For example, if you encounter the HTTP 304 status code, you can likely assume that it’s an issue with your browser settings or DNS configuration. As we’ve discussed, there are five potential solutions you can try to fix this issue:
- Clear your browser cache.
- Temporarily disable your browser extensions.
- Run a malware scan.
- Flush your DNS and reset your TCP/IP settings.
- Check your server configuration files.
Do you have any questions about fixing HTTP 304 not modified? Let us know in the comments section below!
Featured Image via Simon.3D/shutterstock.com
The post How to Fix the HTTP 304 Not Modified Status Code appeared first on Elegant Themes Blog.

