Running a website today requires a secure connection between you and your users. This connection is done via SSL certificate, and it is actually pretty easy (and free) to install on your site. Most web hosts offer free Let’s Encrypt certificates and renewal that can be installed with just a few clicks. Installation, however, isn’t the final step. However, mixed content is a common issue when setting up SSL, and it’s not a big deal. We can show you how to fix the mixed content error in WordPress easily and get your site fully secured.
What is the Mixed Content Error in WordPress?
Essentially, the mixed content error is when your WordPress site delivers some of the resources securely by HTTPS and some insecurely by HTTP. Sometimes, bits of that mixed content won’t even show up, making your site appear broken in any number of ways. This is obviously bad for a few reasons.
The first being that Google penalizes any site that it deems insecure, both warning users as they click into the site that your site could be home to any number of internet evils. Chrome users will get a double-dose of this as the browser itself warns of potentially dangerous sites.
The second is that Google and other search engines will penalize your site in the rankings both for having an insecure site that could potentially contain malware, but also for having a poor user experience with content simply not loading.
Add in that mixed content errors on WordPress sites can severely impact load times, and you’re hitting a trifecta of reasons users and search engines alike will avoid your site like the plague. Because to them, your site appears like it is or has the plague itself.
So how do you keep this from happening and your site becoming a pariah in Google’s eyes?
How to Fix the Mixed Content Error in WordPress with a Plugin
It’s actually relatively simple to fix a mixed content error in WordPress. Because of the customization and flexibility in the platform, basically any problem you can have has been solved by a plugin developer. You just have to know where to search. For most sites, being able to quickly install and configure a plugin is the best solution.
We recommend checking out SSL Insecure Content Fixer by WebAware. Simply installing and activating the plugin can potentially fix any mixed content errors showing on your WordPress site. It handles, as the WordPress.org plugin description puts it, “some basic fixes on your website using the Simple fix level.” If you need more than that, the plugin has a more advanced settings page where you can tweak what needs to be secured.
You can find the settings under Settings – SSL Insecure Content in your WP admin panel menu. Note that the Simple selection is already enabled.
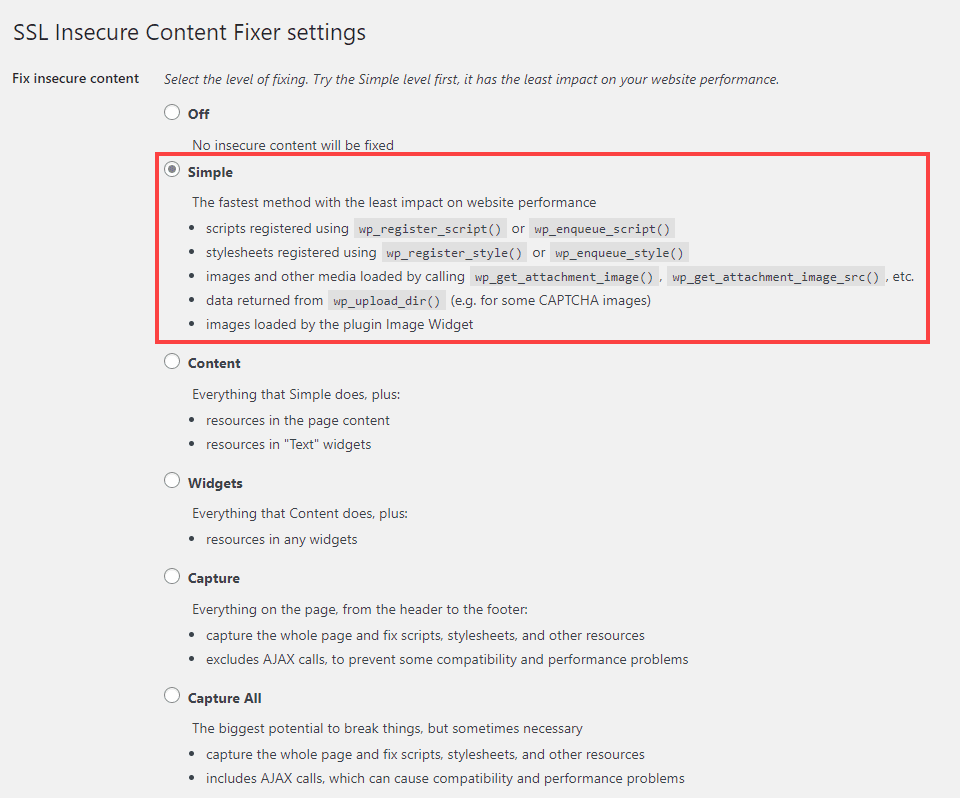
Most of the time, this works. To make sure it’s working, we highly suggest running a page speed test on GT Metrix or Pingdom. While these tests are pretty fantastic on their own to help with identifying errors on your site, they both report on insecure/mixed content. So if you do have anything amiss, one of them will tell you.
We have had luck using this plugin to fix the errors using everything except Capture All. In our experience, the AJAX calls being automatically fixed has tended to break site functionality. However, each of the other options has fixed anything that GT Metrix or Pingdom found.
The biggest issue with using a plugin like SSL Insecure Content Fixer is that if you deactivate the plugin, there’s a chance the mixed content fixes will deactivate as well. If this is a potential issue for you, we have a solution for that, too.
How to Fix the Mixed Content Error in WordPress Manually
WordPress, like any other major web app, is really just a database on a server. If the resources in that database are still marked as HTTP and the browsers are calling for HTTPS…that’s a mixed content error. Luckily, there are pretty easy fixes you can perform manually, too.
Find & Replace in your WP Database
While this does involve a plugin, too, it’s only for the actual functionality and can be disabled afterward. Find the Better Search Replace plugin on the WP.org repository.
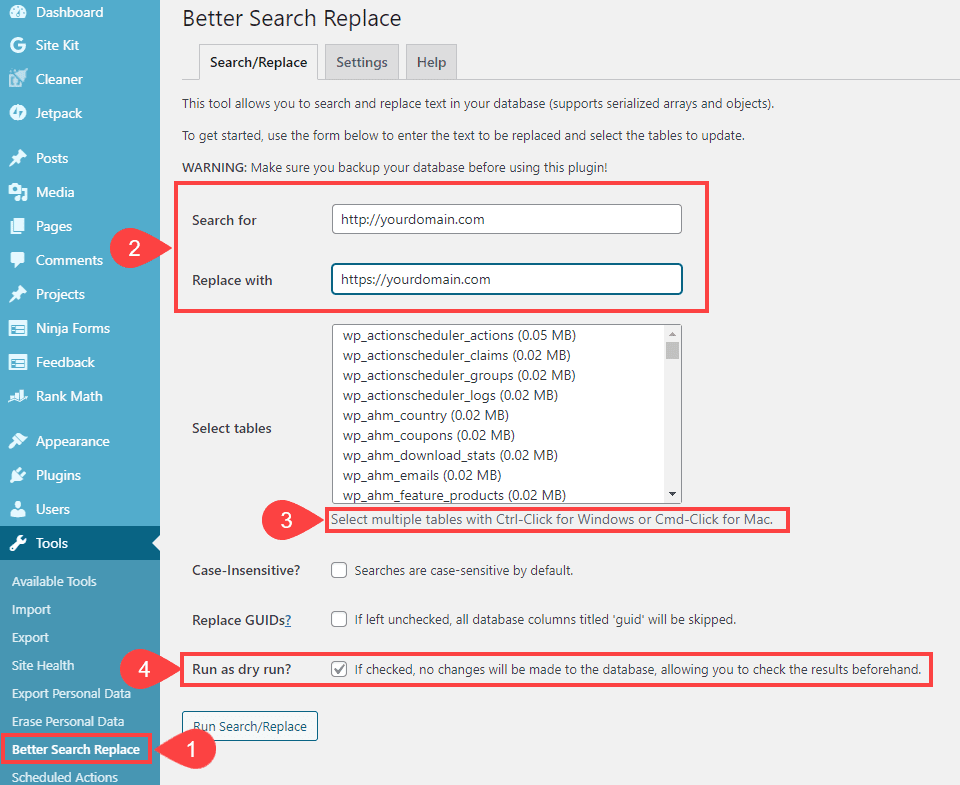
Under Tools – Better Search Replace, you’re going to be searching for insecure instances of your domain name and replacing them with HTTPS versions. So simply enter http://yourdomain.com and https://yourdomain.com in the Search For/Replace With fields (2).
Then, choose which database tables you want to include in the search. In general, this will be all of them. So click the top, scroll to the bottom, and shift-click the last one. This will highlight all the tables in the list (3).
We suggest enabling the Run as Dry Run option. Doing so will have the plugin perform all the actions, but not actually save the changes. It will report on anything it finds.

If you like what you see, uncheck the dry run box and run it for real. Before doing so, however, we highly suggest backing up your site and database. Any time that you even think about touching your database, back it up. A corrupted or mishandled database is one of the hardest things to fix in all of WordPress.
You can also do this same process through phpMyAdmin in your hosting dashboard, but it doesn’t have the dry run feature and requires a lot more technical knowledge to implement. So we suggest the plugin method for most people.
Altering the .htaccess File
Your website’s .htaccess file is responsible for directing traffic and allowing, well, access to elements of your site. You can force HTTPS on your site’s resources by adding a few lines to your .htaccess file using either FileZilla (or another FTP client) or from within your host’s dashboard file manager.
Basically, you’re going to up redirects using .htaccess, so your existing content doesn’t continue to load by HTTP.
To do this, navigate to the /public_html or root directory and look for the .htaccess file within. Right-click on it and choose the option that lets you edit the file, which will open the file using your default text editor if you’re using FTP or an integrated editor if you’re using your host’s dashboard.
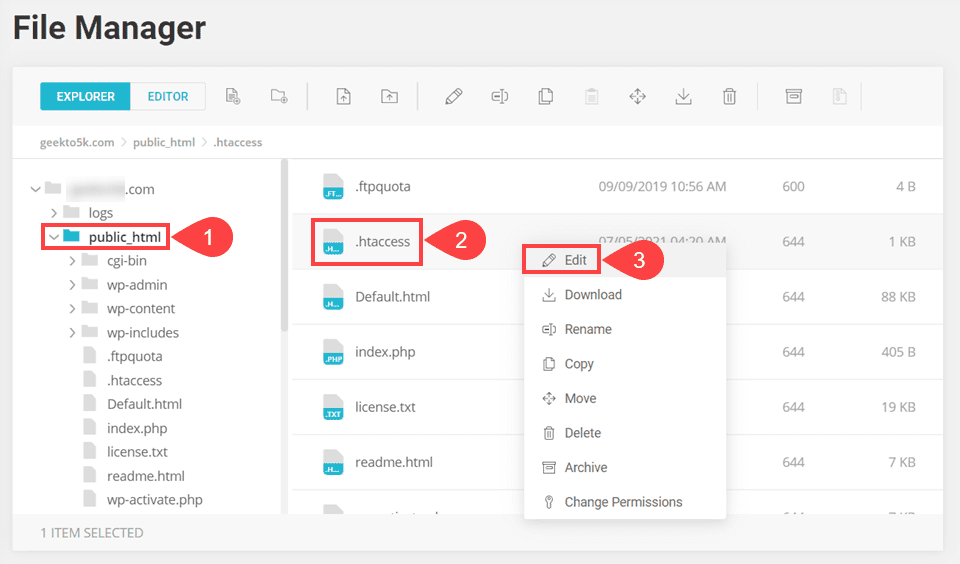
Inside, you will past the following code between the final tag and the line that reads # END WordPress.
    RewriteEngine On
    RewriteCond %{SERVER_PORT} !^443$
    RewriteRule (.*) https://%{HTTP_HOST}%{REQUEST_URI} [R=301,L]
    RewriteBase /
    RewriteRule ^index.php$ - [L]
    RewriteCond %{REQUEST_FILENAME} !-f
    RewriteCond %{REQUEST_FILENAME} !-d
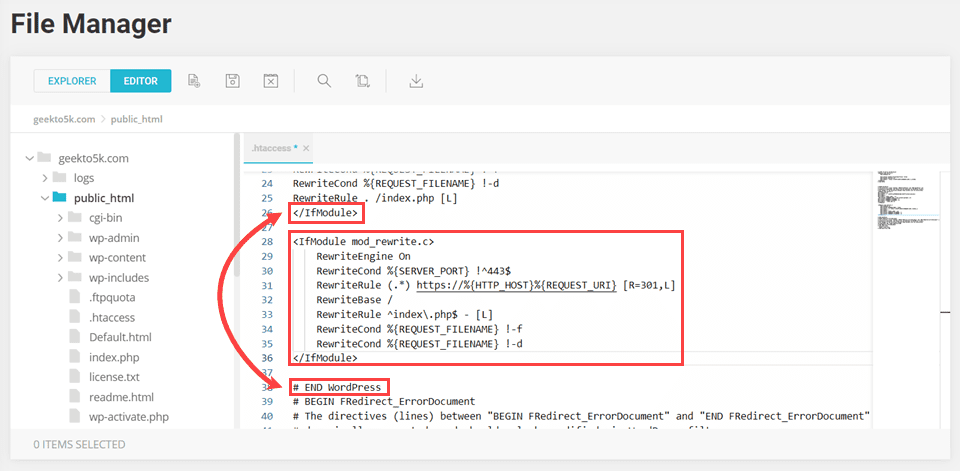
Word of advice here, too. Download a backup of the current .htaccess file just in case these changes make something go awry.
If things work like they should, you should no longer see the mixed content error. However, you might still run into the error if you’re using a caching plugin. If that’s the case, make sure you empty your website’s cache and try loading your website once more.
Wrapping Up
If you or your users are getting the mixed content error in WordPress, it’s not as scary as it sounds. In fact, it’s one of the easier WordPress error messages to fix. Whether you prefer plugin fixes or digging into your WordPress core files, getting rid of the mixed content error on your site is simple, quick, and easy.
What have been your experiences with mixed content errors?
Article featured image by Ksusha Dusmikeeva / shutterstock.com
The post How to Fix the Mixed Content Error in WordPress appeared first on Elegant Themes Blog.

