If you’ve used WordPress for long enough, you know mistakes and errors can happen. Backups are an essential part of maintaining a WordPress website. With backups, you eliminate any worry about your site being erased or damaged. Being able to backup and restore your site when problems arise makes life much easier. Cloudways includes backups standard with every Divi hosting plan. You should absolutely be using this feature on your websites. In this post, we’ll tell you about Divi hosting by Cloudways. Then we’ll show you how to restore and manage your backups with Cloudways. Let’s get started.
What is Divi Hosting By Cloudways?
We’ve partnered with Cloudways to bring you a hosting plan designed for Divi. Every Cloudways Divi hosting plan is optimized to give you the fastest, most protected Divi site available. Plans range from $12 to $321 per month. Also, Divi comes pre-installed on your server. Having Divi come pre-installed makes it easy to jump in and start designing.

Automatic backups, choices for cloud servers, 24/7/365 support, and incredible security features are included with every plan. Now, we don’t partner with just any hosting company. Features, cost, and compatibility are all considered. We firmly believe that Cloudways is a great option for Divi users. Why? You’ll get Divi installed for you. Your site will be optimized for speed and security. Plus, it’s affordable. Before we talk about how to manage backups on Cloudways, let’s talk about why they are so important.
Why are WordPress Backups Important?
Since its inception in 2001, WordPress has become the most used content management system (CMS) in the world. Data shows that anywhere from 44% to 65% of all websites are built with WordPress. Because of its popularity, bots, malware, and other bad actors are a concern. It’s crucial to have systems in place to protect yourself from attacks. Backups are an essential part of the solution.
Not all hosts provide backups for its customers. Cloudways shines in comparison to their competition by offering 1-click backups with every plan. Cloudways combines backups with bot protection, firewall, and login security to protect your site from anyone looking to do harm. Let’s discuss how to manage backups with Cloudways.
How to Create Backups With Cloudways
Problems can arise at any time. However, you don’t have to worry about losing your data with Cloudways. Cloudways makes backing up your data a breeze. There are a couple of ways to create backups with Cloudways. You can create them at the server level or application level. Each of these has its own benefits. Let’s go over how to schedule backups for your server. Next, we’ll discuss creating a backup for your applications.
Scheduling Server Backups With Cloudways
First, log in to your Cloudways account. Next, click on Servers in the main navigation bar. Click on the server name you wish to create a backup for.
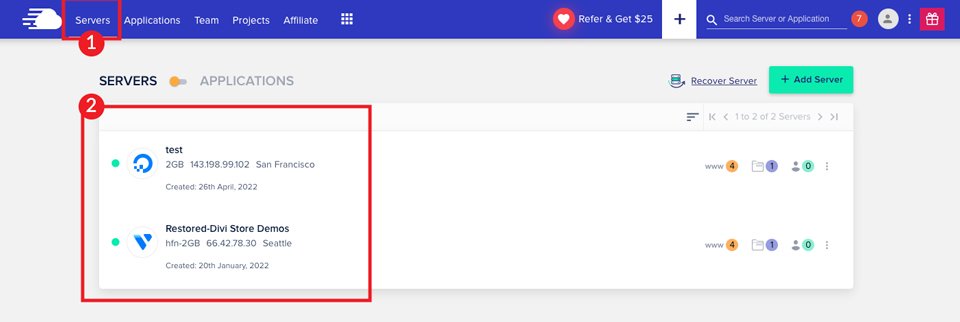
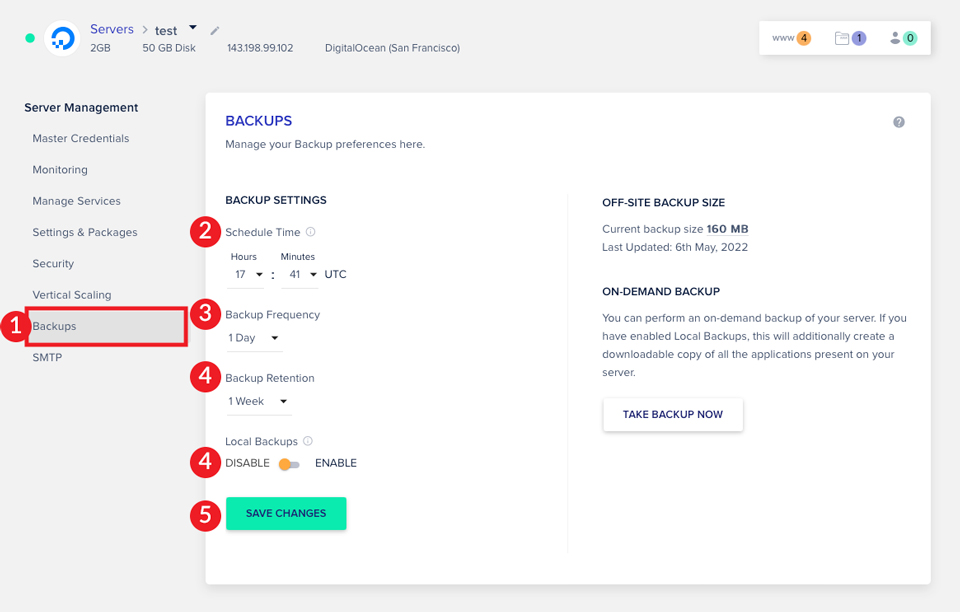
Once your screen refreshes, you’ll see your server management screen. Click on Backups.
To configure your backup, follow these steps. First, schedule a time for your backup by choosing the time of day. Next, choose your backup frequency. You can choose from 6 hours, 12 hours, 1 day, 2 days, or 3 days. Then choose how long to keep your backup. Your choices are 1 week, 2 weeks, 3 weeks or 4 weeks. The frequency you choose depends on the amount of storage you have. For example, you may not want to keep your backups for more than one week if you have a small (2GB) server. The next step is to choose to enable or disable local backups.
If you enable local backups, Cloudways saves a copy of your application to your server. This allows you to download it with SSH/SFTP. Keep in mind that only the latest backup is available locally. This doesn’t affect off-site backups. Those will continue to work as usual.
Lastly, click on SAVE CHANGES to set your backup frequency.
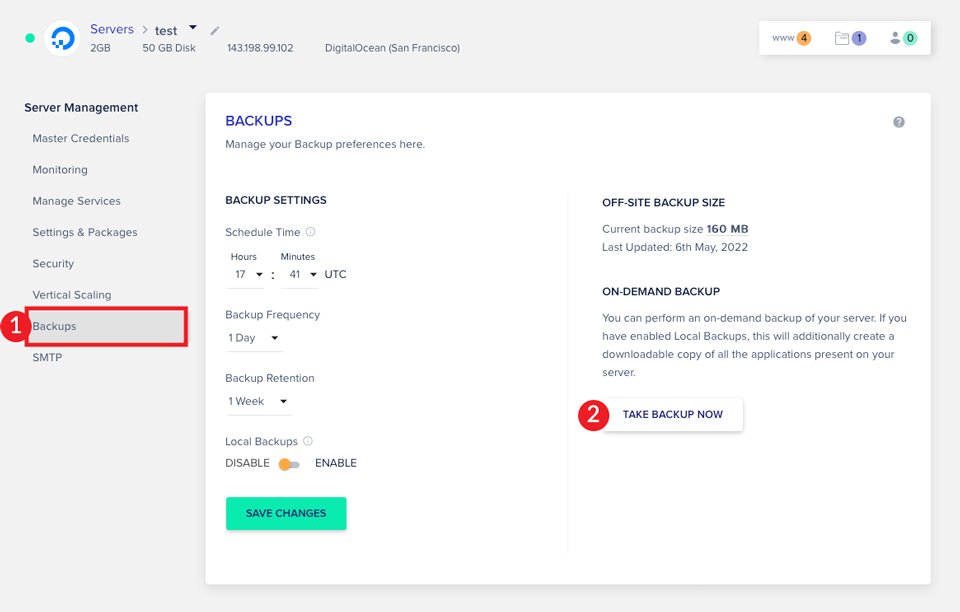
Creating an On-Demand Server Backup
There may be situations where you want to backup your server manually. For instance, if you plan to make several changes to your server. It is a good idea to back up your server before you make changes that you may not be happy with. Creating a manual backup is easy. Click on the TAKE BACKUP NOW button. In order for you to use the on-demand backup feature, you must have local backups enabled.
Creating Application Backups With Cloudways
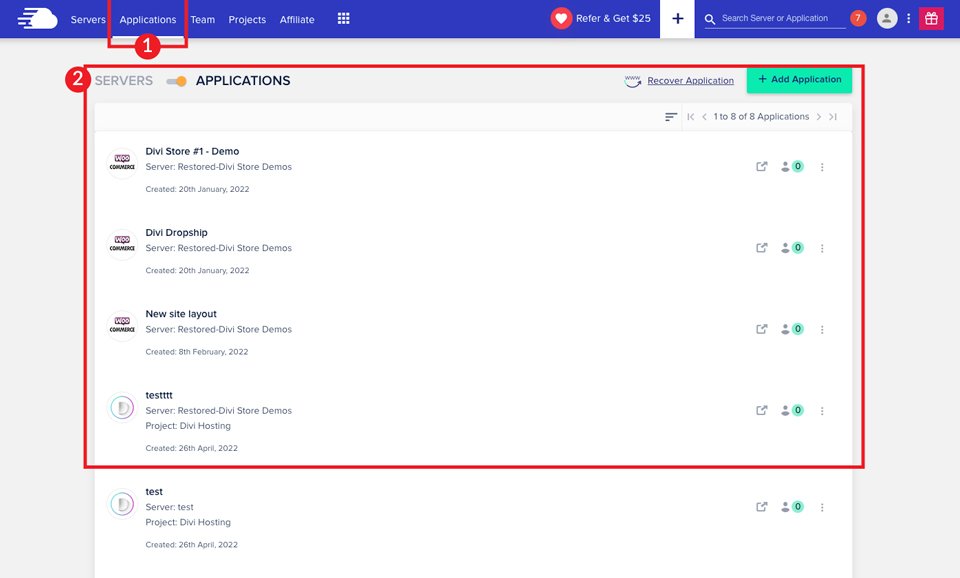
There are situations where you don’t need to backup your entire server. For instance, you only need to make changes to one of your wordpress installs. In this case, it makes more sense to create a backup of one application. Creating an application backup is simple. First navigate to Applications in the top bar of your account.
Next, click on the application you wish to back up.
Next, click on the backup and restore tab in the application management dashboard. Finally, click the TAKE BACKUP NOW button. Clicking this button will create a backup of your application and database files.
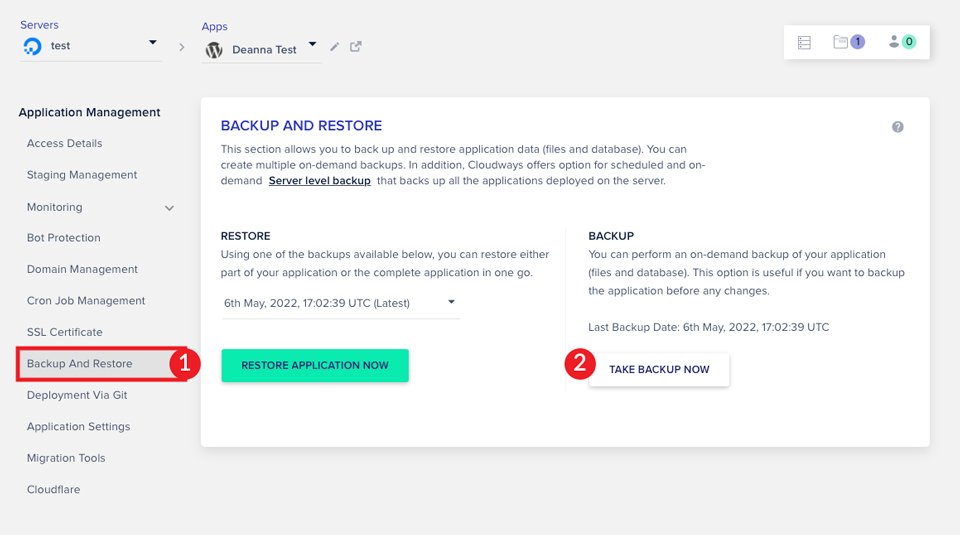
Backups are available on all five cloud server partners offered through Cloudways. In addition to backups, a couple of Cloudways providers offer snapshots.
What are Snapshots?
We’ve discussed how to backup your servers and applications on Cloudways. We’d like to tell you about a feature that is specific to Amazon Web Services (AWS) and Google Cloud (GCE). With AWS and GCE on Cloudways, you’ll get an added option for backups. Snapshots are backups that take far less time to restore. For example, if you have a server on AWS with more than 10GB of data, you cut your restore time down significantly by taking a snapshot. Snapshots make large data transfers quick and painless.
The process to configure your snapshots is mostly the same as backing up on the server level that we explained above. However, the difference is in the server management section. First, click on backups in the server management screen. Next, choose SNAPSHOTS. Then choose your snapshot frequency. You can choose from 1 day, 2 days, or 3 days. Lastly, click SAVE CHANGES to set your schedule.
Now that we’ve demonstrated the different ways to create a backup on Cloudways, let’s dive into how to restore your data.
How to Restore a Backup With Cloudways
Restoring your data with Cloudways is a simple process. Being able to restore your site after problems happen is a great benefit to have. First, we’ll tell you why you never have to worry about your server crashing. Next, we’ll discuss the steps needed to restore an application if you encounter a problem.
Servers hosted on Cloudways don’t require you to manually restore them. Unlike traditional hosts that use shared servers, Cloudways stores your data in the cloud on dedicated servers. Your backup schedule serves as a system restore point. Cloudways will automatically keep track of your server’s stats to ensure optimal performance. If a problem is detected, your server will be restored from the most recent backup point. This saves you from having to troubleshoot the issue.
Restoring Application Backups With Cloudways
Restoring your application with Cloudways is ridiculously easy. Cloudways makes the process so simple that it only requires a few clicks. If you discover that your site is broken, missing pages, or displaying contents oddly after you added new plugins, don’t worry. Cloudways will get you up and running in no time.
To restore an application from a backup, follow these easy steps. First, click on the applications tab in the main navigation menu. Next, choose the application you wish to restore.
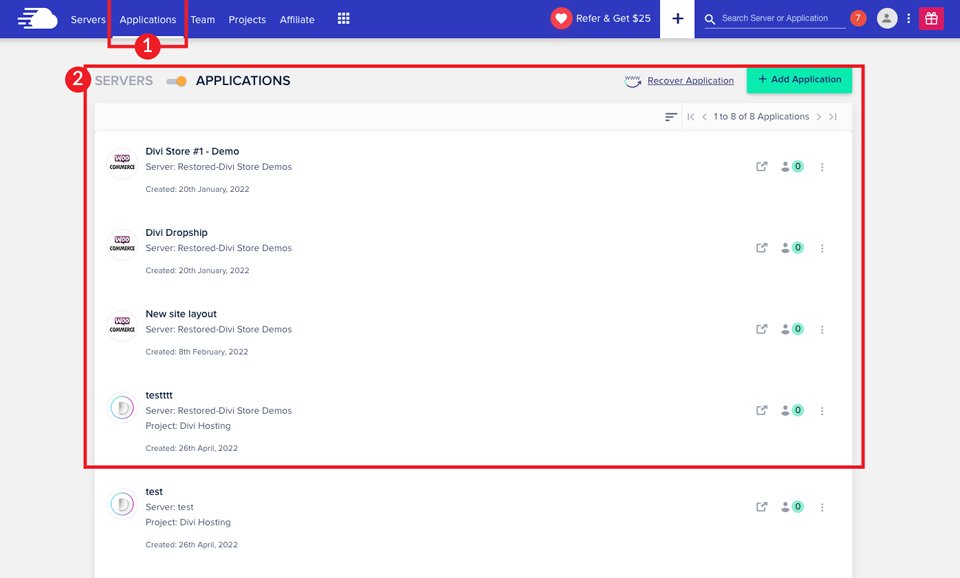
The next step is to click on backup and restore. Choose your restore point from the dropdown menu. Lastly, click the RESTORE APPLICATION NOW button.
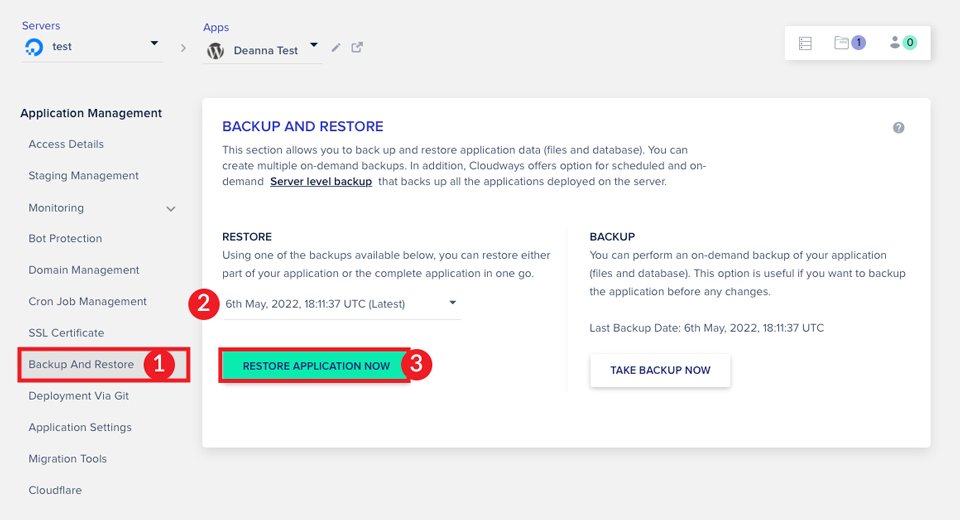
That’s literally all you have to do. In just a few steps, your application will be restored to its previous condition saving you a lot of time and effort.
Wrapping Things Up
Website backups are an essential tool for WordPress users. They protect you from costly errors during updating, and other nasty scenarios that are out to ruin your day. Cloudways offers a simple way to create and manage your backups. With 1-click backup and restore functions, you don’t need to worry about downtime or frustrating scenarios with plugins or manual restores. Whether you are a current Cloudways customer, or you’re searching for a new host, Cloudways could be a good option to make this necessary task an easy one.
To get a full breakdown of Cloudways hosting, read our review.
If you have a question or comment, please leave one below.
The post How to Restore & Manage Backups on Cloudways Divi Hosting appeared first on Elegant Themes Blog.
