Divi’s Theme Builder opens the door for creating some amazing website templates that can be exported and imported easily from one Divi site to another. This allows developers and designers to create entire website packs that function much like a child theme for any Divi site. So it is important to understand how to use Divi’s Theme Builder portability features to properly export and import these templates for the best results.
In this tutorial, we’ll be covering how to use Divi’s Theme Builder portability features to import and export templates in a variety of ways. Hopefully, this will help alleviate any hesitancy you have with the portability options going forward.
Let’s jump in!
How to Export All Templates at Once
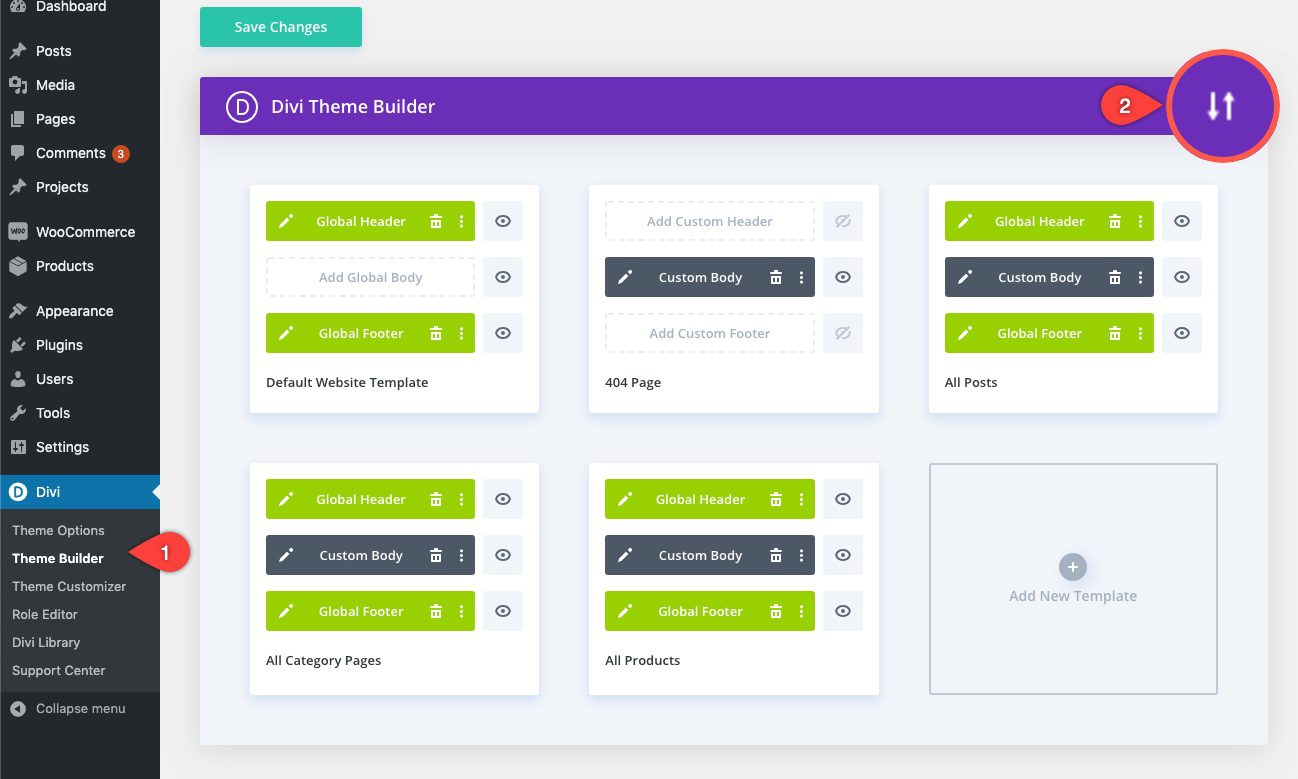
For our first example, let’s say you have a collection of templates (including a default website template) that you want to export. To do this, simply go to the WordPress Dashboard and navigate to Divi > Theme Builder. Then select the portability icon in the top right of the page inside the purple menu bar.
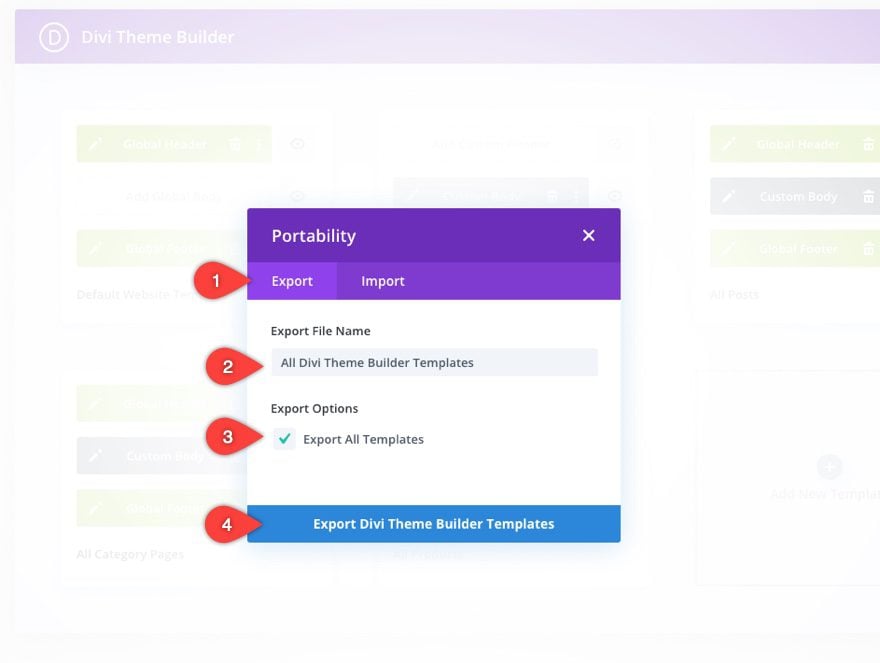
In the portability modal, under the export tab, enter a name for the export file. Keep the option “Export All Templates” checked and click the Export button.
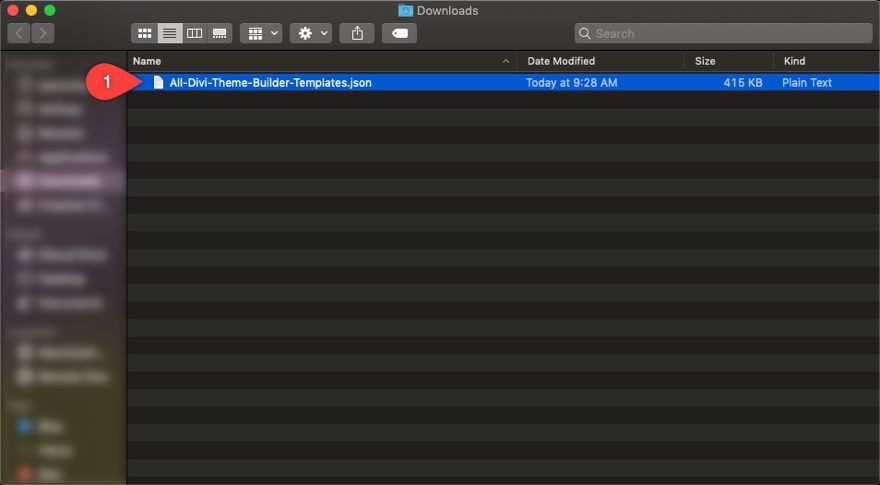
Now the json file with all those templates will be saved to your computer, ready to be imported back to any Divi site.
How to Import Templates using the Divi Theme Builder
In order to import templates to your site, you will need to have the right file to import. This file is in json format and will be generated upon a successful export of one or more Theme Builder templates. The json file could contain a single template or multiple templates (including a default website template) all in one single file. So it is important to name your export files to better recognize the contents of the json file later on.
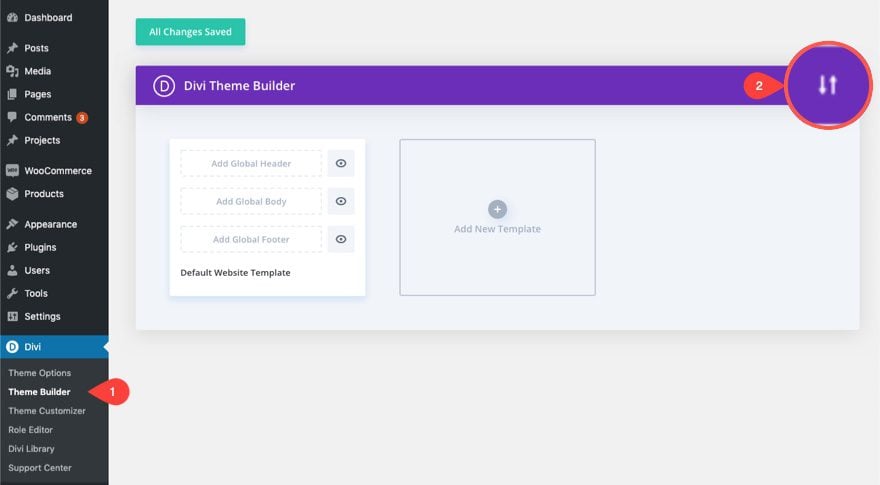
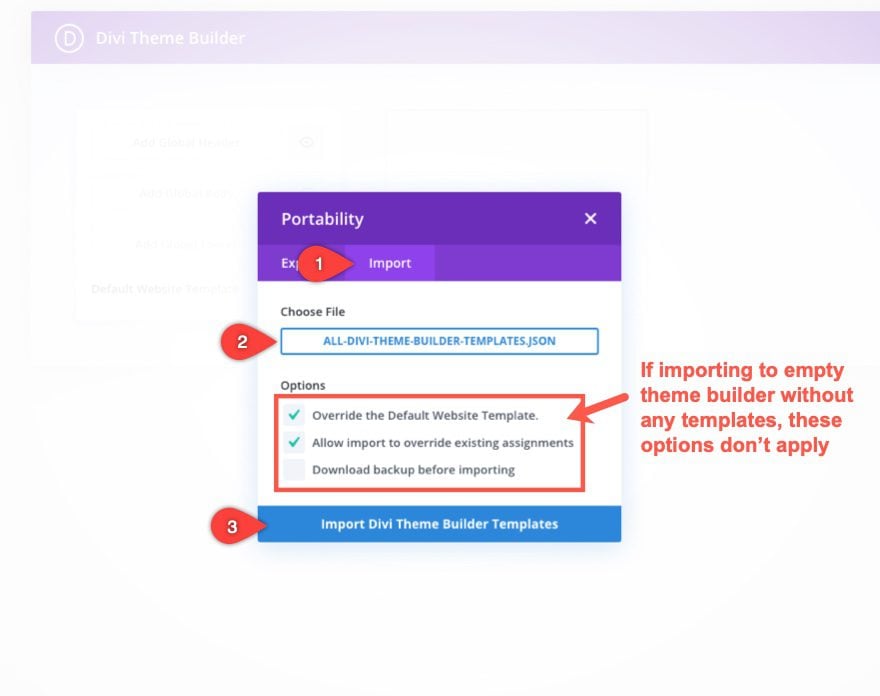
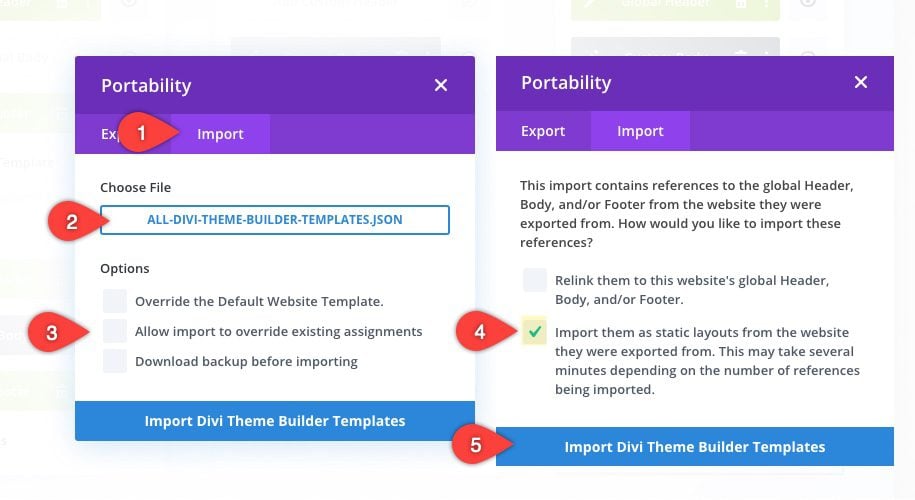
To import the json file using the Divi Theme Builder, you will navigate to the same portability options within the Theme Builder by clicking the portability icon at the top right of the page.
Then select the Import Tab.
Choose the file from your computer.
If you are importing templates to an empty theme builder, the options don’t apply so you can leave them checked. We’ll cover overrides later in this post.
After that, click the import button.
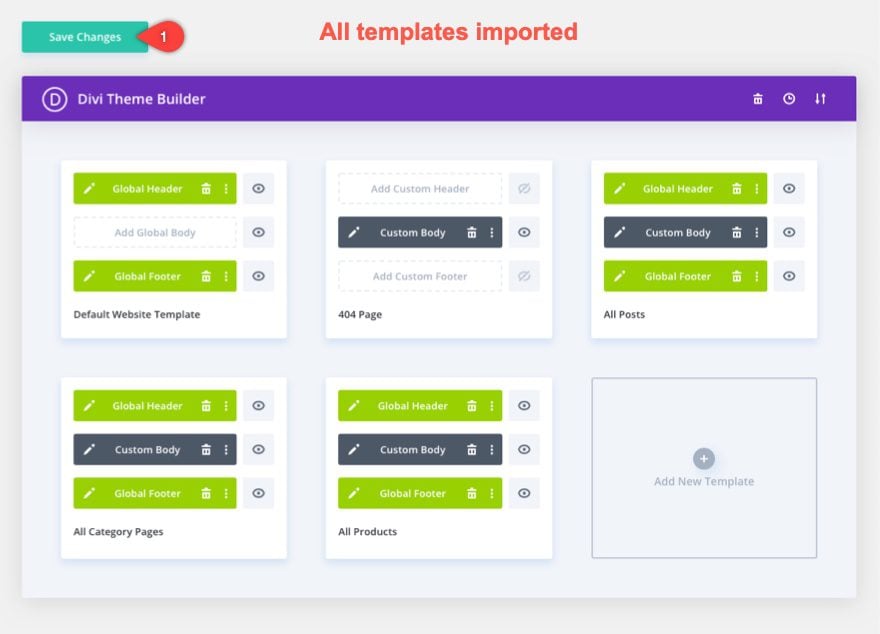
That’s it! All the templates contained in the file will be magically imported to your website with all the Global areas and assignments in place. All you have to do now is click to save changes.
How to Export an Individual Template
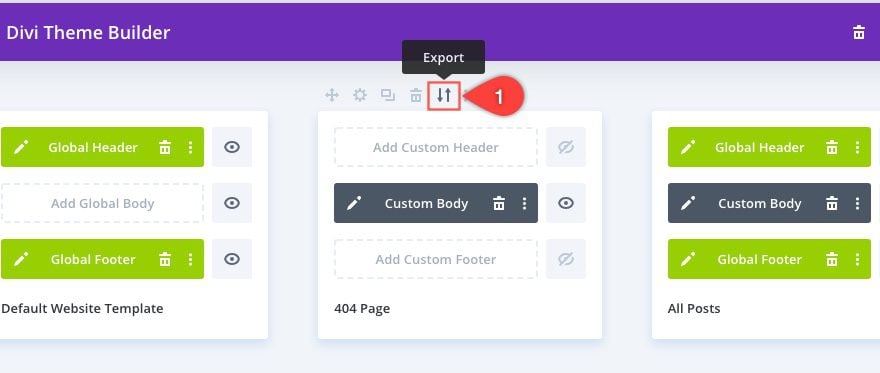
There are actually two ways you can export an individual template from the Theme Builder. The first way is to select the export icon on the individual template menu that appears when hovering over the template.
After you click the export icon, simply enter an export file name and click the Export button.
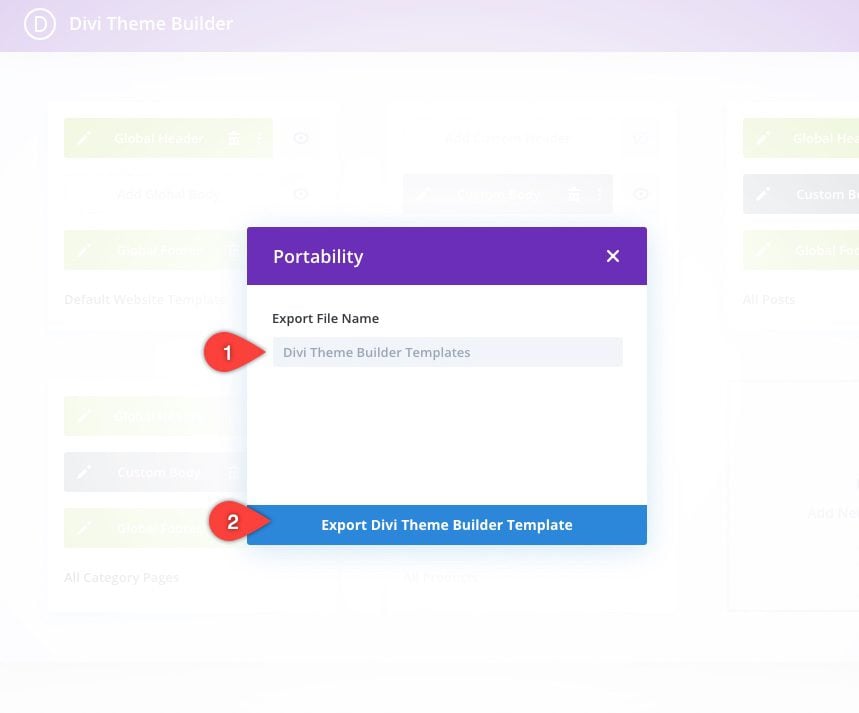
The individual template json file will download to your computer.
The other way to export an individual template is to use the general portability options of the theme builder.
To do this, click the portability icon at the top right of the theme builder interface.
Under the export tab, enter the export file name.
Then “uncheck” the option “Export All Templates”. This will cause a list of available templates to appear. Select the individual template from the list and click the Export button.
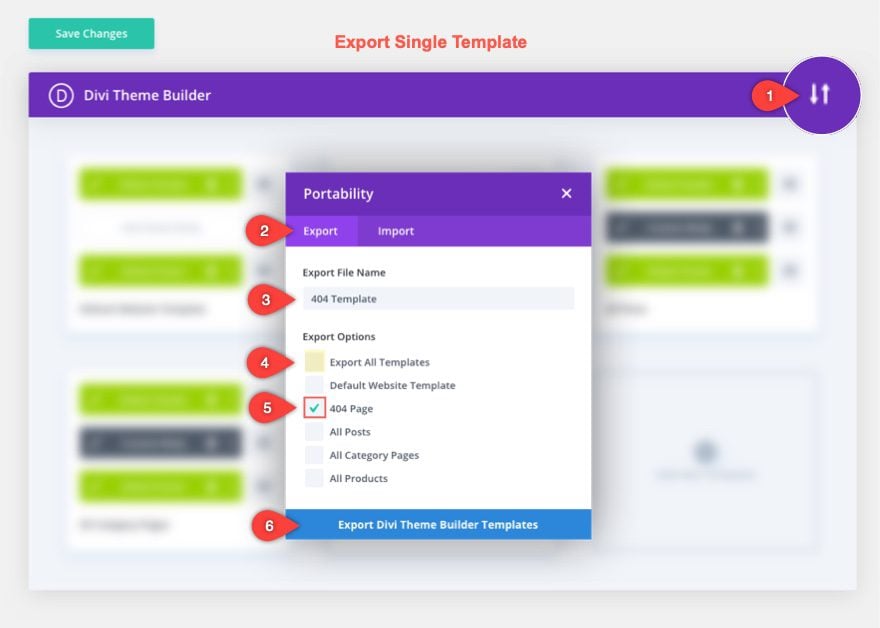
Your file will be downloaded accordingly.

How to Export Selected Templates
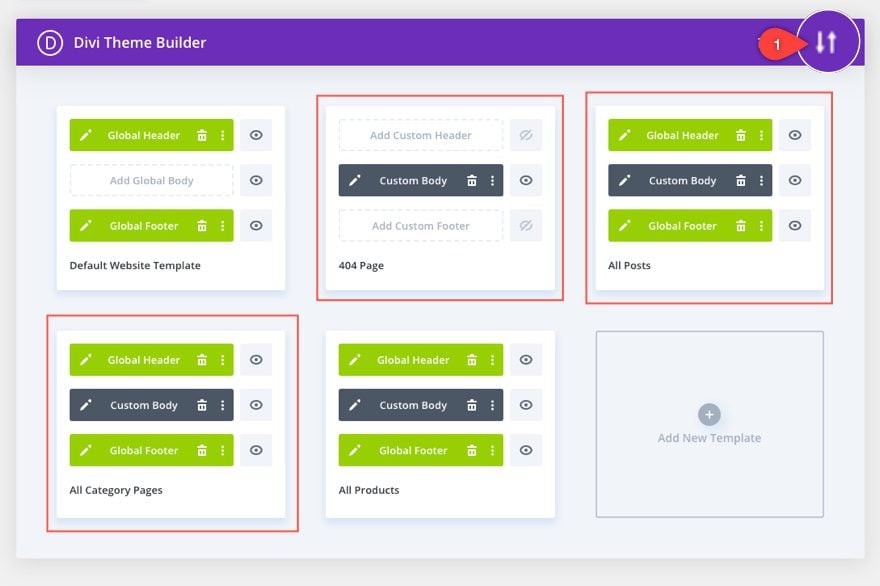
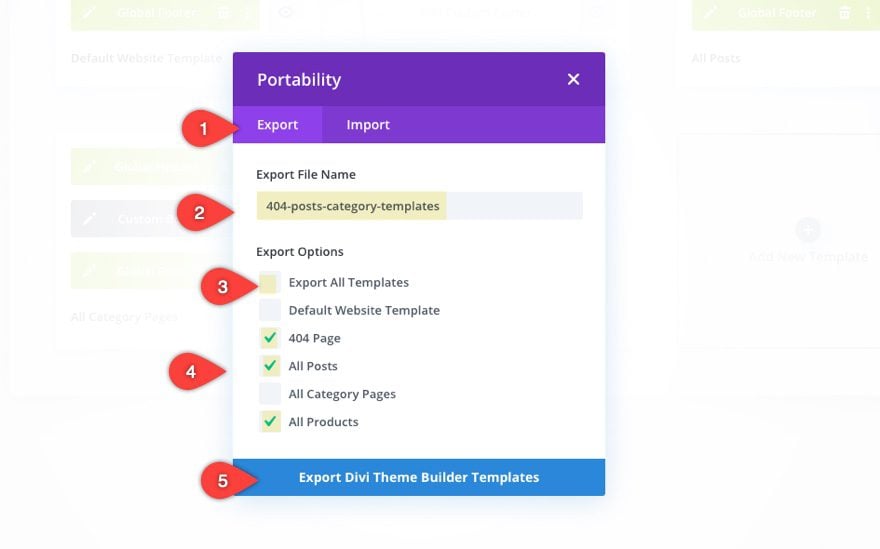
In order to export a select number of templates, click the portability icon at the top right of the theme builder interface. In this example, let’s say we want to export the templates for the 404 page, All Posts, and All Category Pages.
In the portability modal, give the export file a name, then “uncheck” the “Export All Templates” option. This will cause a list of available templates to appear. Select the templates you want to export from the list and click the Export button.
Handling Import Conflicts with Portability Options
Sometimes you will want to import templates to a site that already has templates in place. To help with possible conflicts, the portability modal includes a few options. One option allows you to choose whether or not you want the templates you are importing to override the assignments of the existing templates.
For example, let’s say you have a post template (a template assigned to “all posts”) already on your website. The template includes a global header, a custom body, and a global footer.
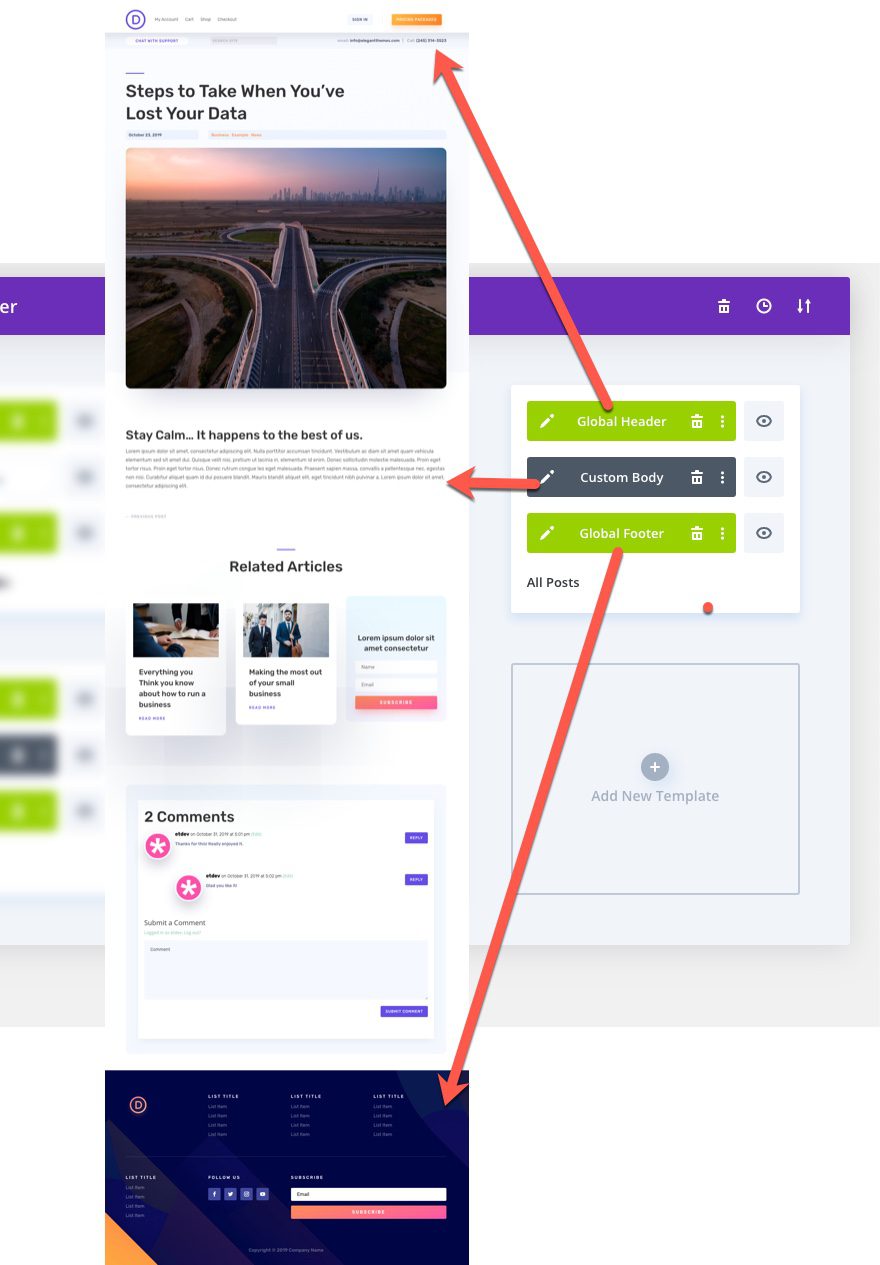
If we want to import another template that includes the same assignment (“all posts”) as well as its own global header and footer, there will be a conflict. The first conflict would be the assignment (both of them are assigned to “all posts”) and the second conflict would be the Global elements (both are linked to a Global Header and Footer).
Here is where those portability options come in handy.
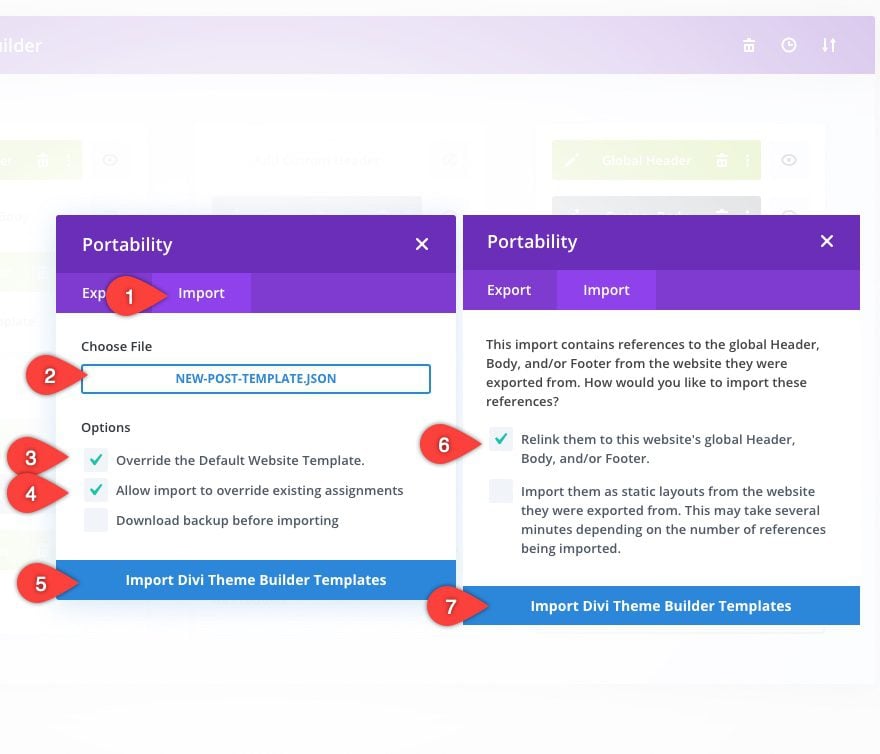
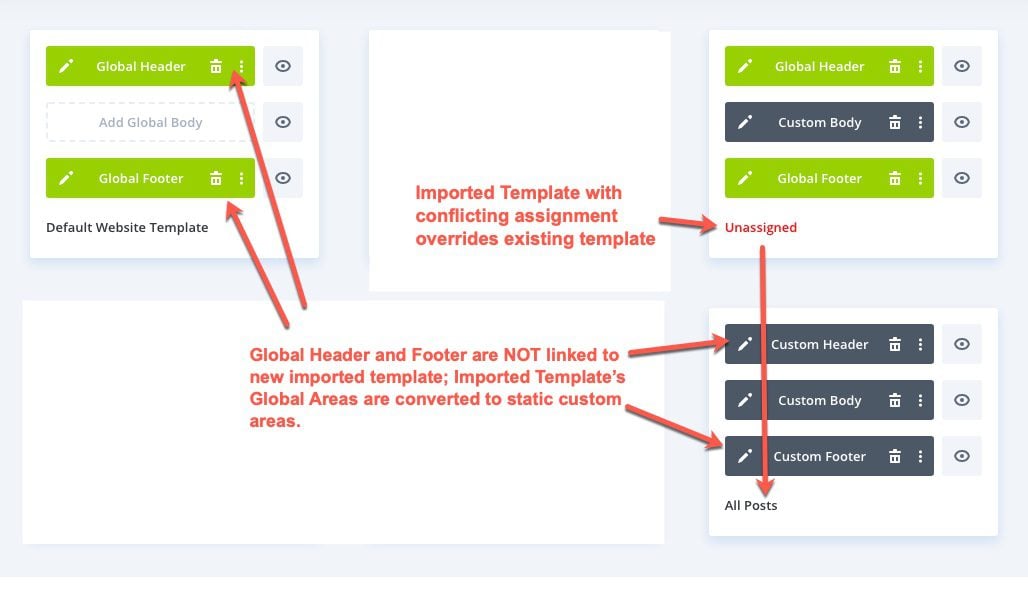
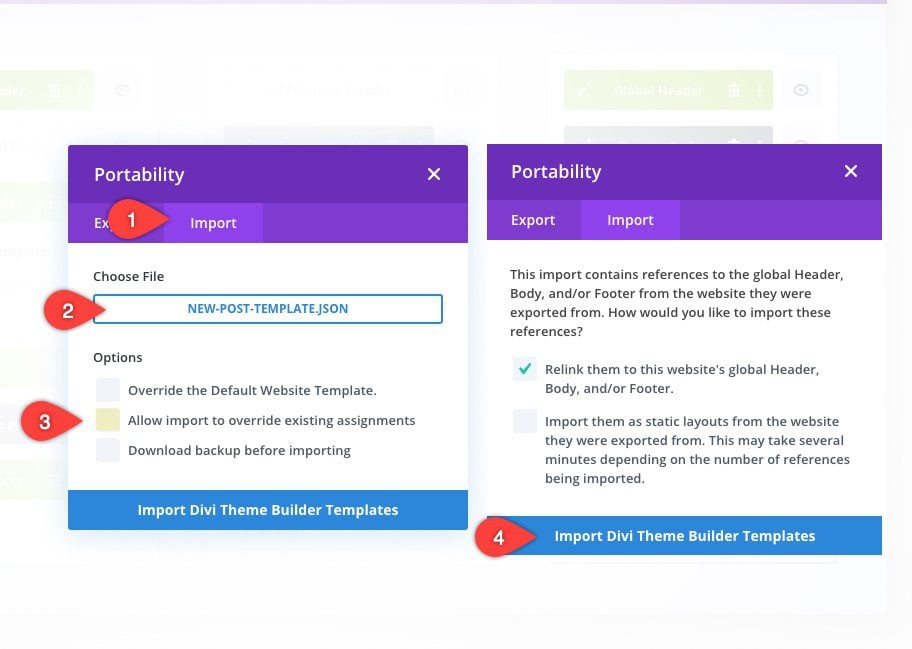
When importing the new post template, keep the option checked “Allow import to override existing assignments”. Then after you click the import button, a new warning appears in the box asking us what we want to do with the import’s global elements. Selecting the option “Relink them to this website’s global Heading, Body, and/or Footer” will allow the Imported template to override existing assignments and adopt the Global Header, Body, and/or Footer of the Website.
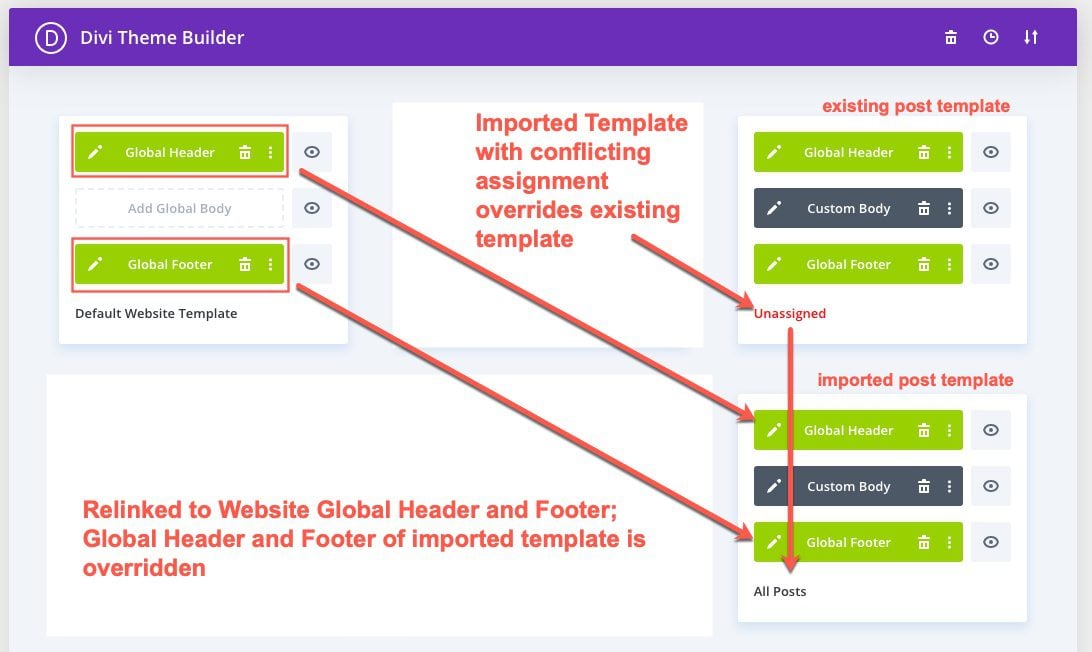
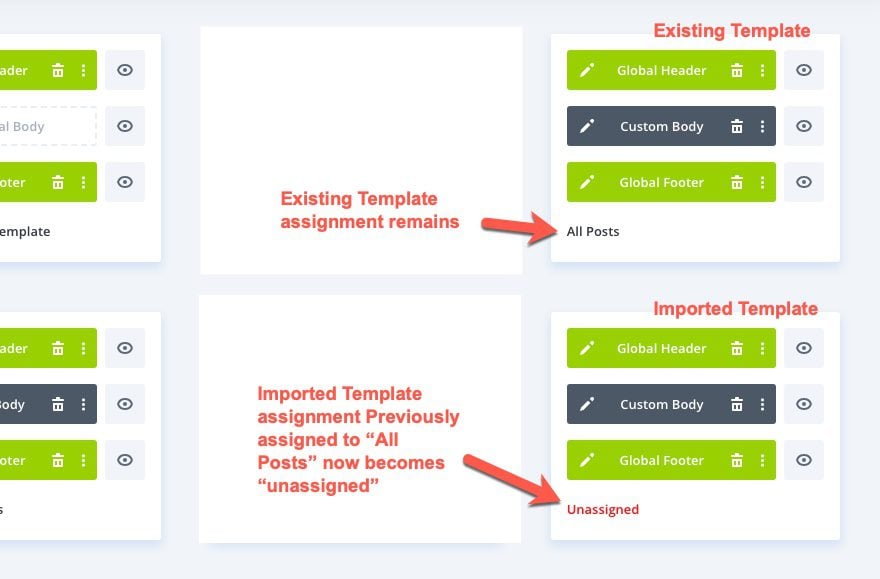
Once the import has been successfully added, the imported template with the conflicting assignment (“All Posts”) overrides the existing template and changes the existing template assignment to “unassigned”. And the template adopts (or is relinked to) the Global Header and Footer of the website.
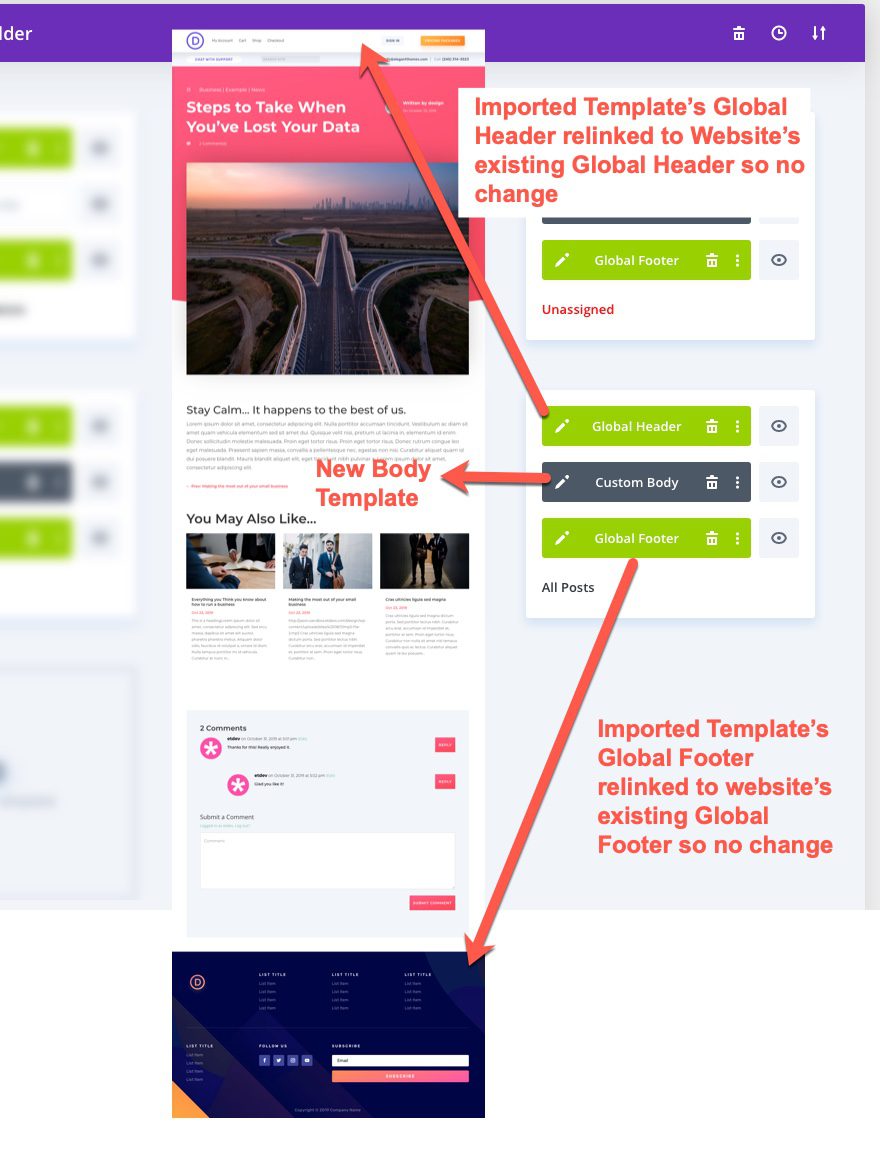
Now if we visit a post on the website, we will see the same Global Header and Footer, but there will be a new custom body. This is because the new imported template is now assigned to “all posts” but has inherited the global header and footer of the website.
If we wanted to import a new post template and keep its own Global header and Footer after the import, we would need to make sure and select the option to “Import them as static layouts…”
To do this, click the portability icon at the top of the theme builder. Under the portability modal, go to the import tab and choose the file from your computer. Keep the “Allow Import to Override…” option checked then click the Import button.
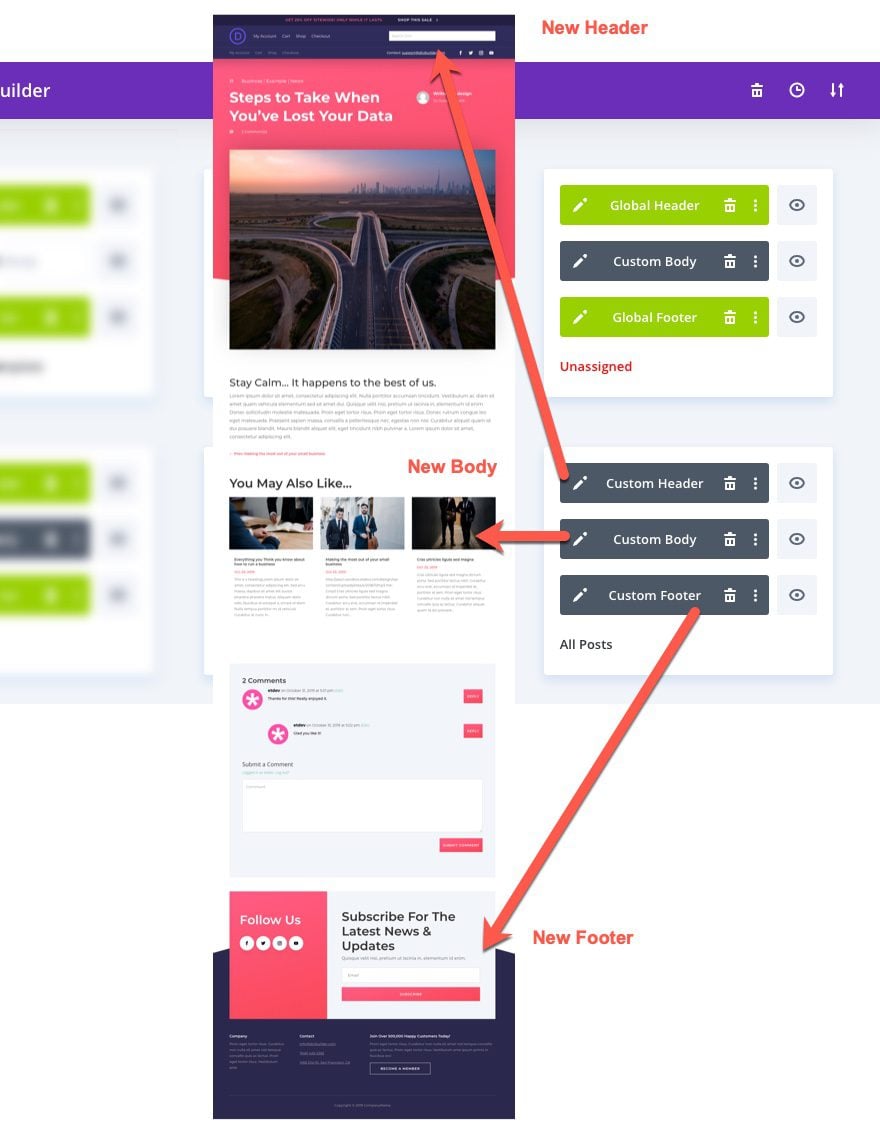
This time, instead of “relinking” the global areas, select the option to “Import them as static layouts…”
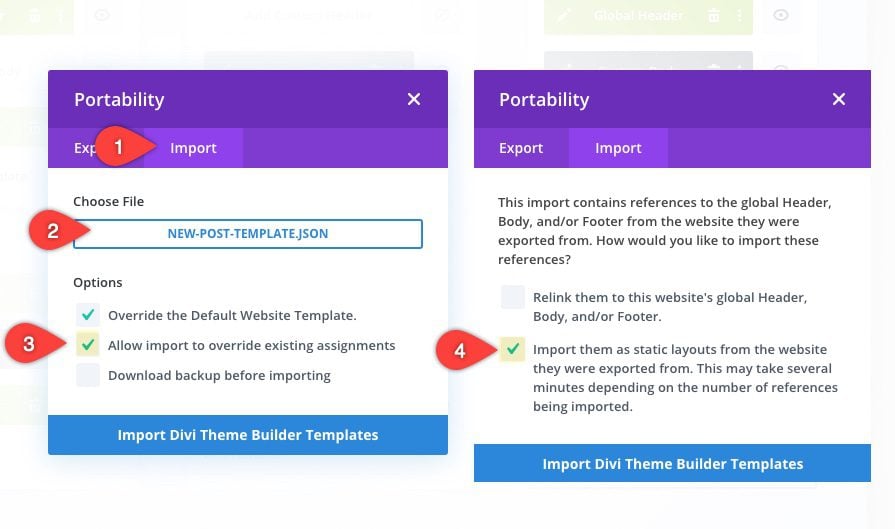
This will allow the imported template to override existing assignments and keep its own Global Header, Body, and/or Footer as static layouts.
If we look at a post on the live site using this new imported template, we will see the header and footer have been carried over as static layouts. This means that the header and footer or visibly (and applicable) on to this individual template (not global).
If you don’t want the new template to override existing assignments, you can “uncheck” the option to “Allow import to override existing assignments” when importing the template.
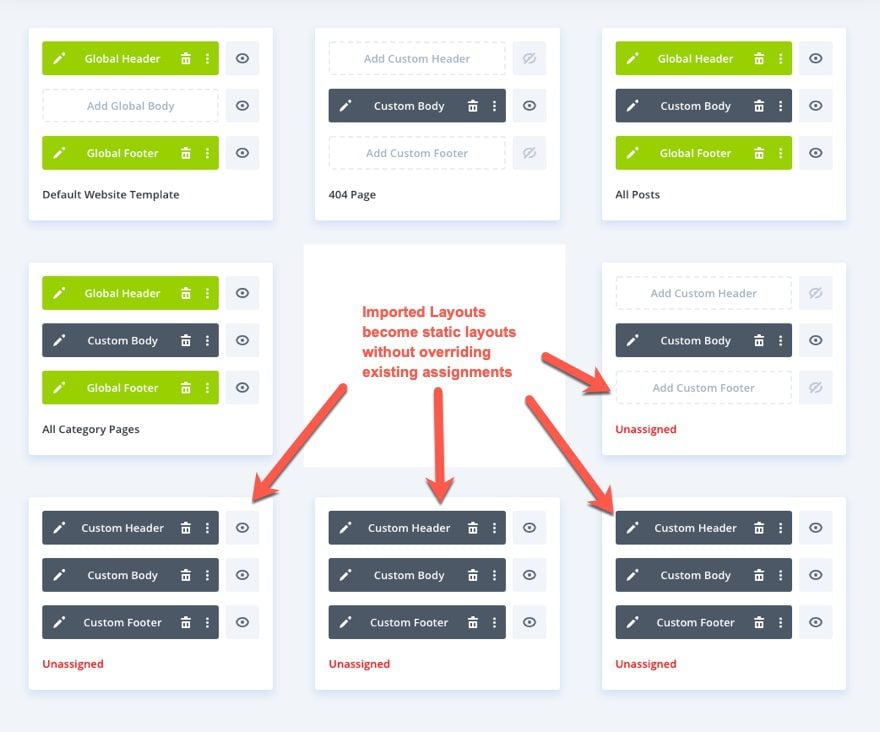
Now you will see the imported template as “unassigned” since the template assignment conflicts with an existing template.
This can come in handy if you want to bring over a bunch of templates (or maybe one of our theme builder packs) without having to worry about changing anything on the current website.
For example, let’s say you have a file with a complete set of theme builder templates, including global items. You can import the file without any “override” options selected and as static layouts.
The imported layouts become static layouts without overriding any of the existing template assignments.
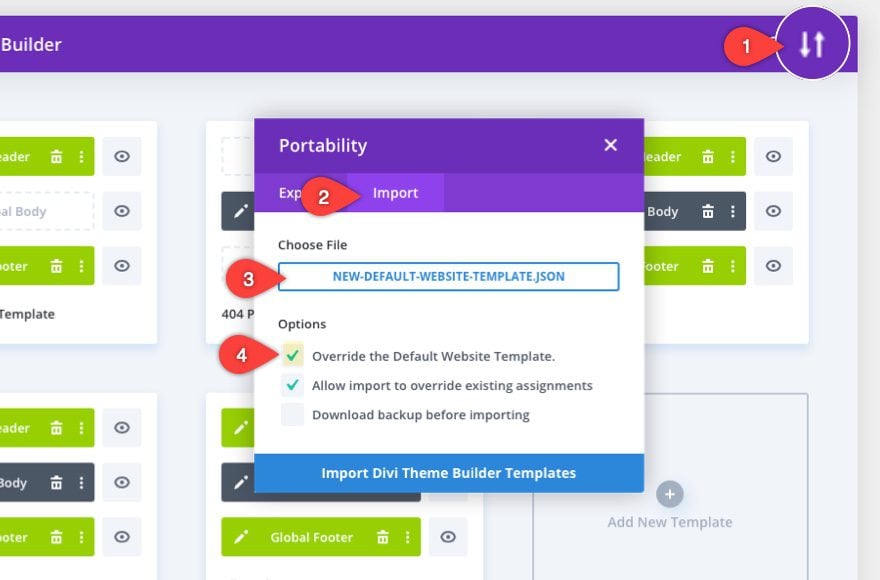
How to Import and Override the Default Website Template
The default website template is a special template in the theme builder that controls the global areas of your website.
A default website template can be exported and imported just like any other template. However, since a website can only have one default website template, you will need to choose only one. If you want to override the default website template with a new default website template, all you need to do is import the file containing the default website template and make sure you have the option selected to “override the default website template”.
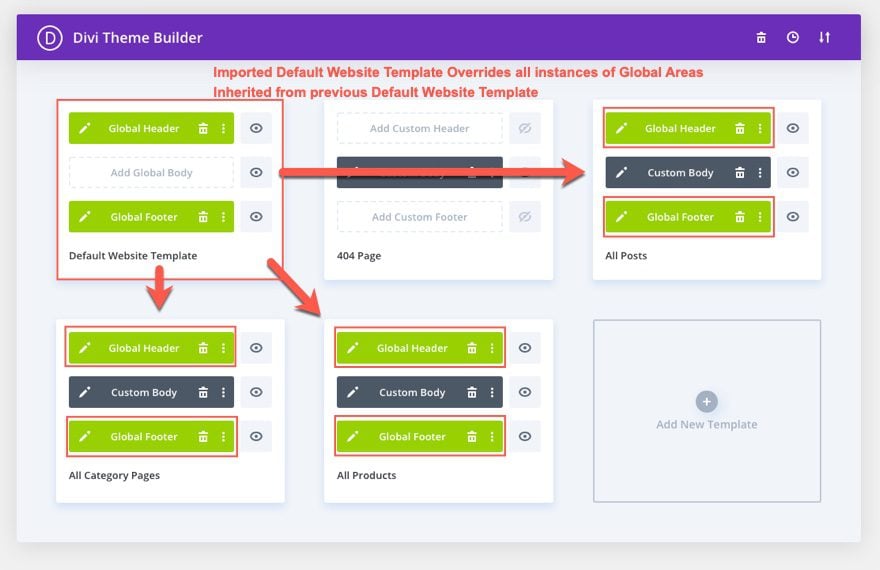
Once the new default website template is imported, it will override all instances of global areas throughout all templates using the previous global areas site wide. So you don’t have to do anything else!
Downloading a Backup Before Importing
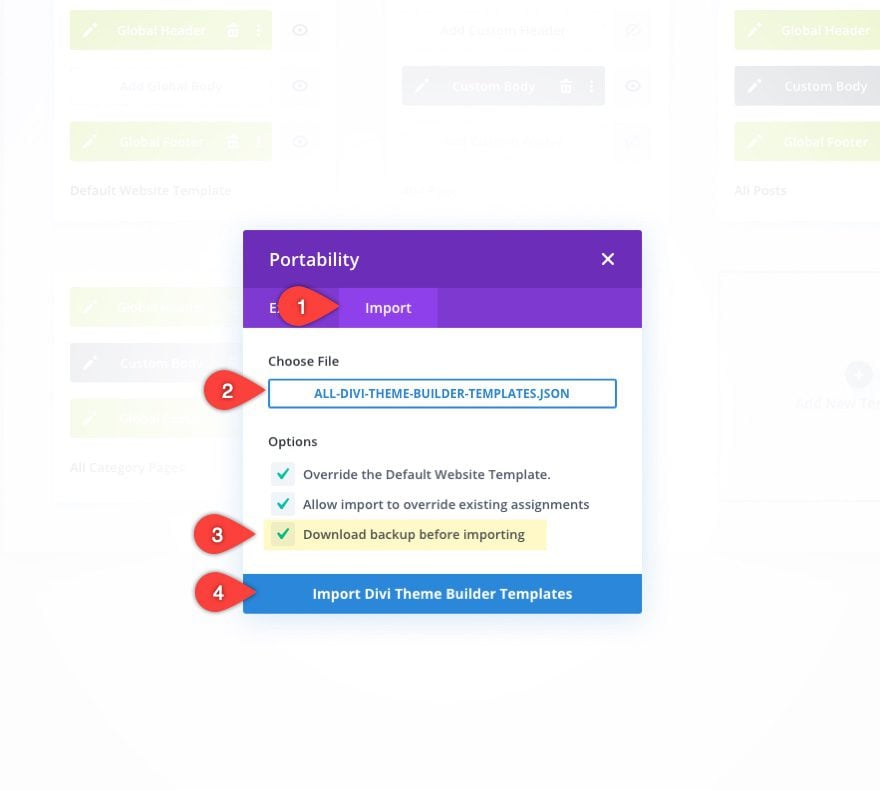
Before we go, it’s important to point out the “Download backup before importing” option available when importing new templates. In fact, It’s always a good idea to download a backup before importing one or more templates to your website. After all, you may a lot of templates and you don’t want to override or erase things by accident without a backup.
The option is the third option under the import tab.
Final Thoughts
There’s something magical about the way an entire site can transform with a few simple clicks. And with Divi’s Theme Builder portability options, you have the power to import and export the template(s) you want and also choose how you want those templates to behave with existing ones. When in doubt, it’s always a safe bet download a backup before importing.
How has your experience been with importing and exporting templates in Divi’s Theme Builder?
I look forward to hearing from you in the comments.
Cheers!
The post How to Use Divi’s Theme Builder Portability (Import & Export) Features appeared first on Elegant Themes Blog.

