Keeping your content organized is an important aspect of running a website. Fortunately, the WordPress Calendar block can help you do that. This element enables you to display a calendar on your site that links to your posts based on their publication dates. As such, your readers won’t need to trawl through your archives to find older articles.
In this post, we’ll explain how to add the Calendar block to your WordPress posts and pages, and discuss each of its settings. We’ll also provide tips and best practices for using this element, and answer some frequently asked questions.
Let’s get started!
How to Add the Calendar Block to Your Page or Post
Adding the Calendar block to your WordPress site is quick and easy. To get started, navigate to the post or page where you want to display the element.
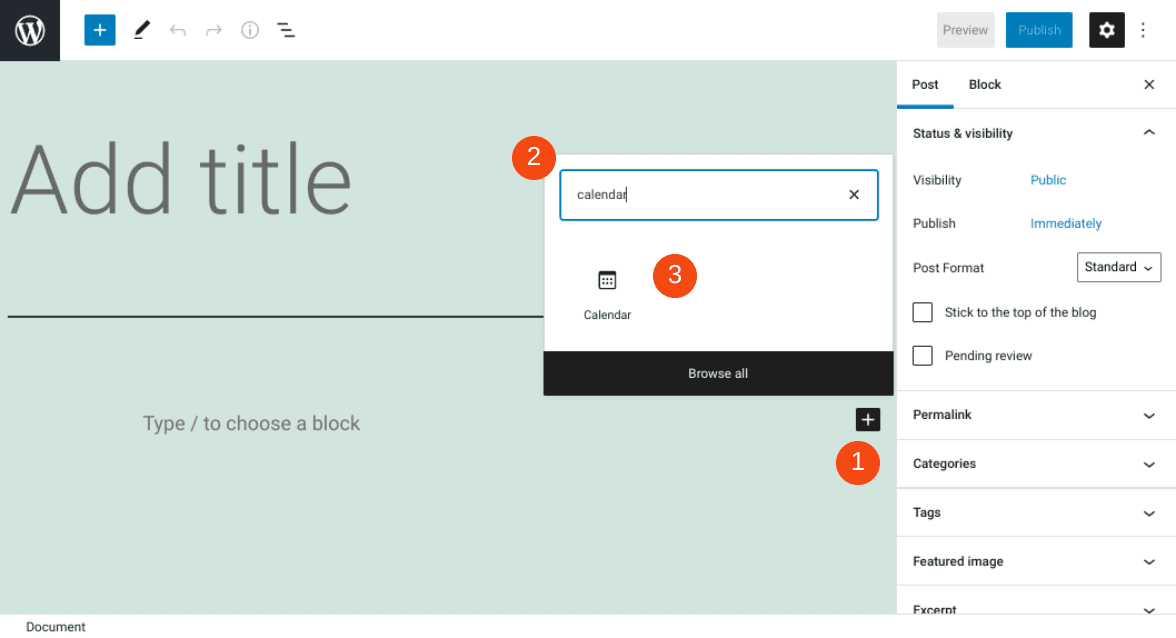
Next, you can click on the plus icon (1), enter “calendar” into the search field (2), and select the Calendar block (3):

This is one of two methods you can use to insert it. Alternatively, you can type “/calendar” into the paragraph block of the editor, and then hit your Enter key. The element will automatically be added.
Calendar Block Settings and Options
Each WordPress block comes with its own collection of controls and settings. Let’s take a closer look at what the Calendar block has to offer.
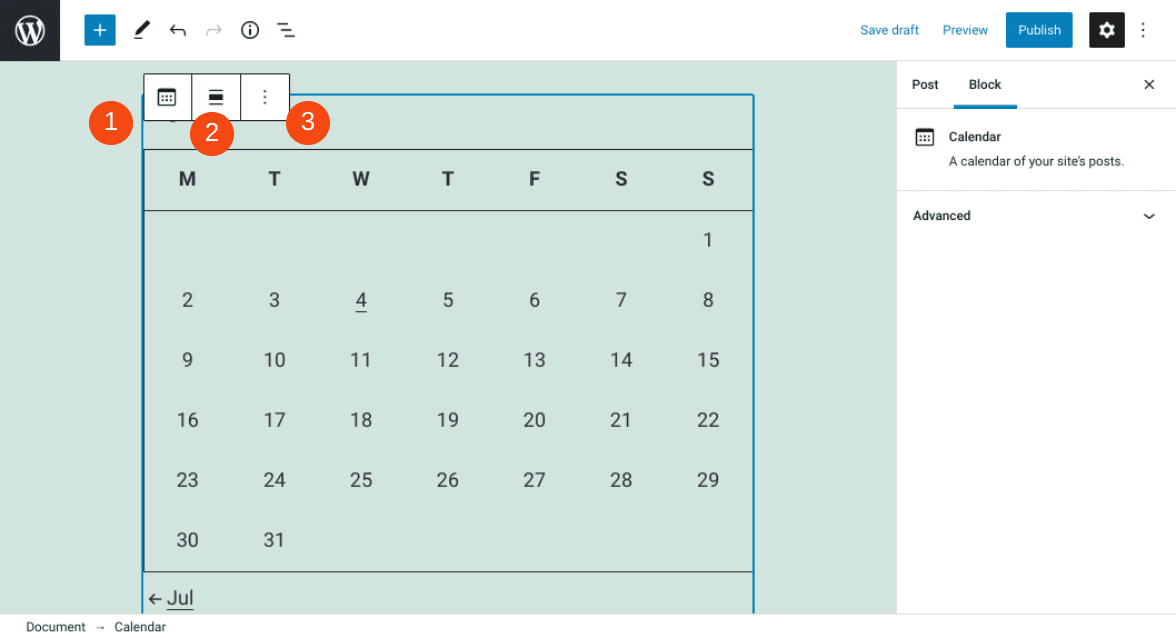
Once you add the block, a toolbar will appear along the top of the calendar with three options:

The first icon is the Transform To button. You can use it to change the element into Groups or Columns.
The second icon is Change Alignment. You can position the block to the left, right, or center. Additionally, you can choose to make it “full” or “wide” width.
The third button is More Options. Here, you will find a handful of additional settings. For example, you can insert another block before or after the calendar, add the element to your Reusable Blocks, or duplicate it.
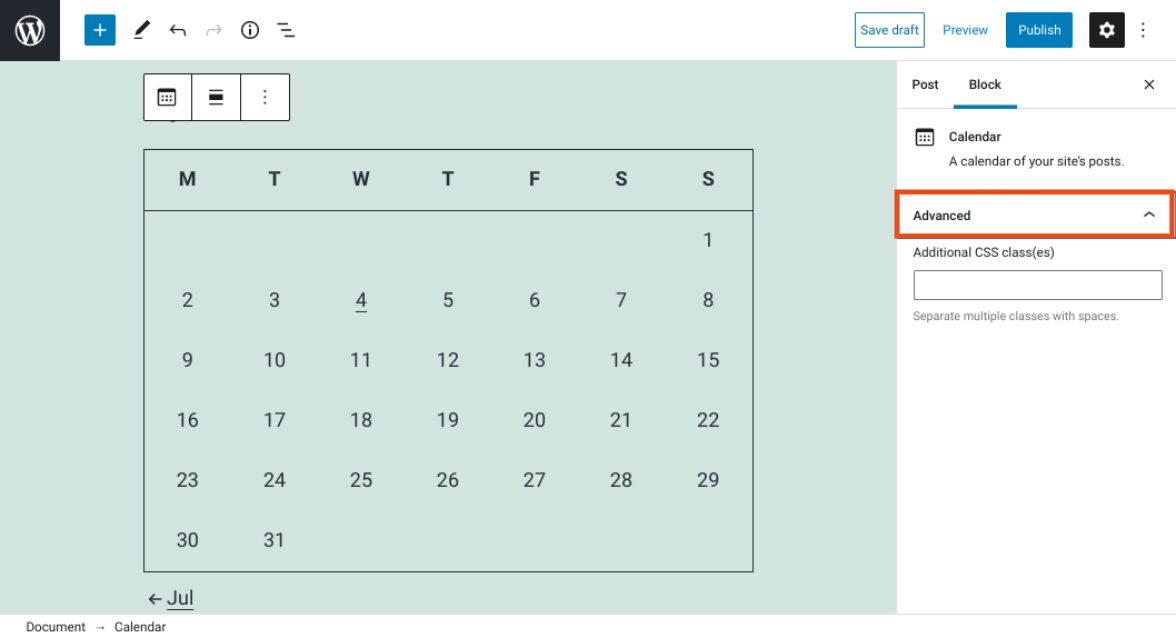
Finally, you can configure the element using Advanced Settings. You can find them on the right-hand side of the screen:

You can click to expand the panel. There is a box where you can add custom CSS if you wish.
Tips and Best Practices for Using the Calendar Block Effectively
The Calendar element is simple, straightforward, and easy to use. Aside from its alignment and width, there aren’t many settings or controls to navigate. With that being said, there are some tips and best practices you might consider while using this block.
First, remember that the Calendar block is only one of several ways to organize your blog posts. It’s an excellent option for when you publish many posts consistently, and want a quick, accessible way to sort them in chronological order.
On the other hand, in addition to using the Calendar element, you might want to use the Categories block. It enables you to organize and group your posts based on specific topics, rather than the date they were published.
Also, keep in mind that your alignment options for this block may vary depending on the theme you’re using. For example, if you want to use either the “full width” or “wide width” alignment, your theme must support those settings.
If you’re having trouble adjusting the block’s positioning, you might want to consider switching to a default WordPress theme, at least temporarily. This step can help you determine whether your current theme is the issue.
Frequently Asked Questions About the Calendar Block
By now, you know almost everything you should about the WordPress Calendar block and how to use it. However, let’s discuss some of the most frequently asked questions, to make sure we cover all of the vital information.
What Does the Calendar Block Do?
This element lets you display a calendar that links to various posts. By default, it shows the current month and the days. You can click on a day to see the content published on that date. However, the block does not let you display other information, such as events.
You can place the calendar anywhere on a page or post (or in a widget area). You can also adjust the alignment so that it displays on either the left or right side of your other content, and select from various width options.
Where Do I Find the Calendar Block in WordPress?
Finding this block in WordPress is incredibly easy. There are two different ways you can locate and add the element to a page or post. First, you can click on the Add Block button and search for “calendar”. Alternatively, you can type “/calendar” into a paragraph block in the editor, and then hit your Enter key.
Can I Use the Calendar Block to Display Events?
You can only use the Calendar block to link to your WordPress posts. If you want to create a calendar for a different purpose, such as to display events, you’ll need to use an event or calendar plugin.
Where Can I Use the Calendar Block in WordPress?
You can add the Calendar block anywhere in WordPress where you can access the Block Editor. Therefore, you can insert it into any of your posts or pages. Additionally, you can use it when you’re editing WordPress widgets.
Conclusion
As a website owner, it’s essential to make sure that you have a clean, organized way of linking to your posts. Otherwise, your readers may struggle to locate your older content. Fortunately, you can use the WordPress Calendar block to improve your site navigation.
As we discussed in this post, this element lets you showcase a calendar with links to your posts. You can easily insert it into any of your posts and pages. Then you can customize the block and align it to the left or right of your content.
Do you have any questions about using the WordPress Calendar block? Let us know in the comments section below!
Featured Image via ivector / shutterstock
The post How to Use the WordPress Calendar Block appeared first on Elegant Themes Blog.

