Being able to create and edit videos on the go is one of those things that don’t surprise us anymore. What does surprise us though, is the range of tools that let you do it well. Video is a large part of digital marketing and no business of any size can get around it. Video is simply a necessity. That’s why today we’ll explore one of the best options available. It’s the Kinemaster pro video editor.
Kinemaster is a free and subscription-based video editing app available for both iOS and Android. In fact, the interface is similar on both devices. The Kinemaster app has surprised many people and has been included in a number of list blog posts depicting “the best mobile video editors for 2019”.
We tried it out and will show you an overview and some thoughts at the end about how it performed.
Free vs Subscription
Kinemaster can easily be used as a free app but your videos will download with a watermark. For Android users, there’s a hack with some audio files which removes the watermark on a use by use basis. This hack is not available for iPhone users. There is a 7-day free trial when you sign up for a one-year subscription.

Getting Started with Kinemaster
The app interface looks almost exactly the same on iOS and Android, unlike other apps where there are notable differences between operating systems. Let’s take a look at what the Kinemaster interface looks like.
Landing Screen
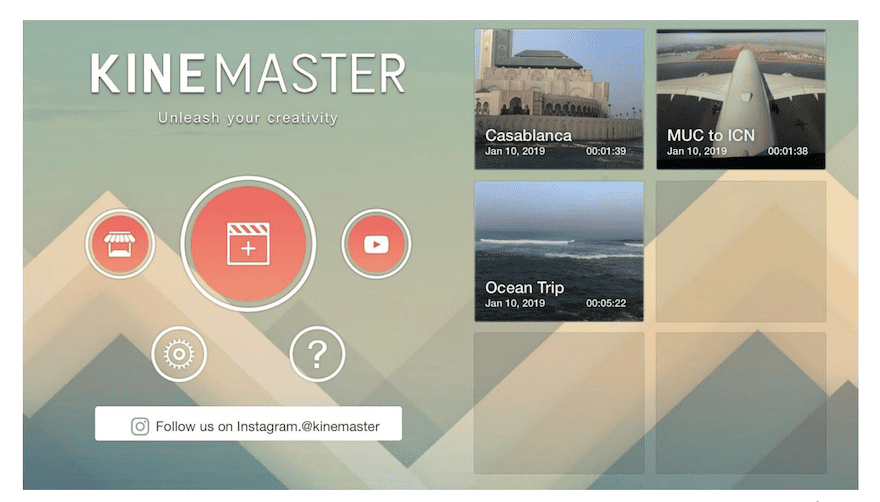
When you first open the Kinemaster App, you are welcomed by a landing page where you can see any previous projects you have worked on, and buttons to start a new project, a quick start button, a button to get help, another to open the Kinemaster YouTube channel and a settings tab.
The Main Settings Tab
The settings tab in the main landing has a gear icon. Click on this button to set up some behind the scene controls for your app. Here you control your subscription status and a few other options. Some settings are different for iOS and Android versions but in general, the settings are for editing, sorting and file locations.
Starting a New Project
From the landing screen, you can choose to either keep editing an existing project or start a new one. When you choose to start a new one the app will ask if you want to creat it a horizontal, vertical or square video. Choose wisely as you won’t be able to change it later. Also, make sure the clips you want to use are in that format or you will have to zoom and adjust to fit the size ratio.

The Editing Interface
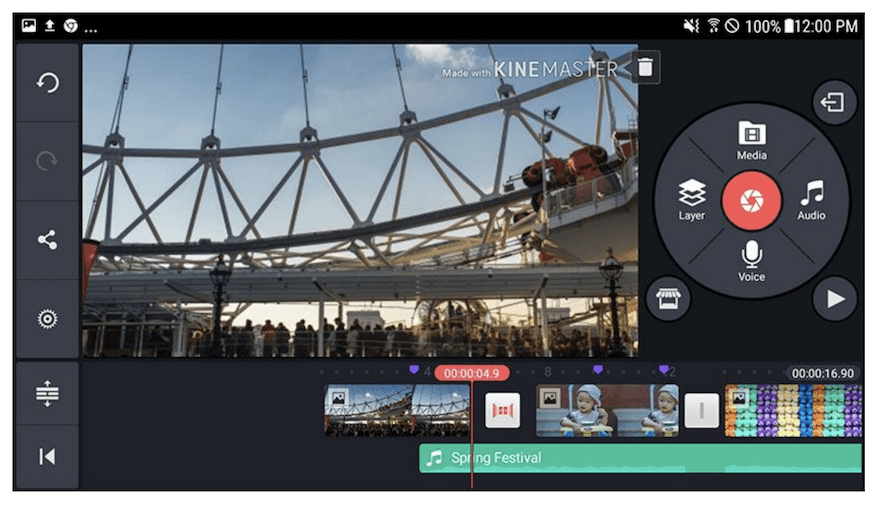
The editing interface looks similar to many other video editing software. Let’s take a deeper look at the controls.
Control Bar. On the left of the interface is the control bar. There are buttons for undo and redo. A capture button to add an image to your project with the help of the device camera. Project settings with lots of available adjustments for the audio, video, and adjustment. There is also a button that opens up the timeline when it’s too crowded at the bottom. The android
The Video Window. The video window is in the center like most video editing software. But if you click on the timeline toggle in the control bar, the video window moves over to the left of the screen.
Media Circle. The media circle is on the top right of the screen. From the media bar, you add new media, music, effects, and layers. The red circle inside the media circle is a capture button. Meaning you can capture video on your phone right from the app. You can also record audio with your microphone.
Advanced Settings. When a video or audio clip is selected, the advanced editing tools appear in place of the media circle. The number of editing options is quite impressive for a mobile app.
Timeline. The timeline is at the bottom of the screen unless you click on the timeline button on the control bar which will put the timeline in a larger area to the right, pushing the video window to the left. On the timeline, you can organize layers with effects, titles, b-roll clips, and audio tracks. The first and topmost layer is the main clip layer. The clips in this layer are always adjacent to each other and there are never any gaps. In the layers below, you can adjust when new clips come into the scene by moving the clips around.
Assets Marketplace. Inside the assets marketplace, you’ll find lots of effects, transitions, and title slides. These are all available when you have a subscription but have a cost per effect when you are just using the free subscription.
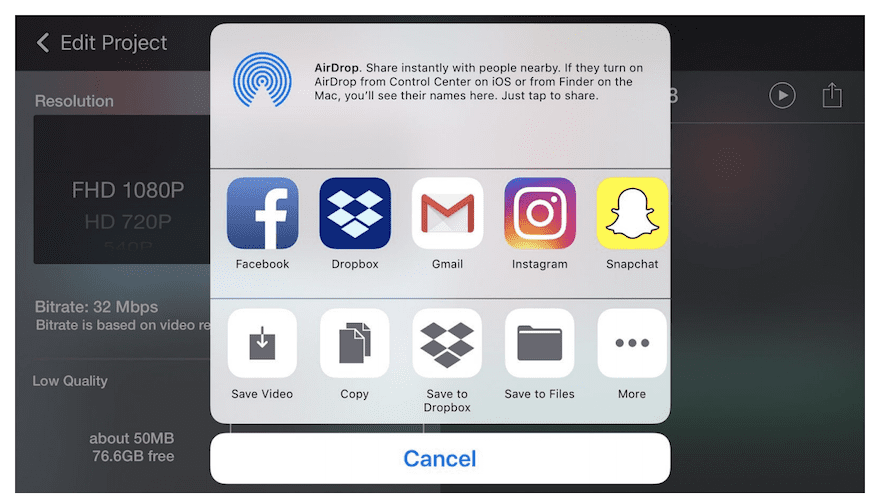
Export and Share. When you’re done with the video it’s time to export it. To share it on YouTube and social media you have to export it first. If the video is long it might take a while to export completely.
Chrome OS Hotkeys. The app has Chrome OS Hotkey capabilities. To learn all the hotkeys you can check the documentation on the Kinemaster website.
Editing Workflow
When using Kinemaster on iOS you need to have your media ready in your photo or video files. There is no integration to apps like Dropbox or Google photos. So it’s best to get clips and photos organized first before starting a Kinemaster project. On Android, you can connect to Google Drive.
Adding files is easy. when you add photos, video or audio the app will ask if you want to add it as a clip or as a layer. Adding as a clip will add it to the top layer, adding as a layer will create a whole new layer.
Clipping, cutting, relocating, reversing, and changing the speed of a clip is easy. In fact, clipping options are quite advanced. The regular split at the playhead option comes with the option to trim to the left or right of the playhead. When you trim, the clips instantly stick together getting rid of all empty spaces.
Adding effects like color grading filters and other creative filters is straightforward. Simply click on a clip and choose from the options in the editing tabs. If you don’t see what you like in the default list, visit the marketplace to find more.
Transitions are added by pressing on the plus sign between clips and there is plenty of options. Likewise, visit the marketplace for more transition options.
When you add a clip to a layer below the main layer, it will take over the scene unless you add an opacity filter or another type of effect. With a bit of practice, you can make plenty of interesting and creative effects using layers and effects at the same time.
Checking your progress is simple. Simply press the play button and watch the video as you edit.
Once your video is ready, export it at the recommended quality or adjust as needed. After it has been exported you can share it social media or via messenger or email or any other app that you have linked to your sharing functions on your device.

Last Thoughts
Having tried a number of different video editing apps, I can safely say that Kinemaster is one of the easiest and most intuitive. The learning curve is not steep at all and it’s easy to get results fast. As a social media marketing and content creator, Kinemaster is one of those apps that will help you make content faster and better.
There is a couple of things that could be improved. The inability to change the aspect ratio from inside the editor is a bit limiting. Also, long and large videos take a long time to export. It would be nice as well if with one subscription you could use both iOS and Android apps. Some of us have a number of devices and use them all depending on the situation.
All in all, the Kinemaster pro mobile video editor is a pretty decent video editing app. It’s not expensive if you are constantly creating videos, especially if you are doing it from your handheld device. You can get Kinemaster in the App Store and on Google Play. You can find an extensive and detailed user guide on the Kinemaster website which helps understand every working detail of the app.
Have you used Kinemaster? Are you curious to try? Let us know in the comments.
Featured image via Ulvur / shutterstock.com
The post KineMaster Mobile Video Editor: An Overview and Review appeared first on Elegant Themes Blog.

