Every business, big or small, needs a social media presence. That’s why a social media scheduler is so important. But when it comes to choosing the right one, it’s all about what the tool can do for you and if it fits your needs. You might have seen MeetEdgar while doing research for the right tool. In this post, we bring you an overview and review of MeetEdgar, the social media scheduling tool. After looking at what MeetEdgar can do, we’ll take a look at who this tool is best for.
What MeetEdgar is Known For
Every social media scheduler has a feature to make them stand out from the rest. Agorapulse has good social listening capabilities, Hootsuite has a vertical column layout and Tailwind, detailed Pinterest, and Instagram tools. MeetEdgar is no different.
The stand-out MeetEdgar feature is the recurred posting queues for evergreen content. These queues post on selected channels on a loop. If there is no more content added to that queue, it will start back from the beginning until new content is added.
This is one of the features that MeetEdgar is known for. The second is the suggested copy variations. When you add a link to the content window, MeetEdgar offers variations. The tool pulls content from the blog post or article URL. Then, you can customize or personalize each variation as you please.
These two important features help businesses stay active on social media even if they forget to add new content. Furthermore, the recurring queues and suggested variations save time when scheduling content.
Of course, not every tool is perfect. MeetEdgar, for example, doesn’t have in-depth analytics tools. It also has limited Instagram tools and no Pinterest scheduling.
With that said, let’s get started with the MeetEdgar overview.
Choosing A MeetEdgar Subscription Plan
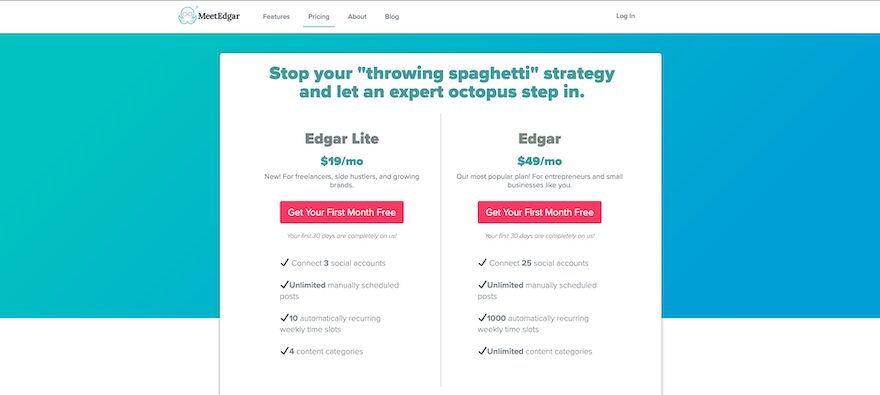
MeetEdgar used to have only one pricing plan at $49 a month. Recently they added a more accessible $19 plan.
Below is what you get from each plan:
$19/Month
- 3 connected social media accounts
- No limit to manually scheduled posts
- 10 weekly time slots for recurring posts
- 4 categories for labeling content
$49/Month
- 25 connected social media accounts
- No limit to manually scheduled posts
- 1000 weekly time slots for recurring posts
- Unlimited categories for labeling content
Upon sign up, you’re offered one free month. Regardless, you can’t start without giving your credit card details upfront. They also offer a no questions asked money-back guarantee if you don’t want to continue after the first month has been charged to your card.
Getting Set Up With MeetEdgar
When you sign up for MeetEdgar, the onboarding process is pretty straightforward. After going through four simple steps, you are ready to get started with the tool. If you don’t finish the steps, the dashboard will remind you until you do. This onboarding process is quite commendable, it sets you up for success with the tool instead of leaving you on your own. Many other scheduling tools show you the steps you need to take for getting set up, but MeetEdgar does it in a way that won’t let you go ahead without it.
Also, when you get started, the team offers different options for learning how to use the tool; by joining the live office hours, or joining a batch content party.
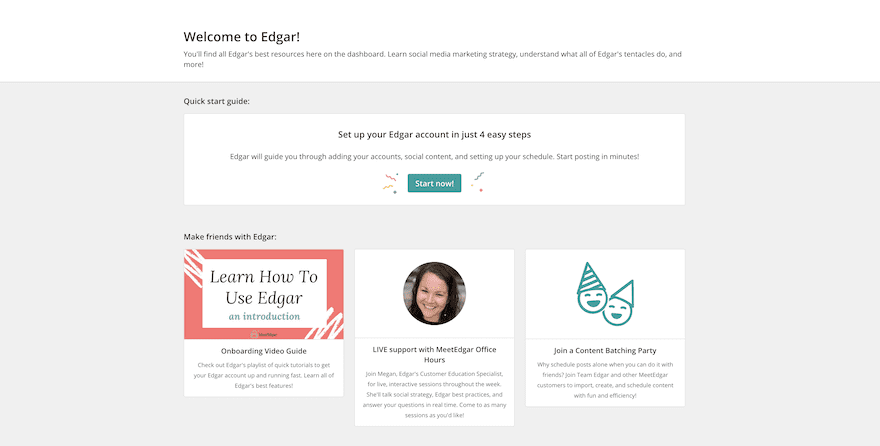
These are the onboarding steps:
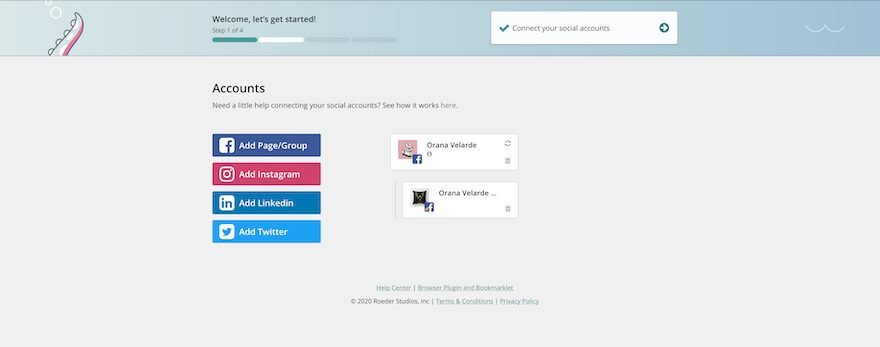
1: Add your social media accounts
The first step of the onboarding process is to add your social media accounts. Add as many accounts as your plan permits. Three for the $19 plan and 25 for the $49 plan.
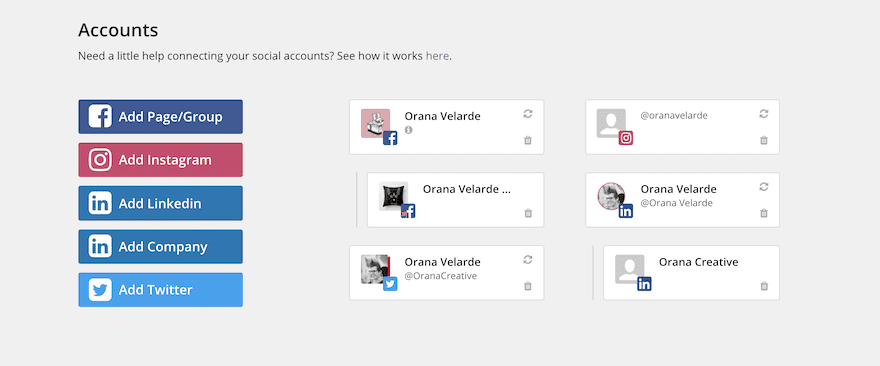
Social channels are organized as follows:
- Facebook pages and groups are organized as dropdowns from your Facebook profile.
- The option for Linkedin company pages is only available once you add a personal account and is then added as a dropdown.
- Twitter and Instagram are added on its own.
You don’t need to add all your account as you’re setting up. You can add more later or when you upgrade to the $49 a month plan.
2: Organize Your Categories
Every piece of content added to your MeetEdgar library must be put into a category. As a default, you are offered four to start with:
- General
- My blog posts
- Promotions & specials
- Recommended reads
With the $19 plan, you can only have these four categories but are allowed to rename them. With the $49 plan, you’re able to add as many more categories as you wish. The categories help you organize your content not only by topic but also by queues, as you will see in Step 4. When you’ve used MeetEdgar for a while, you’ll start to notice which categories you’re using the most or the least.

3: Add Content
The next step is to start adding content. If you signed up with an email associated with your website, MeetEdgar will instantly pull the RSS feed for you. It’ll offer to import the content into your library. This is the easiest way to get started with content in MeetEdgar.
If you added a Gmail email, for example, there will be no content to import. You’ll have to add content on your own or add an RSS feed manually. You can add as many RSS feeds as you like.
Regardless of which RSS feed you add, from your website, or any other, all imported content will be stored in a pending folder of your library. No content will be shared until you’ve approved it to go into the library.
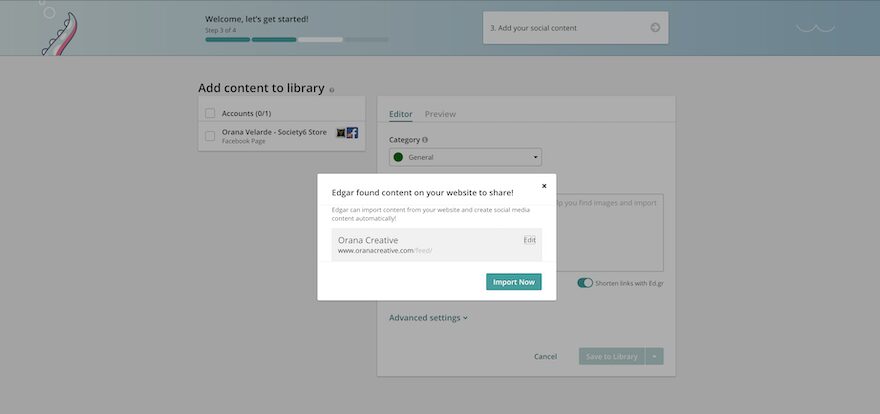
In the setup stage, you are offered one piece of content from your website’s RSS feed or are asked to add content manually. Later, you can add content via the ‘Add Content’ button on the top right of your browser window.
In the content editor you are asked to select a couple of things:
- The social channels to share to
- A category the content will be added to
- Copy variations to share the content in different ways
- How the content will be saved and shared
Copy Variations
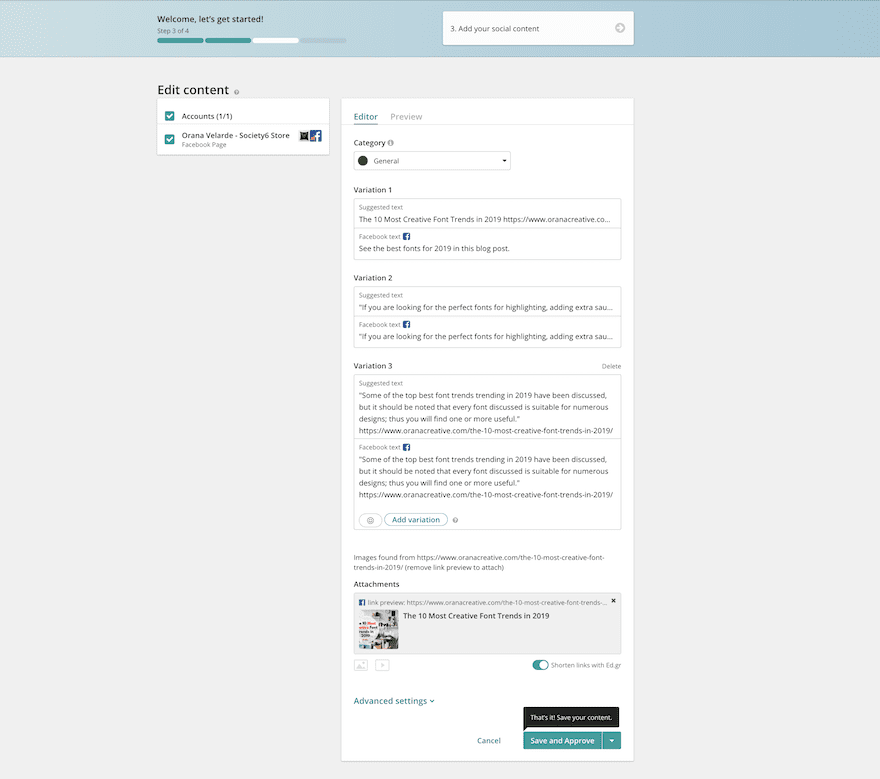
Let’s talk about the copy variations. This is one of MeetEdgar’s most notorious features. When you add new content, either from an RSS feed or by adding a link to the edit window, the editor offers to create automatic variations. It pulls content from the link you added, creating 4 different combinations.
You can either keep those as-is or edit them to best suit your brand voice.
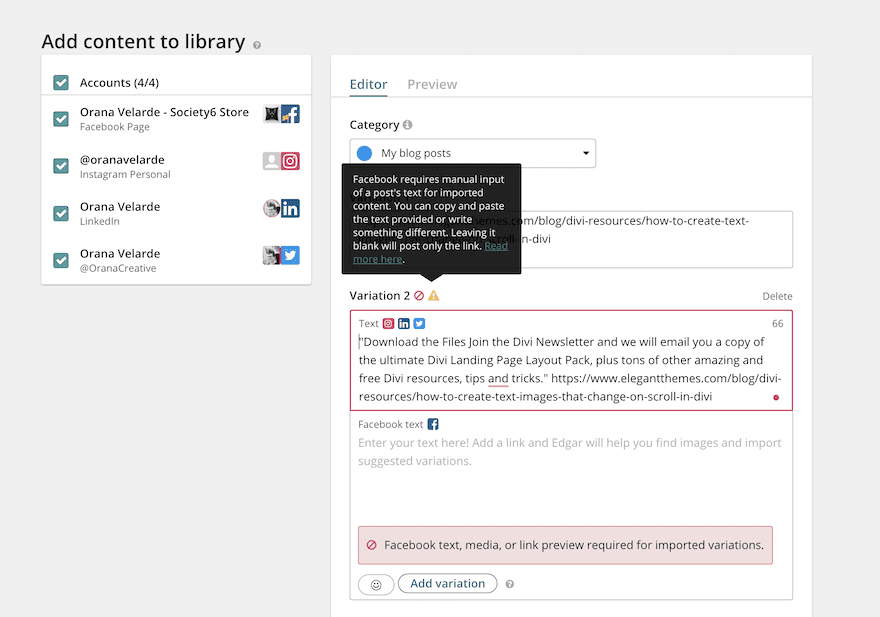
It’s important to note that Facebook won’t add these variations automatically, they’ll only be suggestions. You then have to copy and paste the text into the correct window. In the case of Twitter and Linkedin, the content will be added to the editor window automatically.
Additionally, you can add manual variations for any piece of content. What you can’t do is personalize the content for each social media channel.
Save And Schedule
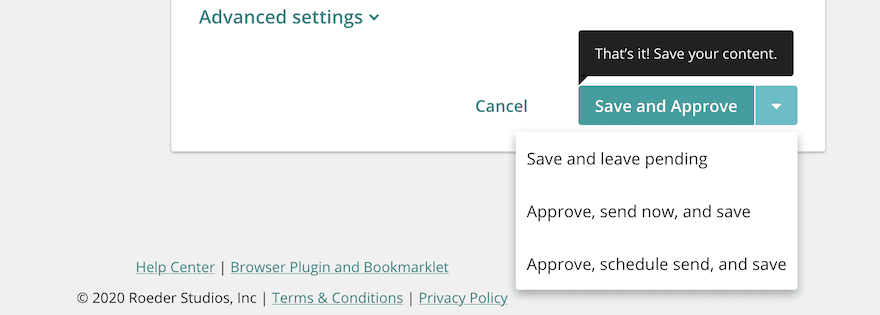
Once all your content is ready, it’s time to save or schedule it. The content editor gives you three options:
- Save and leave pending
- Approve, send now, and save
- Approve, schedule send, and save
Every piece of content will be stored in your library, either as pending or approved. The first choice is to simply save in your library to schedule later. The second option will share the content one minute after clicking the button and then be added to the recurring queue for its particular category and social media channel. By choosing the third option, you’ll be able to schedule the post for a specific time. After that, it’ll be added to your library and will go out again according to the category’s recurring schedule.
Use the advanced settings to schedule content to go out only once or to expire at a certain time.
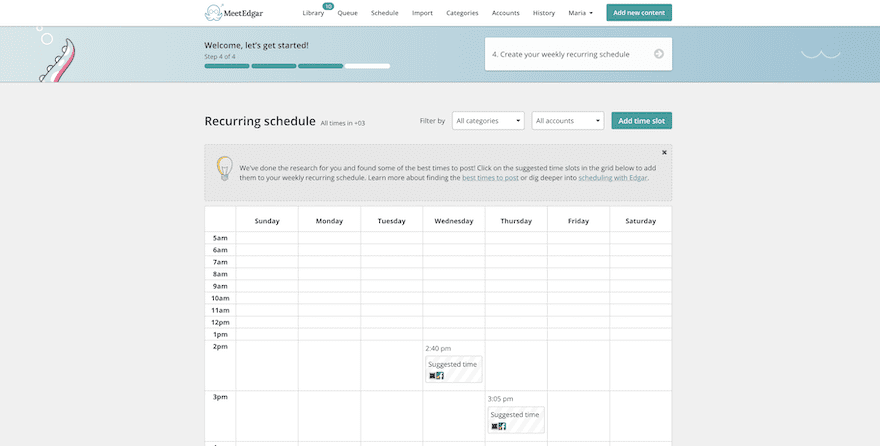
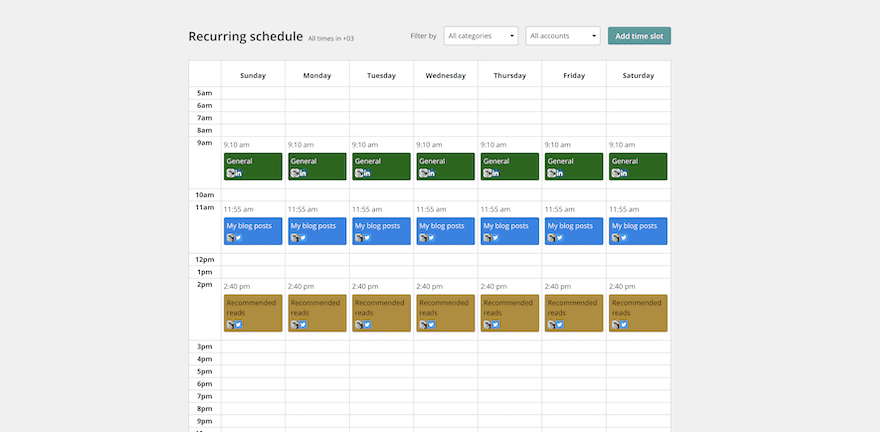
4. Set Up Publishing Queues
The last step in the setup tutorial is to create recurring schedules. These are the publishing queues that repeat once their allotted content runs out. If you don’t create these schedules, you’ll only be able to share and schedule your content manually. In the tutorial, you can set up all your schedules or just a few and then do the rest later. You need to add at least one to finish the tutorial.
MeetEdgar offers suggested times to share on particular social channels, you can choose to follow these suggestions or create your own schedules. The tutorial also offers further resources to find out more about the best posting times and how to optimize your MeetEdgar scheduling.
The scheduling tools in MeetEdgar are another of the well-known features that social media managers love. The options you see in the tutorial are only the beginning. For a full explanation of how the posting schedules work in MeetEdgar, read their documentation in depth.
Navigating Your MeetEdgar Library
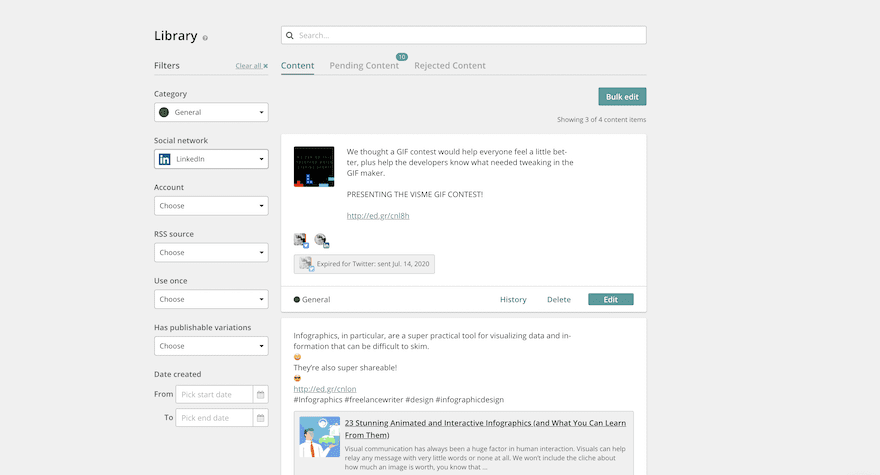
The recurring publishing queues pull content from your library. The library has three main sections:
- Content
- Pending Content
- Rejected Content
The first time you open the library you’ll see a notification about how each section works. These lightbulb popups show up whenever you are doing something for the first time and will stay until you click the x icon. This is what the popup says:
The content imported from your website or other RSS feeds is kept in the Pending tab of your library. Click Approve to add the content to your library or edit to add media, Facebook text, or variations! Click Reject if you don’t want to keep the content.

To view the content in your library, use the filters to find specific types of content. Each content window has the option to edit, delete, or see it’s posting history. These are the filters to help you navigate the library:
- Category
- Social Network
- Account
- RSS Source
- Use Once
- Has publishable variations
- Date created
You’ll be glad to have these filters once the library has a lot of content in it.
Another available option in the library the ‘Bulk edit’ feature. This is helpful when you need to edit something specific on all the posts for a particular campaign. MeedEdgar often reminds you about how bulk edit has no ‘undo’ button. Once you’ve changed something, that’s it.
Use the filters mindfully before doing any bulk edits.
Adding Content
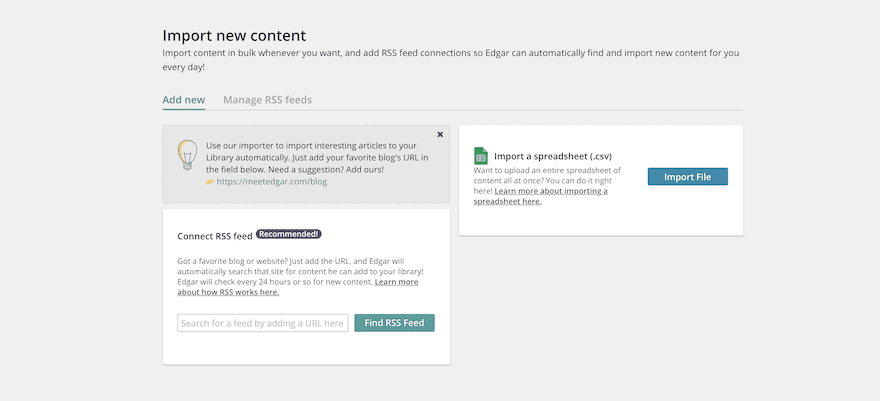
To reap the benefits of the Meet Edgar library and recurring schedules, you’ll need to add plenty of content to the library first. There are three ways to add new content into your library:
- Manually
- Adding an RSS feed
- Bulk importing with .csv spreadsheet
Remember, the content from RSS feeds goes directly to the pending content category of your library. From there you can customize it and approve it to be shared.
The Bulk import feature is a little different. The contents of the spreadsheet show up in a list at first. From there you can choose to ‘post once,’ select a category and choose to what social accounts the content should be added. Then you can import the content to approve in the library later.
When you add manually, you’ll have the choice to select a category, choose the social media accounts, create automatic variations, and then schedule or save just as we saw above in the setup tutorial.
Optimizing Your Categories in MeetEdgar
Well-organized categories are a large part of your success with MeetEdgar. The $19 plan only offers 4 categories, meaning you’ll have limited control over the organization of your content library. The $49 plan offers unlimited categories. As I mentioned before, you can’t add content to the posting library if it isn’t added to a particular category.
You can use categories for specific campaigns, types of content (video, blog post, carousel, etc), and anything that will help you keep your content organized.
When you add a new category, there’s an option to add it to the “random scheduled timeslots”. When you turn that off, the category is considered a ‘holding category’. All the content in this category will stay unshared until you either change the category for each piece of content or turn the aforementioned toggle back on.
The MeetEdgar help center has plenty of ideas on how to optimize your content.

Navigating The History
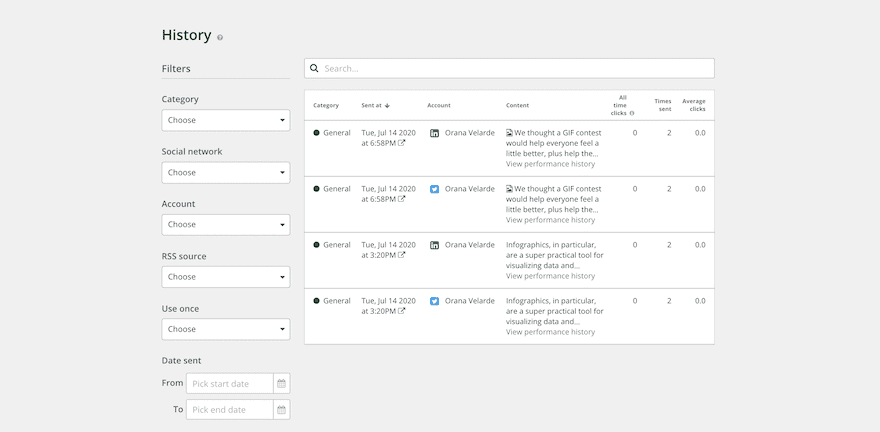
Finally, the history section. This isn’t an analytics tool; at most, you can see how many times a post was shared and how many clicks it got. The filtering works the same way as the library.
Pros and Cons of MeetEdgar
Now that we know how MeetEdgar works, it’s time to analyze the pros and cons.
Pros
- The library and categorization are great for social media managers that follow a strict content marketing and editorial calendar.
- Recurring schedules save lots of time. You set it up once and let it run, simply adding more content when you want to.
- Holding categories are a good enough solution for not having a collaboration feature.
- Holding categories also make adding content super productive, as you can do it in advance.
- Bulk importing and RSS feeds are another productive feature.
- Having a clear cut $49 pricing plan is simple and straightforward.
Cons
- You can’t personalize for specific social media channels unless you create a new piece of content altogether.
- There is no Pinterest scheduling.
- Instagram features are limited.
- The small $19 plan isn’t really enough for anyone.
- No in-depth analytics.
Who Is Meet Edgar For?
Finally, who is the perfect MeetEdgar user? That would be a small business owner, solopreneur, or freelancer that wants to manage their social media accounts and maybe one social media client on top of that. The tool is practical, easy to use, and saves lots of time that can be directed at other productive tasks.
The new addition of a smaller $19 plan is ok, but it’s not really enough unless you have limited social accounts. It’s definitely not for a business, as most have at least 4 or 5 social media accounts.
MeetEdgar is for users that aren’t looking for Pinterest scheduling or robust Instagram features. Sure, you can supplement MeetEdgar with Tailwind but most people prefer to use just one tool.
If you are big into the analytics of your social media efforts, then MeetEdgar might not be the right choice either.
The good thing about MeetEdgar is that you can try it out and see if it’s the right fit. The money-back-guarantee is a good enough reason to go ahead and try.
What social media scheduler do you use? Are you a MeetEdgar user? What do you love about it? Share in the comments and help the community!
Featured Image via RoseRodionova / shutterstock.com
The post MeetEdgar Social Media Scheduling Tool: Overview and Review appeared first on Elegant Themes Blog.
