Modern Tribe‘s The Events Calendar lives up to its name. It has become the defacto events plugin for many people. That’s saying a lot because there are a lot of fantastic events plugins available to choose from. It’s just that this one in particular does so much in the free version that it’s making a name for itself. So let’s walk through what makes The Events Calendar so popular.
Up and Running
You folks know the drill. Head over to the WordPress Plugin Repository and download The Events Calendar. It’s a free plugin, so you can either do it manually or straight from your dashboard’s Plugin page.
Once it’s activated, you get a new Events option in your admin dashboard. Depending on your specific plugin setup, it may be a little different, but it should be up top near Posts. The Settings tab should always be your first stop with a new plugin. Especially one like this that can be tweaked to do exactly what you want it to.
Settings – General
As you can see below, there are a lot of options here, even in just the General tab. Many people won’t have to adjust many (if any) of these to begin with. I wanted to call your attention to 2 in particular:
- Include events in the main blog loop
- Enable Google Maps
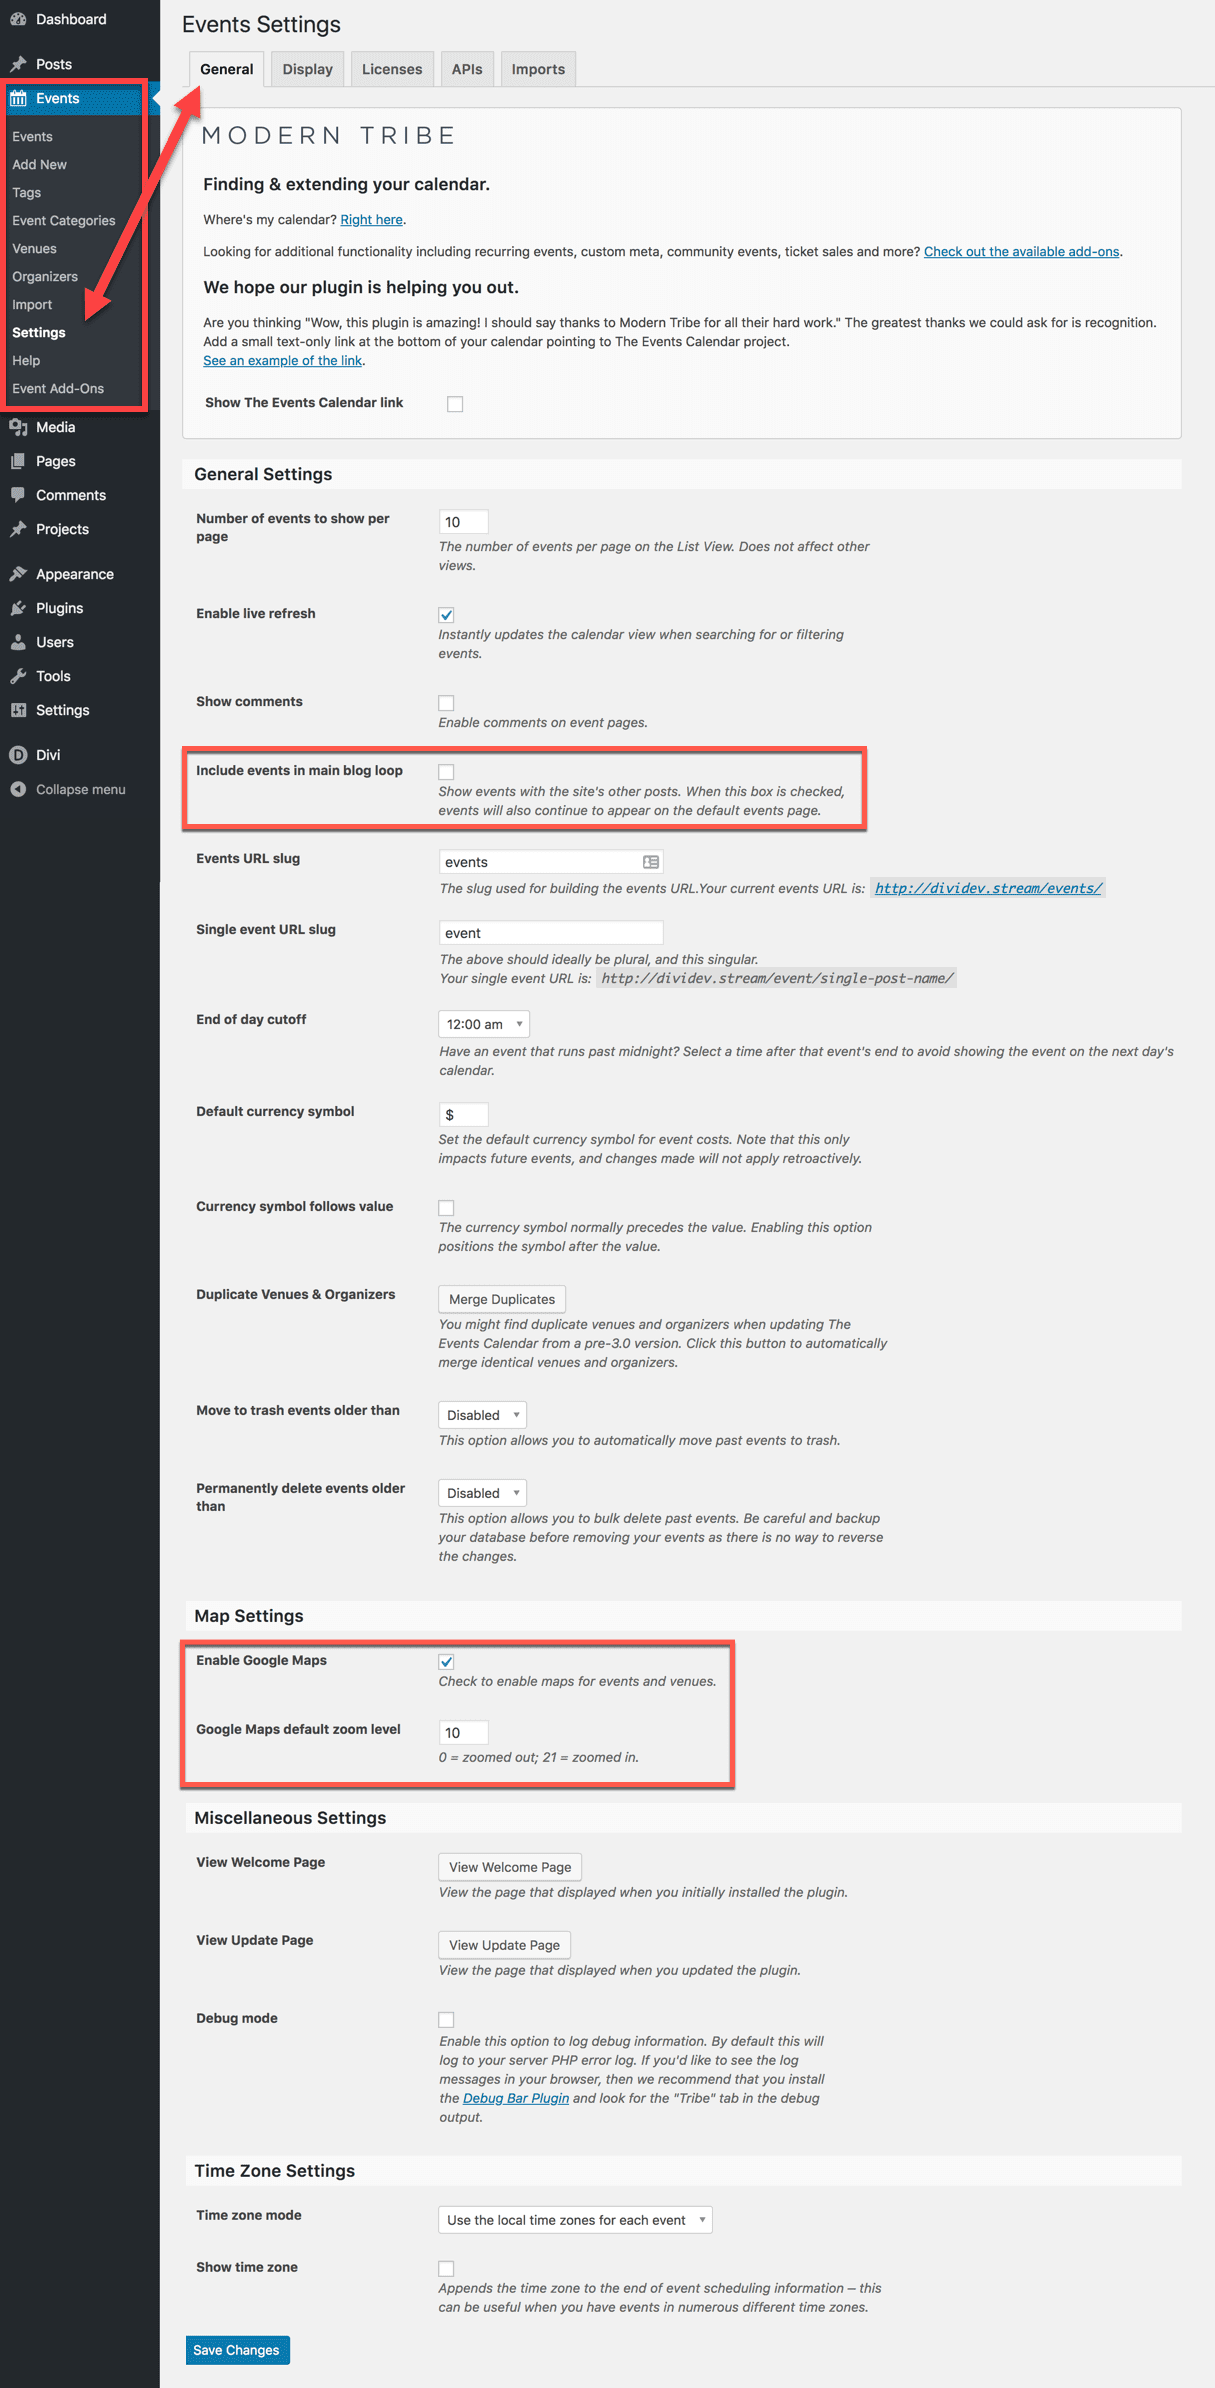
Personally, I’d want to enable include events in the main blog loop. Now, any Events created through the plugin will show up in the normal blog feed in addition to the calendar itself. That makes it part of RSS and email subscriptions, too. This is a personal preference after all, depending on what your site needs. But I thought it may have needed explanation if you’re not familiar with “The Loop” in WordPress.
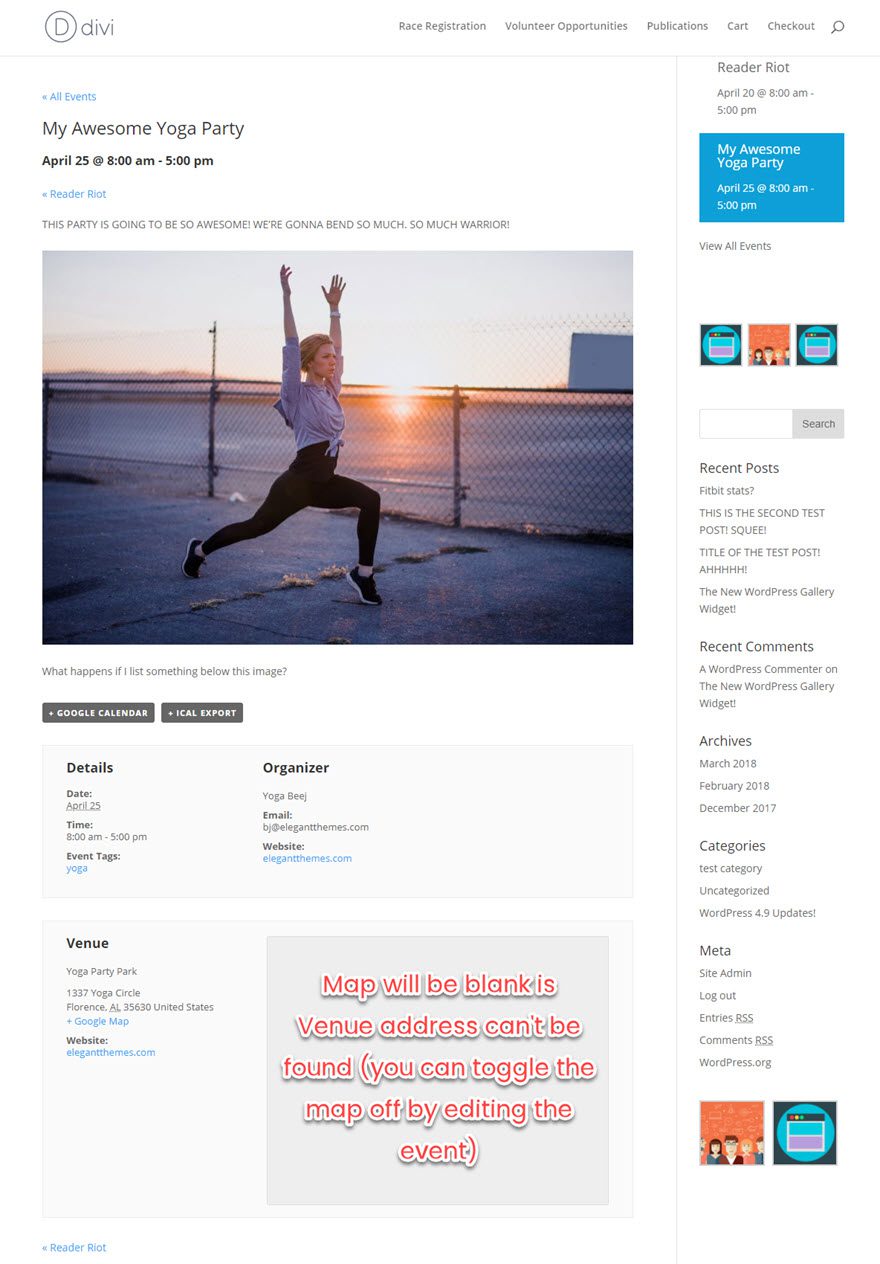
Enable Google Maps is pretty self-explanatory. It will put a map on the event page correlating with the address you supply. However, there’s one more step you’ll need to take even if this is enabled. Otherwise, you’ll get this:

Uh oh. Let’s take a quick detour and fix this before it even pops up.
A Quick API Detour
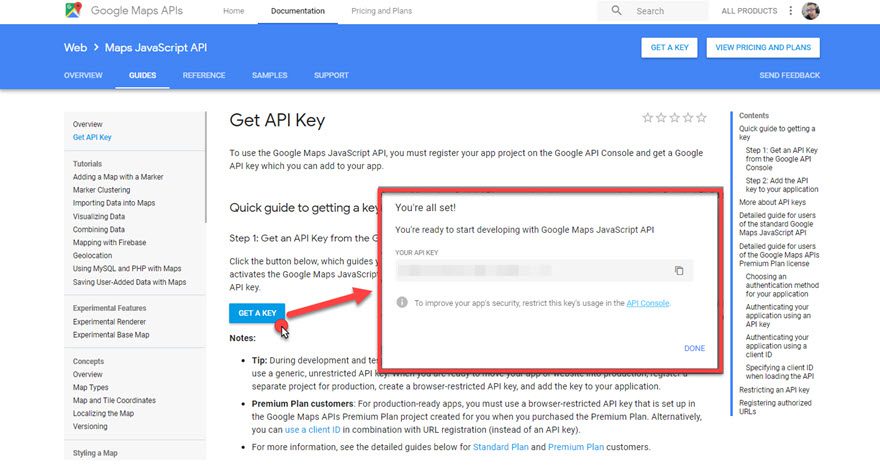
In the browser’s search console, you’re told there’s no API key for Google Maps. But it’s easy to get one. Head over to Google’s “Get API Key” page (yes, that’s what it’s called), and click on Get a Key. Give it a name in the modal that pops up and BAM! Instant API key.
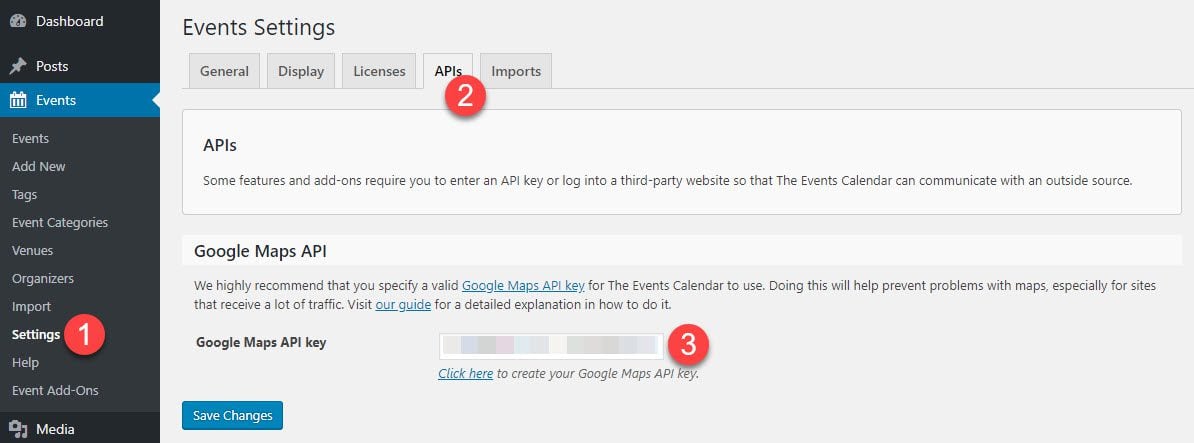
Copy it and navigate to the APIs tab under settings and paste it in the field.
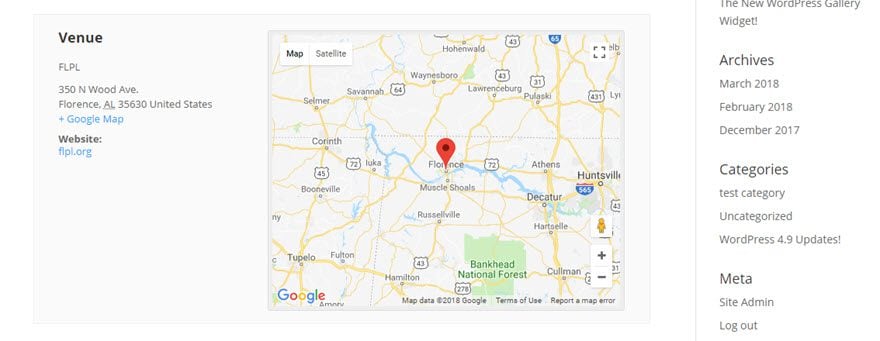
Now, you’ll have a map attached to all events with an address. (You can adjust the zoom in the settings tab, too — this is is the default.)
Settings – Display
Again, a lot of these will be personal preference based on your site’s needs (such as date display mode, format, default views). The important ones, though, are Default Stylesheet, Events Template, and Advanced Template Settings.
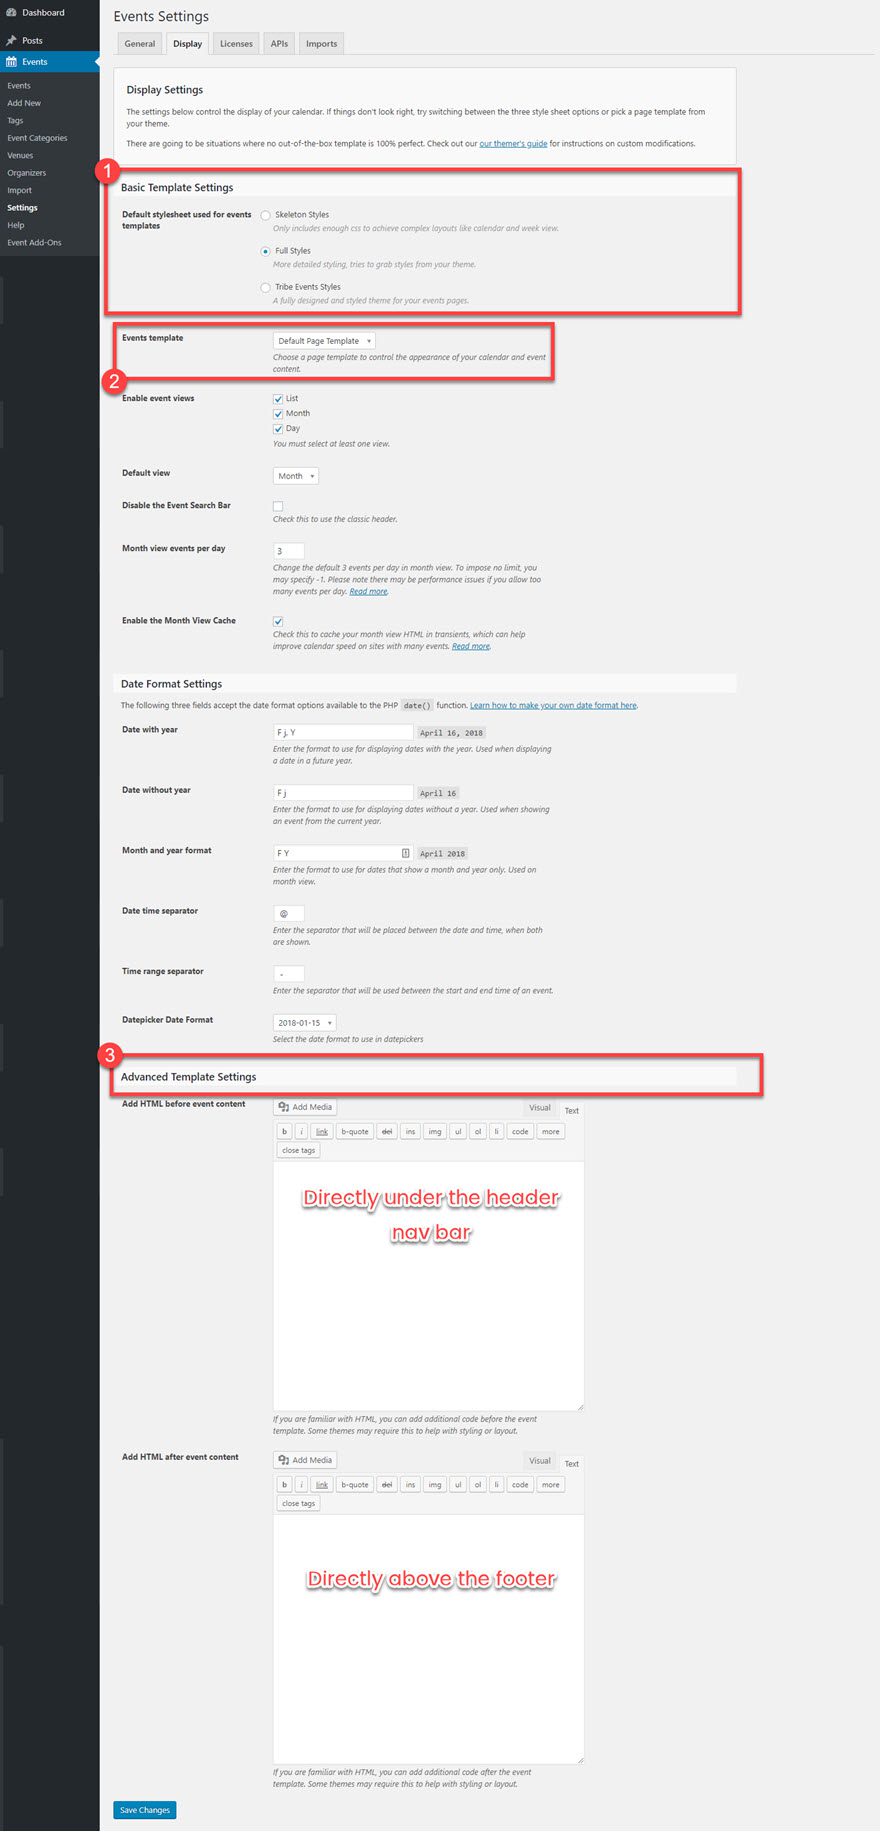
The Event Template is, by default, a right-side bar post. The Default Page Template takes whatever your site has set as the default page template and assigns it (for instance, if you have a no-sidebar page as your default).
Advanced Template Settings lets you put any HTML you want preceding or succeeding your event. This will be entirely wrapped around the entire post, being literally the first and last things displayed on the page other than the header and footer.
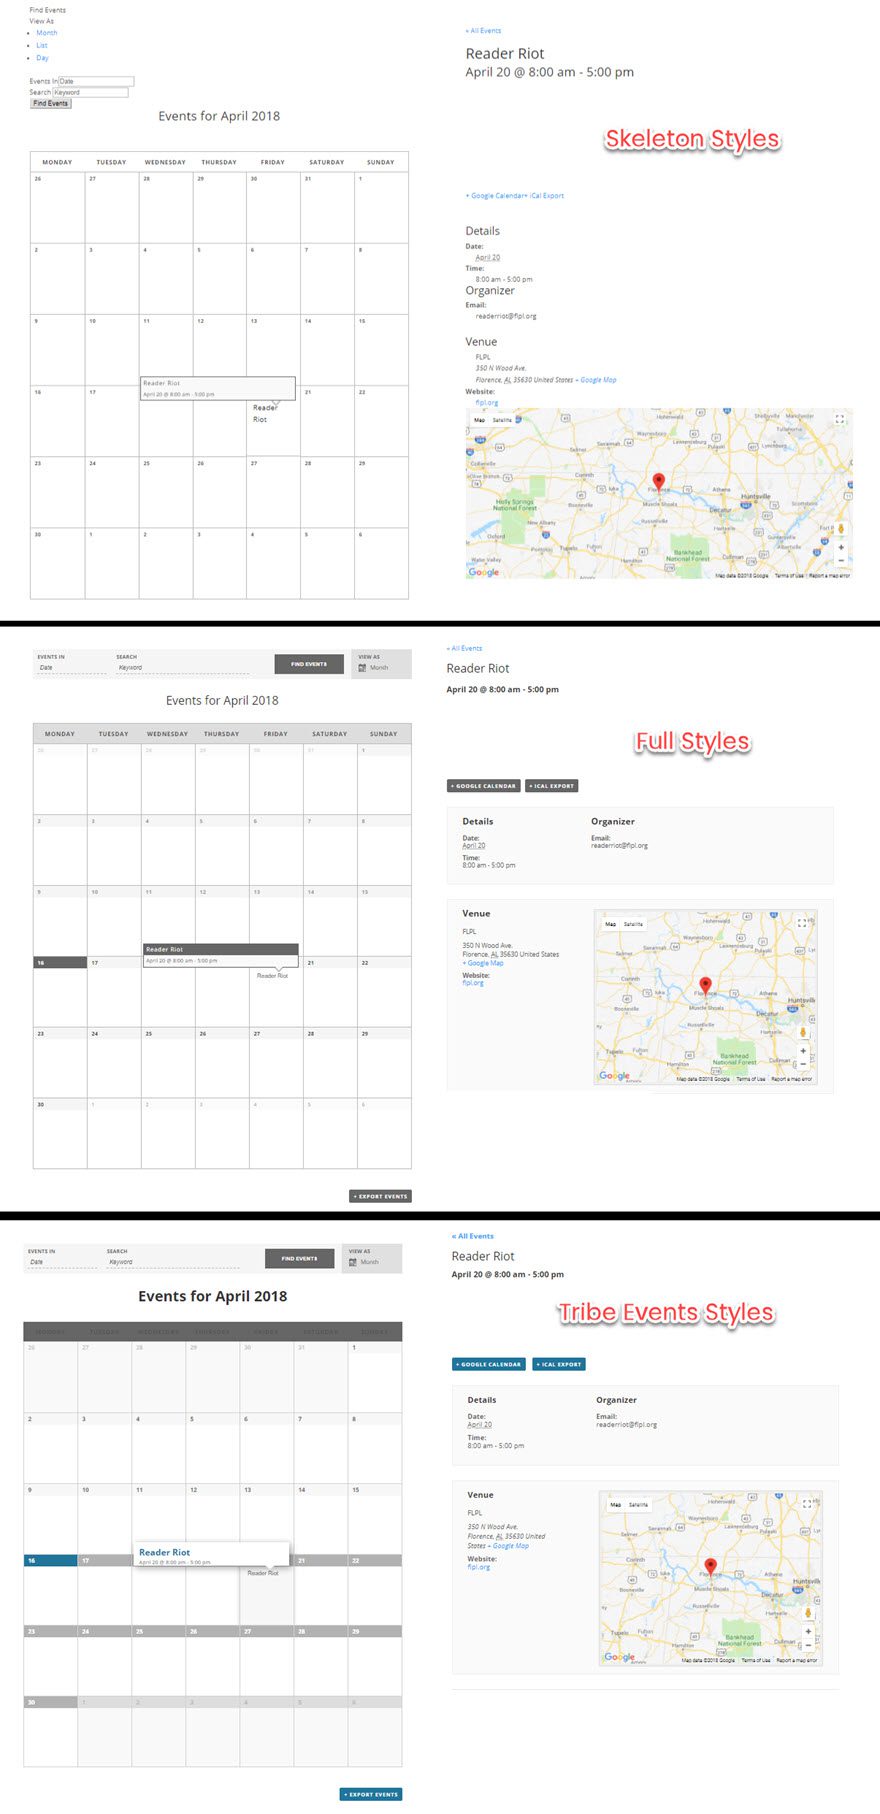
And for the Default Stylesheets, you get three options: Skeleton, Full, and Tribe Events. Skeleton is a bare-bones, no frills template that make for super-quick loading. Full styles takes your own styles from the Theme Customizer and applies it to the calendar and events. And Tribe Events is the official, fully styled theme from the devs.
Here’s what each looked like on my demo site:
Settings – Licenses, APIs, Imports
The other three tabs don’t have a lot in them. If you upgrade from the free version of The Events Calendar, you’ll put your license key in under the Licenses tab. We’ve already been through the APIs tab because as of this writing, the only API key you need with the plugin is Google Maps.
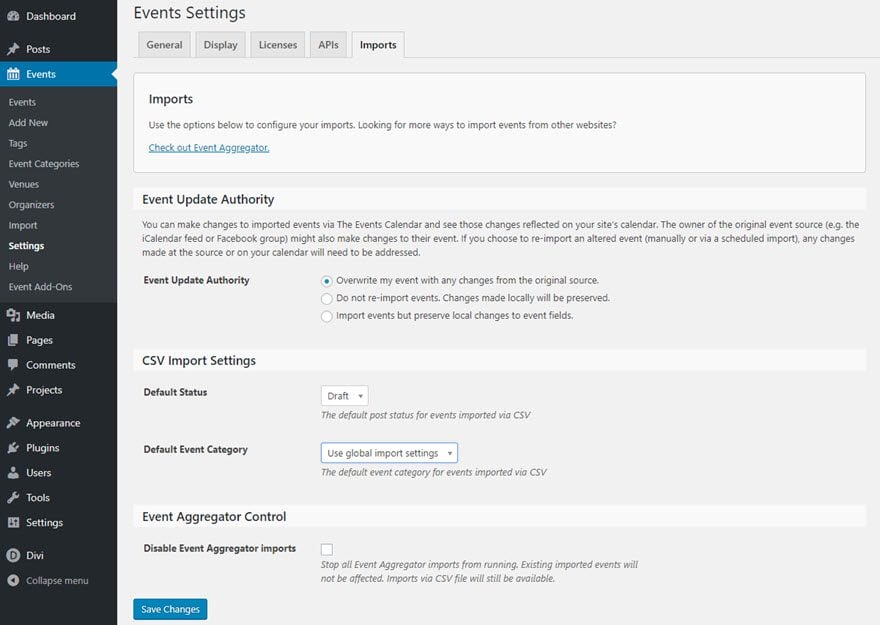
Imports is slightly more complex, but not by much. You can import from a CSV export of another service or calendar, and you can set the default post status (each Event will be posted new as draft, pending, published, etc.) and the category you want it posted under (“Events” by default).
The Imports tab is also where you will use the Events Aggregator plugin that Modern Tribe offers. If you buy it, you can pull from Meetup, Facebook, and a bunch of others using the WP REST API.
Adding and Editing Events
The real meat of the plugin, however, is the host of Events you can, well, host using The Events Calendar. What makes the plugin work well for so many people is that adding and managing the Events is honestly no harder than posting a blog post about the event. In essence, that’s what you’re doing anyway. So in your dashboard, go to Events -> Add New. (You can also access the Add New button from the list of all Events as well.)
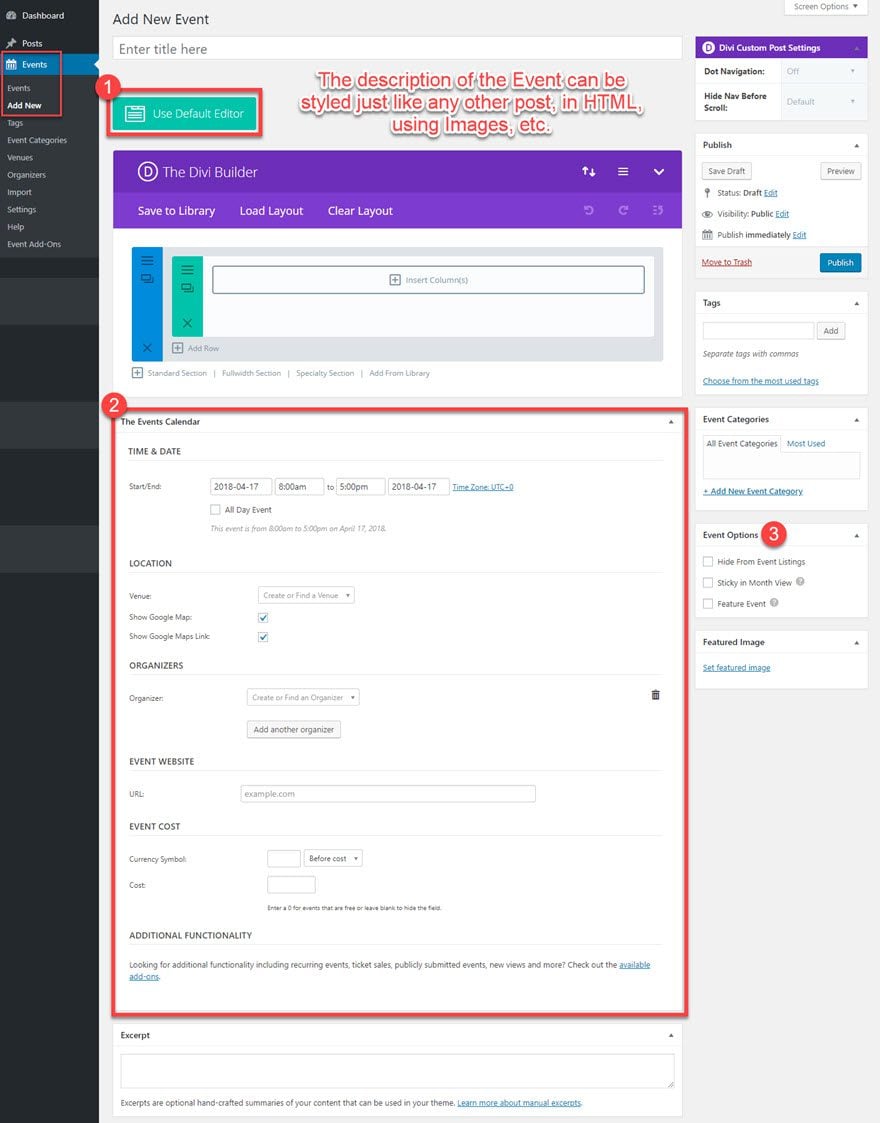
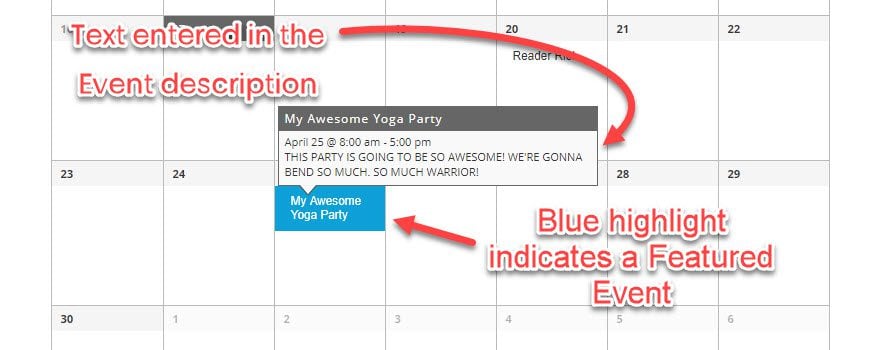
First, you see the post/page editor (#1 above). If you’re a Divi user, you can use any of the builder options you like. Or you can choose to use the Default editor to write it out. You can use images, HTML, whatever. It’s exactly like a blog post, and will appear above the Event-specific information you include below. It will also appear when a user hovers over the event, but any images or media will be hidden until they click through.
When that’s done, you can then move on to the Event information (#2 above), with the primary info being Time and Date, Location, Website, Cost, and Organizers. Sometimes, you might not have all of this, and that’s fine. What isn’t included will simply not appear on the Event page.
And in regard to the Event Options meta-box to the right (#3 above), you may or may not use this, but it’s great to have them regardless. If you check Hide From Event Listings, it will…hide the event from the listings. It will be live for you to share with people; however, it won’t be on the calendar or list view (or in The Loop, if you’ve chosen that option).
For Sticky in Month View, it means this entry will always be listed at the top, and Featured Event differs in that it will be listed and displayed prominently in widgets, archives, and various views.
Location, Venues, and Organizers
The final part of creating an Event is telling folks where it is, and who is throwing the party (or sponsoring the festival or whatever). While there is an Add New button under both the Venues and Organizers items in the dashboard menu, the far easier way to create them is on an event-by-event basis as you fill out the information.
Please keep in mind that as you create new Venues or Organizers this way, the text area/dropdown labeled that says Create or Find a Venue is for Names only. The address information will pop up when it’s filled out. So you don’t need to type it all in, unless you want your venue to be named “1337 Yoga Circle” or whatever the street address is for organization purposes.
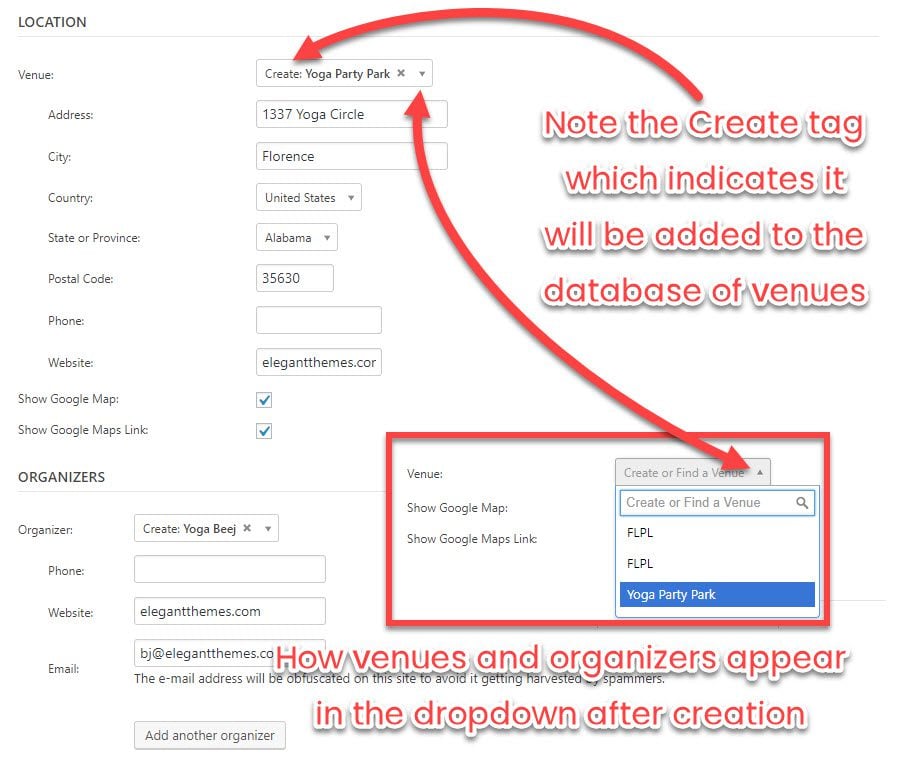
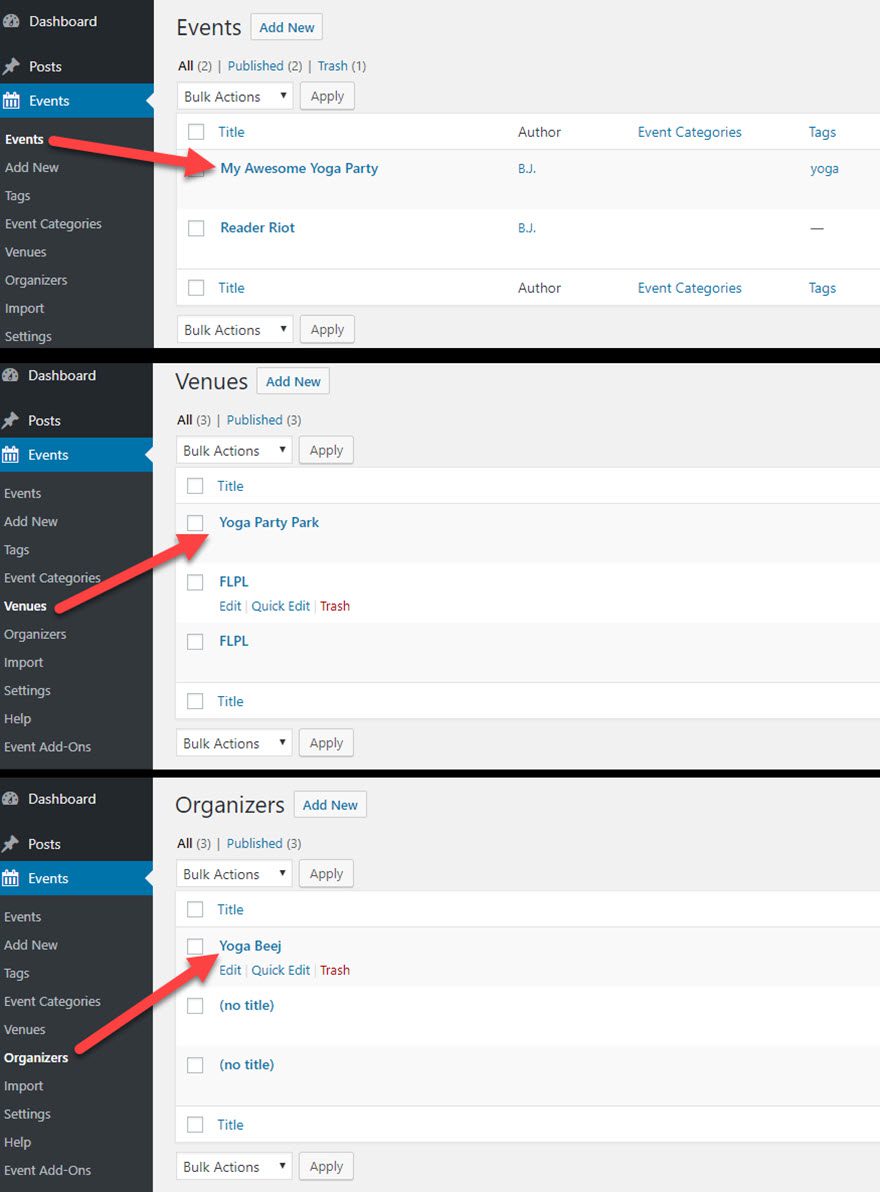
Best of all, any Venues or Organizers you create this way will stay in the database for later use, so you can simply pick them from a dropdown in any future event you create. You can also see/edit every single Venue and Organizer from the corresponding admin menu.
The Events List Widgets
Finally, we have the built-in widget that you can place in any widgetized area of your site. You can select a title, how many upcoming events you want to show (and even hide the widget entirely, if no events are upcoming). This is additionally where the Featured Event tag comes into play, as you can have a widget specifically for those.
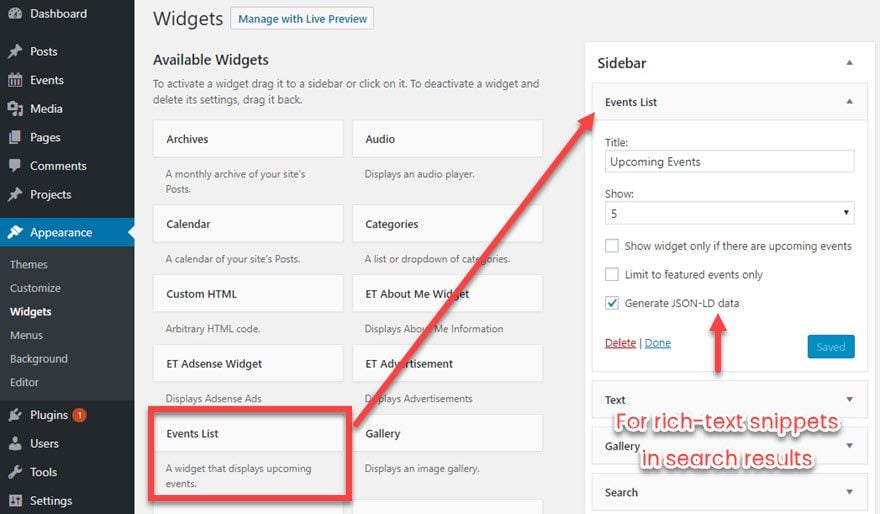
You will also notice the Generate JSON-LD Data, which is checked by default. I say keep it checked, as it’s a default schema for Google and other search engines to grab event data specifically and list them in search results separate from your page (such as in cards).
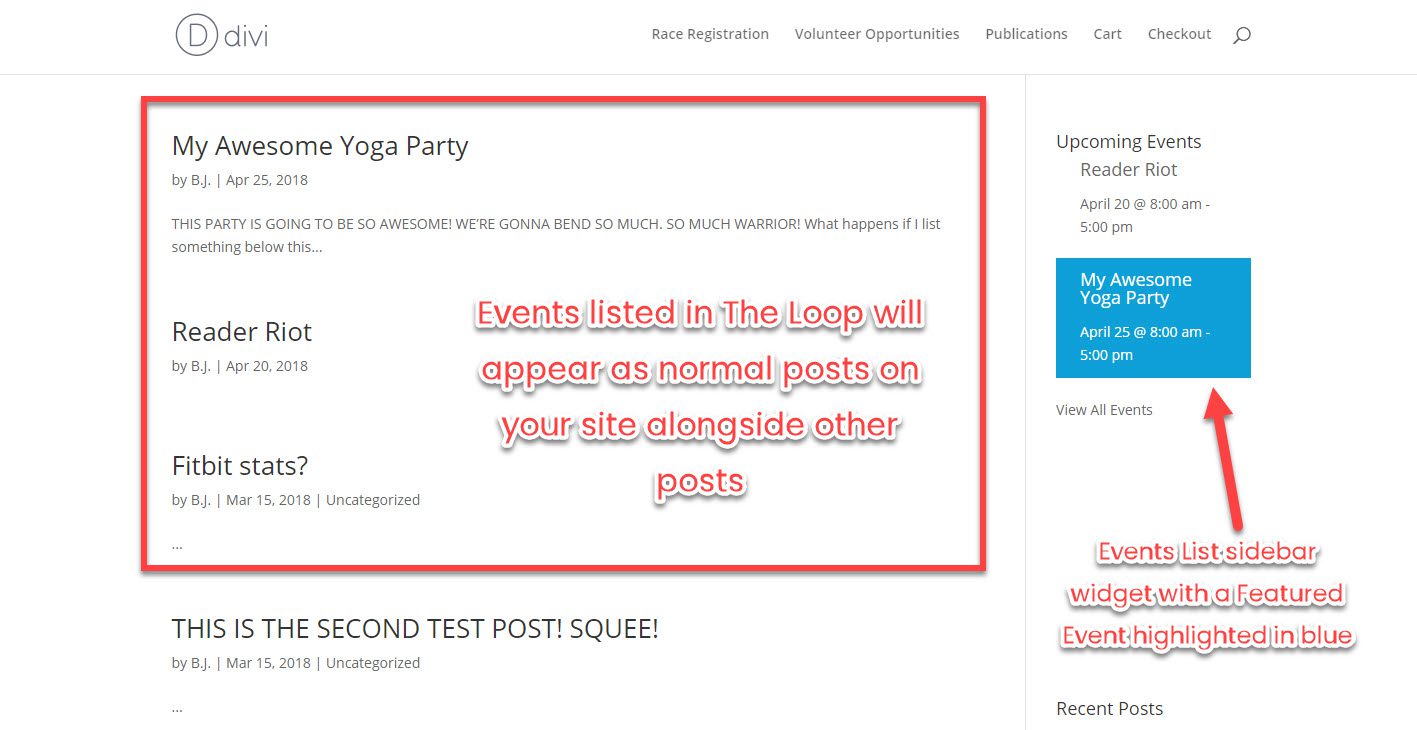
Lo and Behold: Your Event!
Now, any event you create like this will show up on the calendar, in any lists or widgets or archives. And if you’ve taken the time to style the description, when you click inside from any of these areas, you and your visitors will get all the information they need to enjoy all your hard work when the time comes.
That’s Just the Free Version!
If you need more functionality than that, there is a The Events Calendar Pro that Modern Tribe sells. Additionally, there are 8 total premium add-ons you can use to extend The Events Calendar and customize it into whatever you need. If you use Eventbrite for ticketing, you can integrate it with the plugin, or you can handle tickets and RSVPs through WooCommerce with another called Event Tickets Plus.
A full list of their add-ons can be found in the dashboard menu item under Events called, appropriately, Event Add-Ons.
What Do You Think?
While the free version does a lot, its major downside is there isn’t a built-in RSVP system except for users to export to iCal or Google Calendar. The real issue there is that organizers and venues don’t get information or analytics about expected attendance. For some people, that might be a dealbreaker, but with the premium add-ons, there’s a solution.
That said, with everything the free version does offer, there’s a really good chance that you will find a use for it. It sure seems like there’s a reason it’s become one of the top event plugins for WordPress. And since The Events Calendar is free, you don’t have much of a reason not to give it a shot.
What is your event plugin of choice? Let us know in the comments!
Article thumbnail image by PureSolution / shutterstock.com
The post The Events Calendar: A Detailed Overview of the Free Version appeared first on Elegant Themes Blog.
